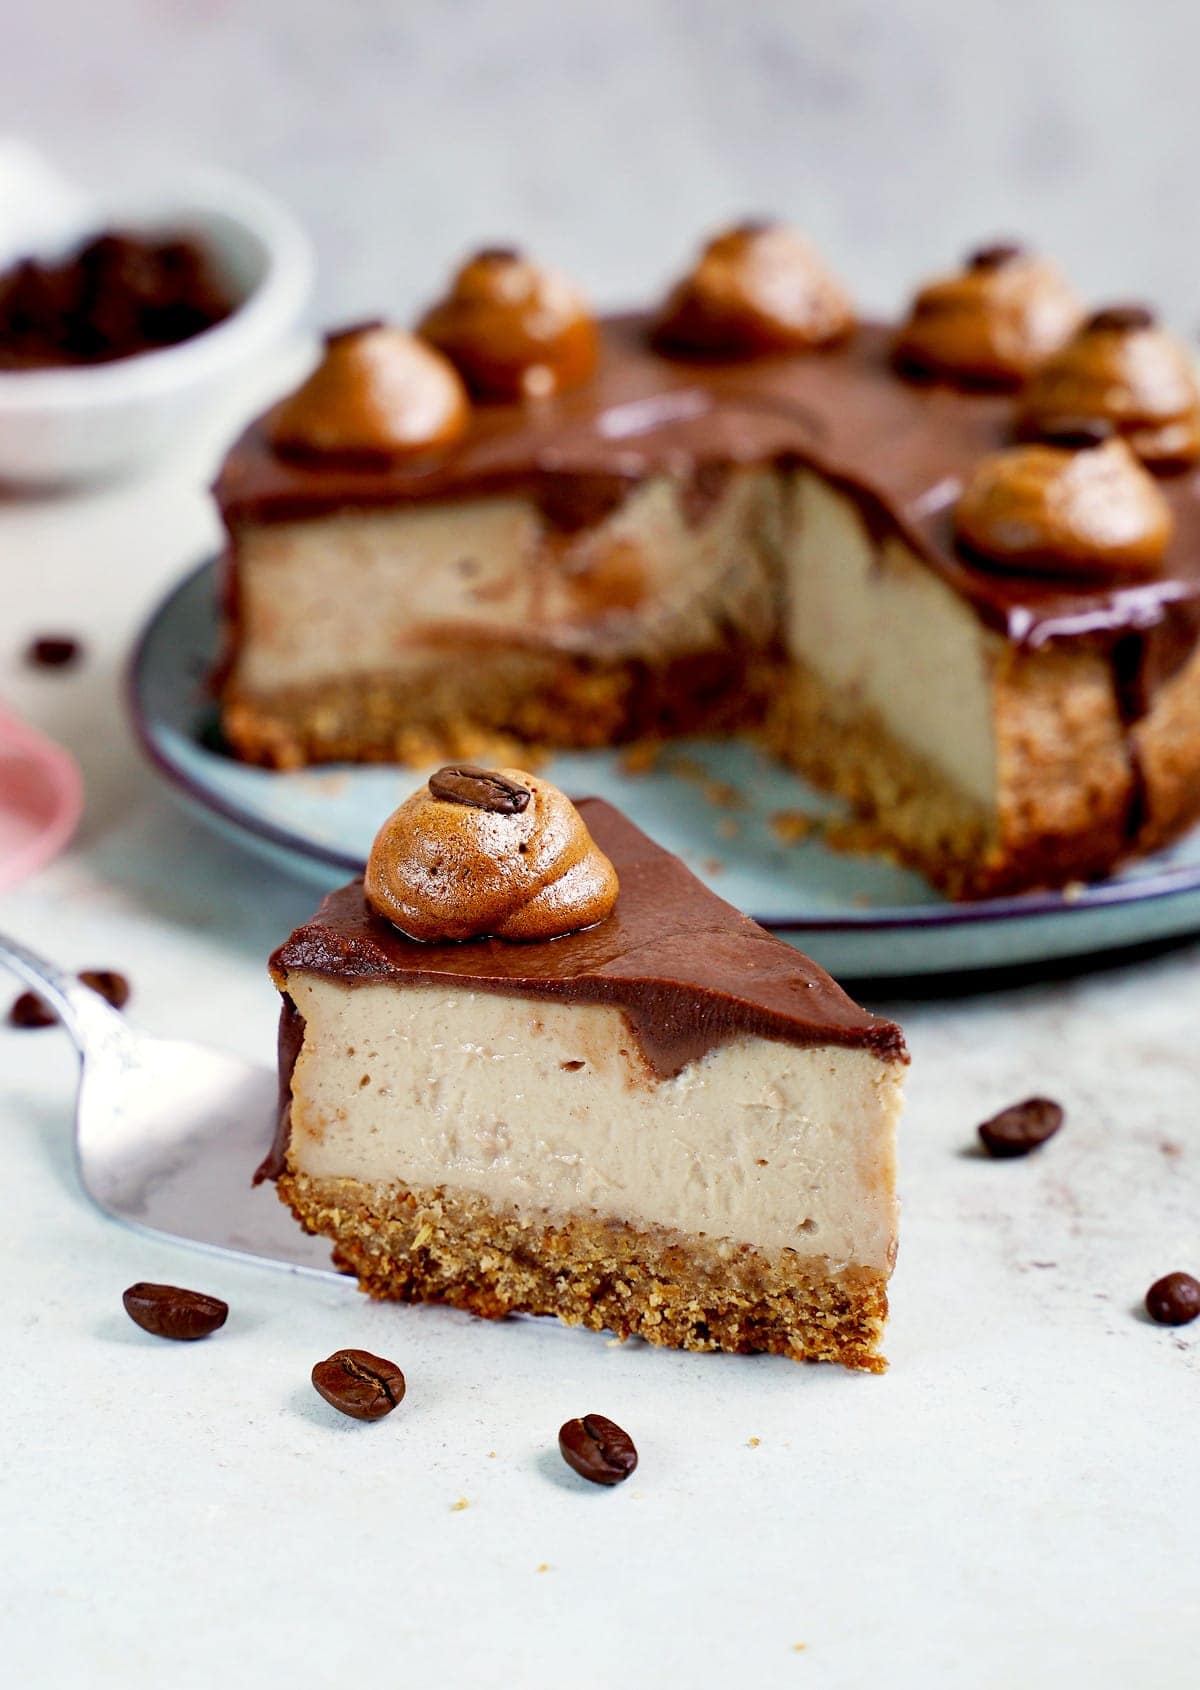
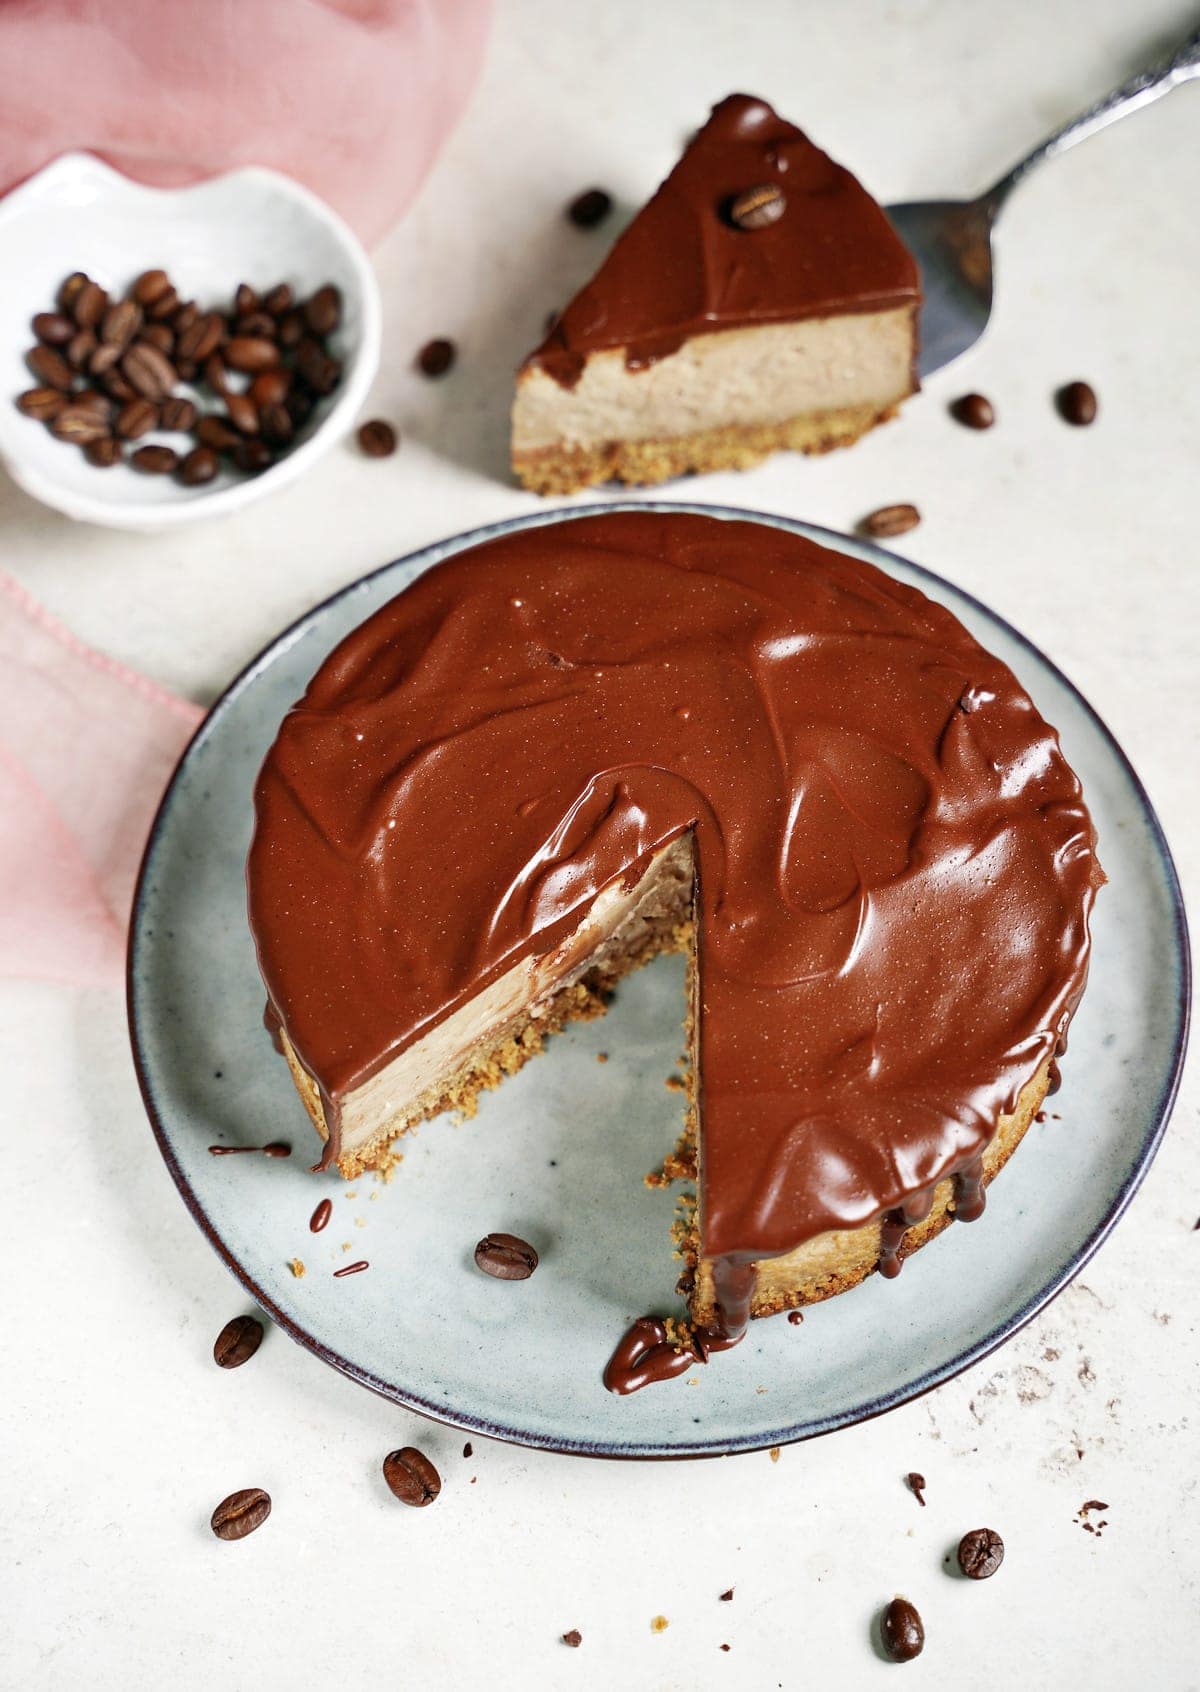
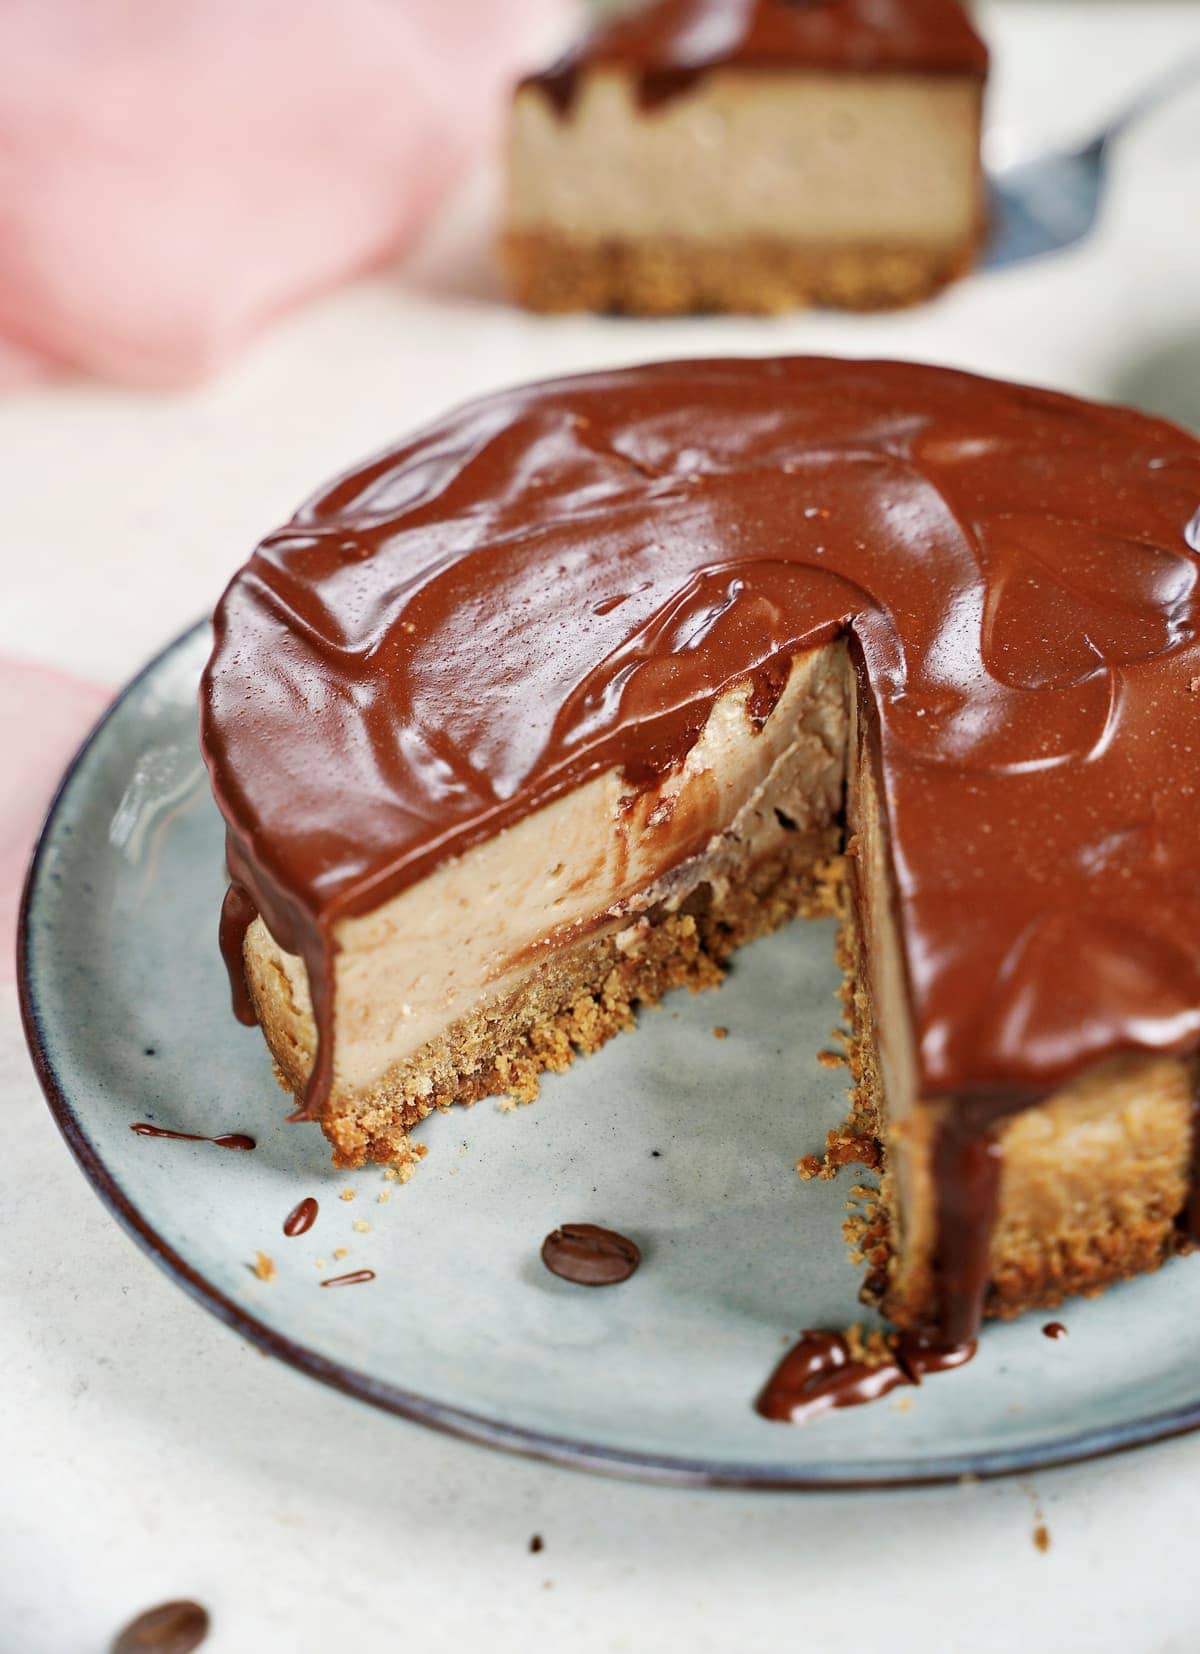
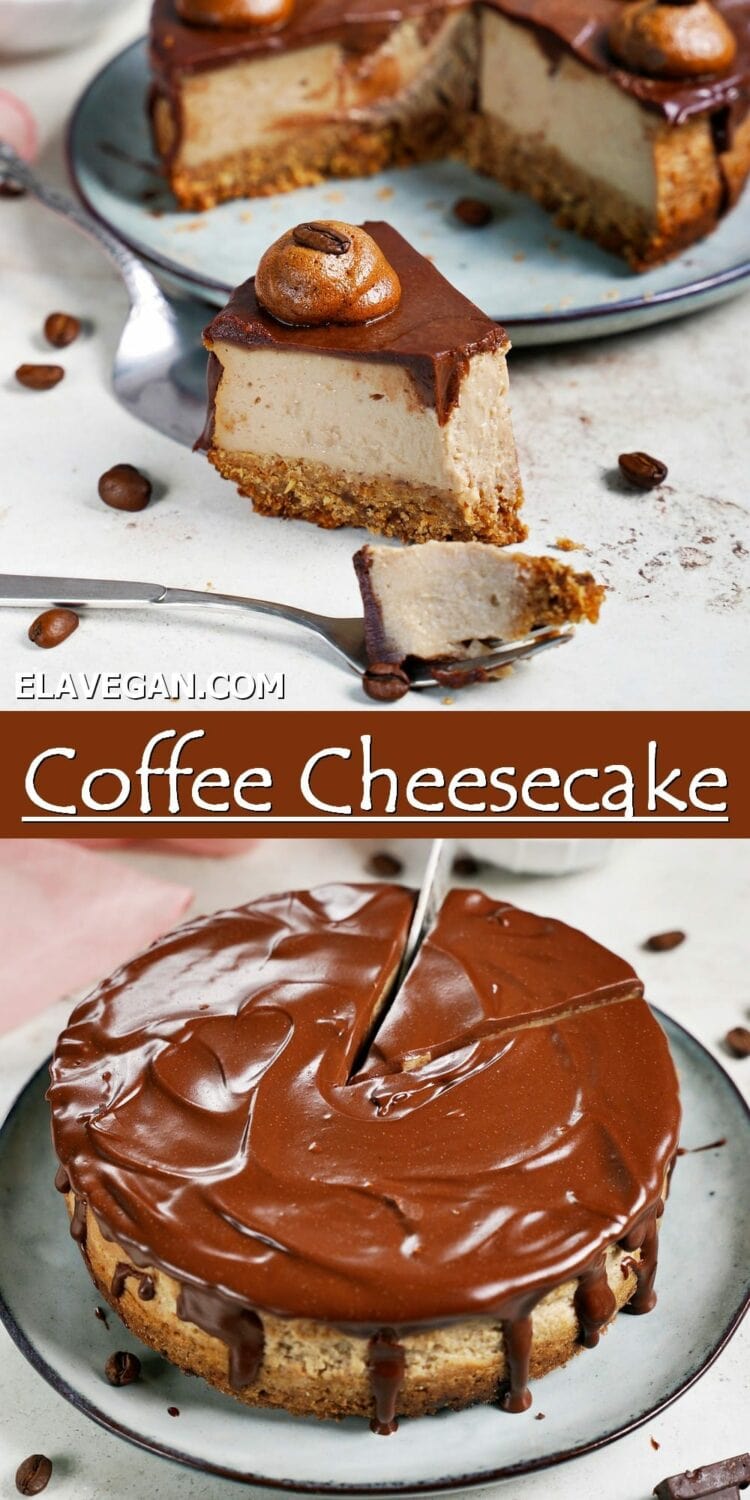
This baked coffee cheesecake is rich and creamy with a healthy crust, smooth coffee filling, and decadent chocolate ganache topping – and all with no dairy! In fact, this mocha cheesecake is gluten-free, vegan, and can be made nut-free and soy-free!
Creamy, Dreamy, Dairy-Free Baked Mocha Cheesecake
If you’ve come across one of my many cheesecake recipes before and are starting to think that I’m obsessed with vegan cheesecake, you’d be correct! However, this time around, I’m omitting my usual fruity flavors like this no-bake avocado kiwi cheesecake, blueberry cheesecake pie, and lemon cheesecake bars for a delicious coffee cheesecake instead! If you love coffee desserts, you will also love this vegan tiramisu recipe and these gingerbread tiramisu cups.
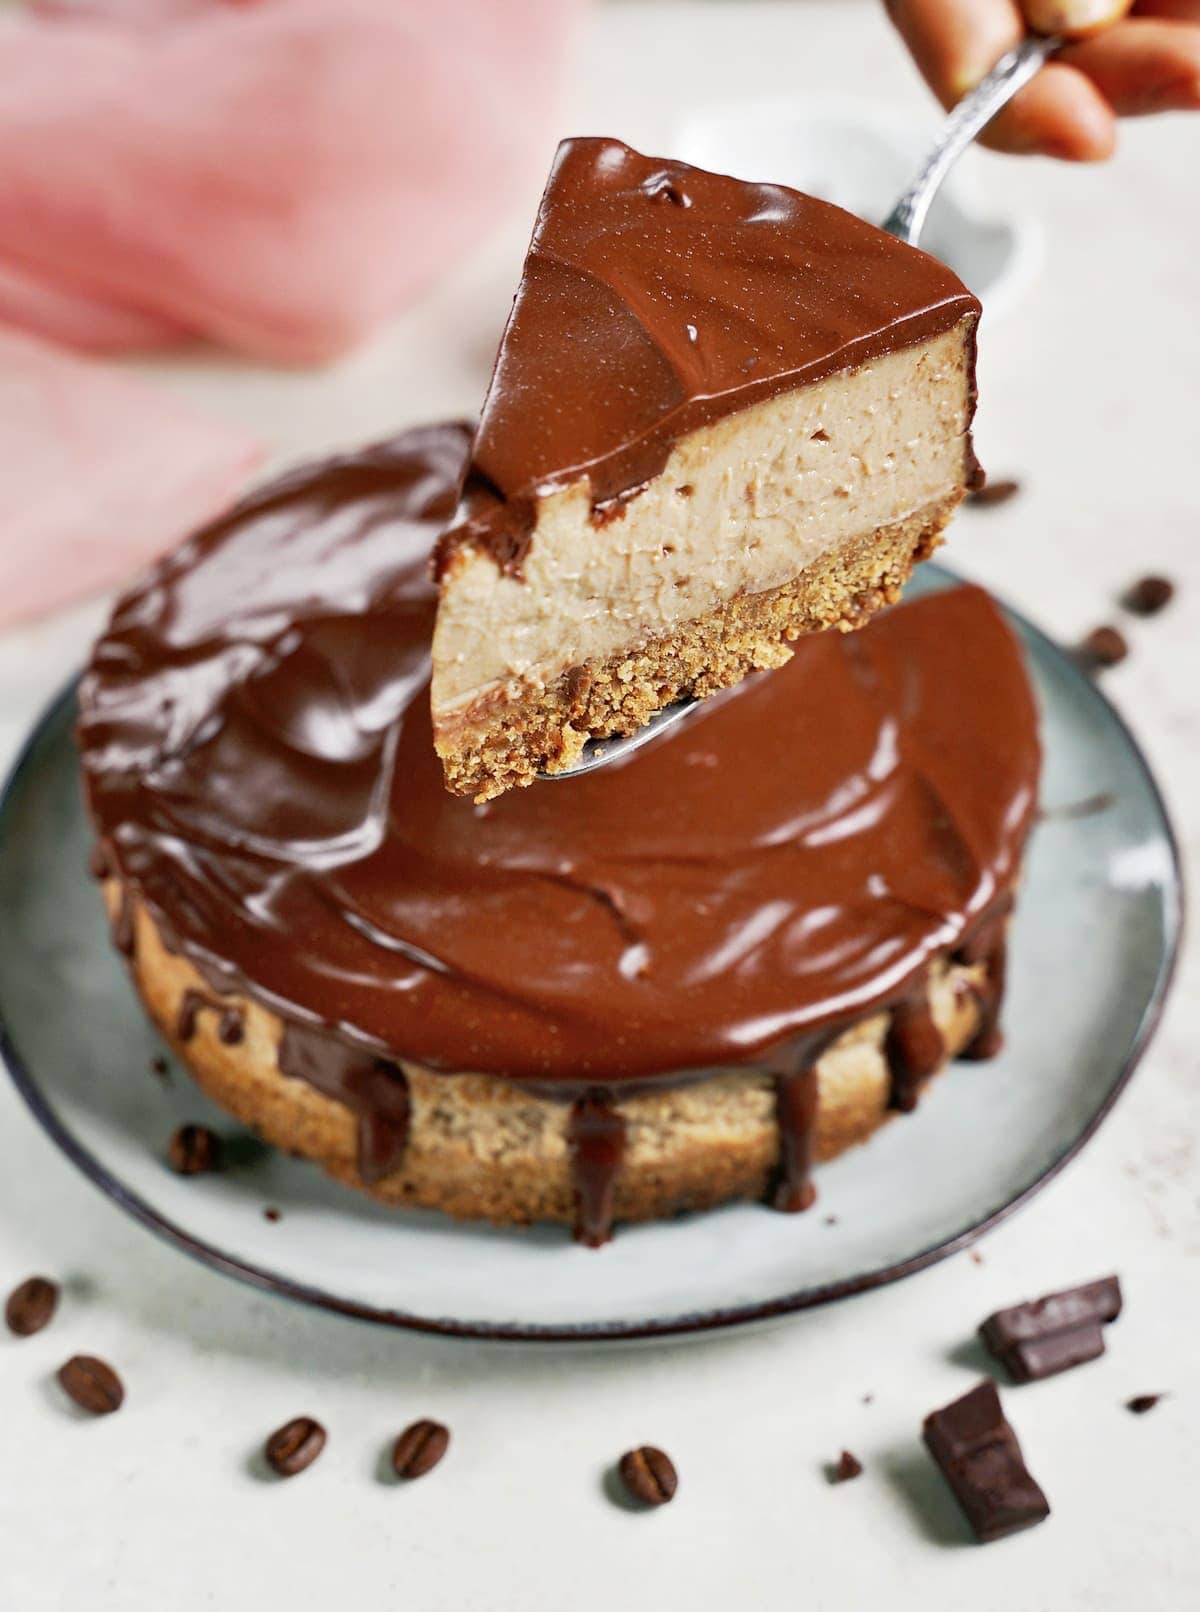
This mocha cheesecake combines a creamy coffee filling topped with a mouthwatering chocolate ganache for flavors that are wonderfully balanced and perfect for satisfying your chocolate and coffee cravings! Plus, with the addition of a wholesome cheesecake crust including nuts (or seeds), oats, and dried fruit, this dessert doubles up as a tasty and healthy cheesecake (ish)!
Best of all, this chocolate mocha cheesecake looks incredibly fancy but is really easy to make (similar to my regular baked cheesecake with a hidden poppy seed filling) – blend, pour, bake, and chill! Making it perfect for special occasions and parties. Plus, it makes for a wonderful make-ahead dessert, since it takes several hours to chill anyway. I recommend making it the night before and then watching your guests/family devour it happily!
The Coffee Cheesecake Ingredients
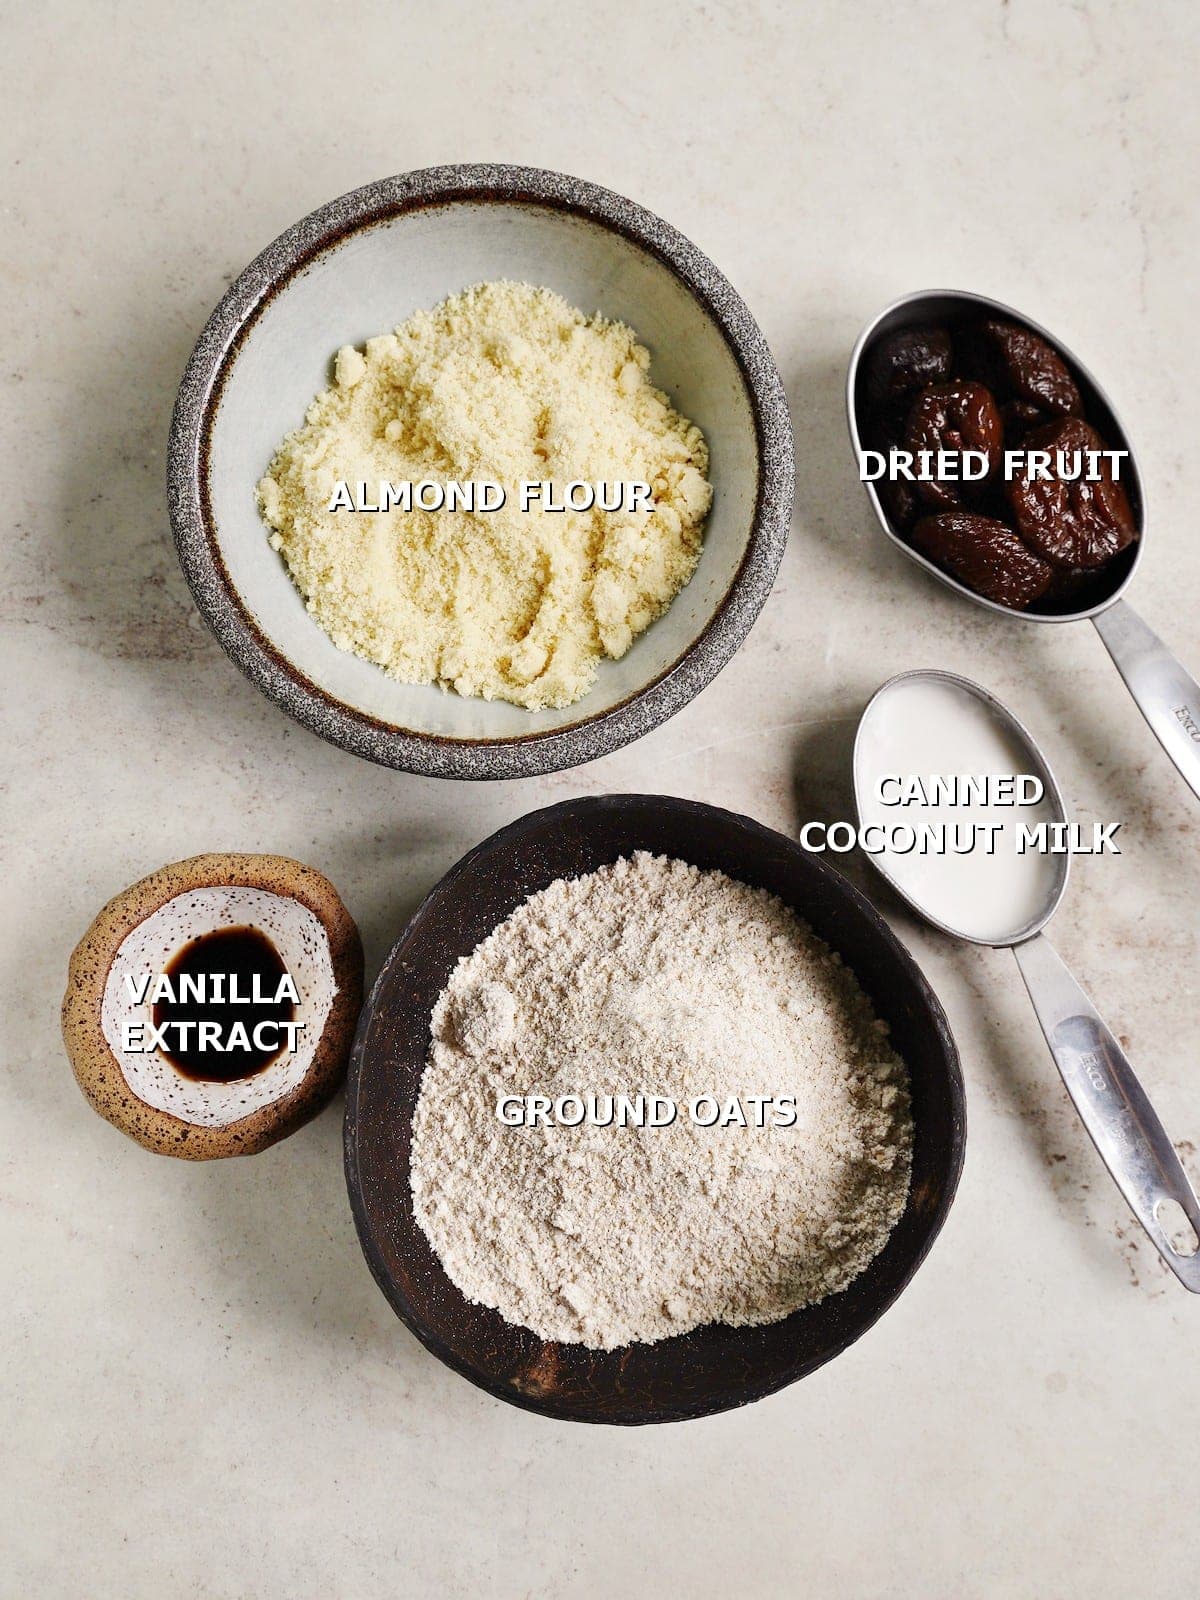
The Gluten-Free Cheesecake Crust:
- Oats: Use certified gluten-free if necessary.
- Almond flour: You can use any finely ground nuts or seeds instead. My favorites include hazelnuts, cashews, or sunflower seeds.
- Dried fruit: Use any soft dried fruit, like dates or figs- to use as a binder.
- Vanilla extract: Use natural for the best flavor.
- Coconut milk: You can either use 2 tbsp canned full-fat coconut milk OR neutral oil.
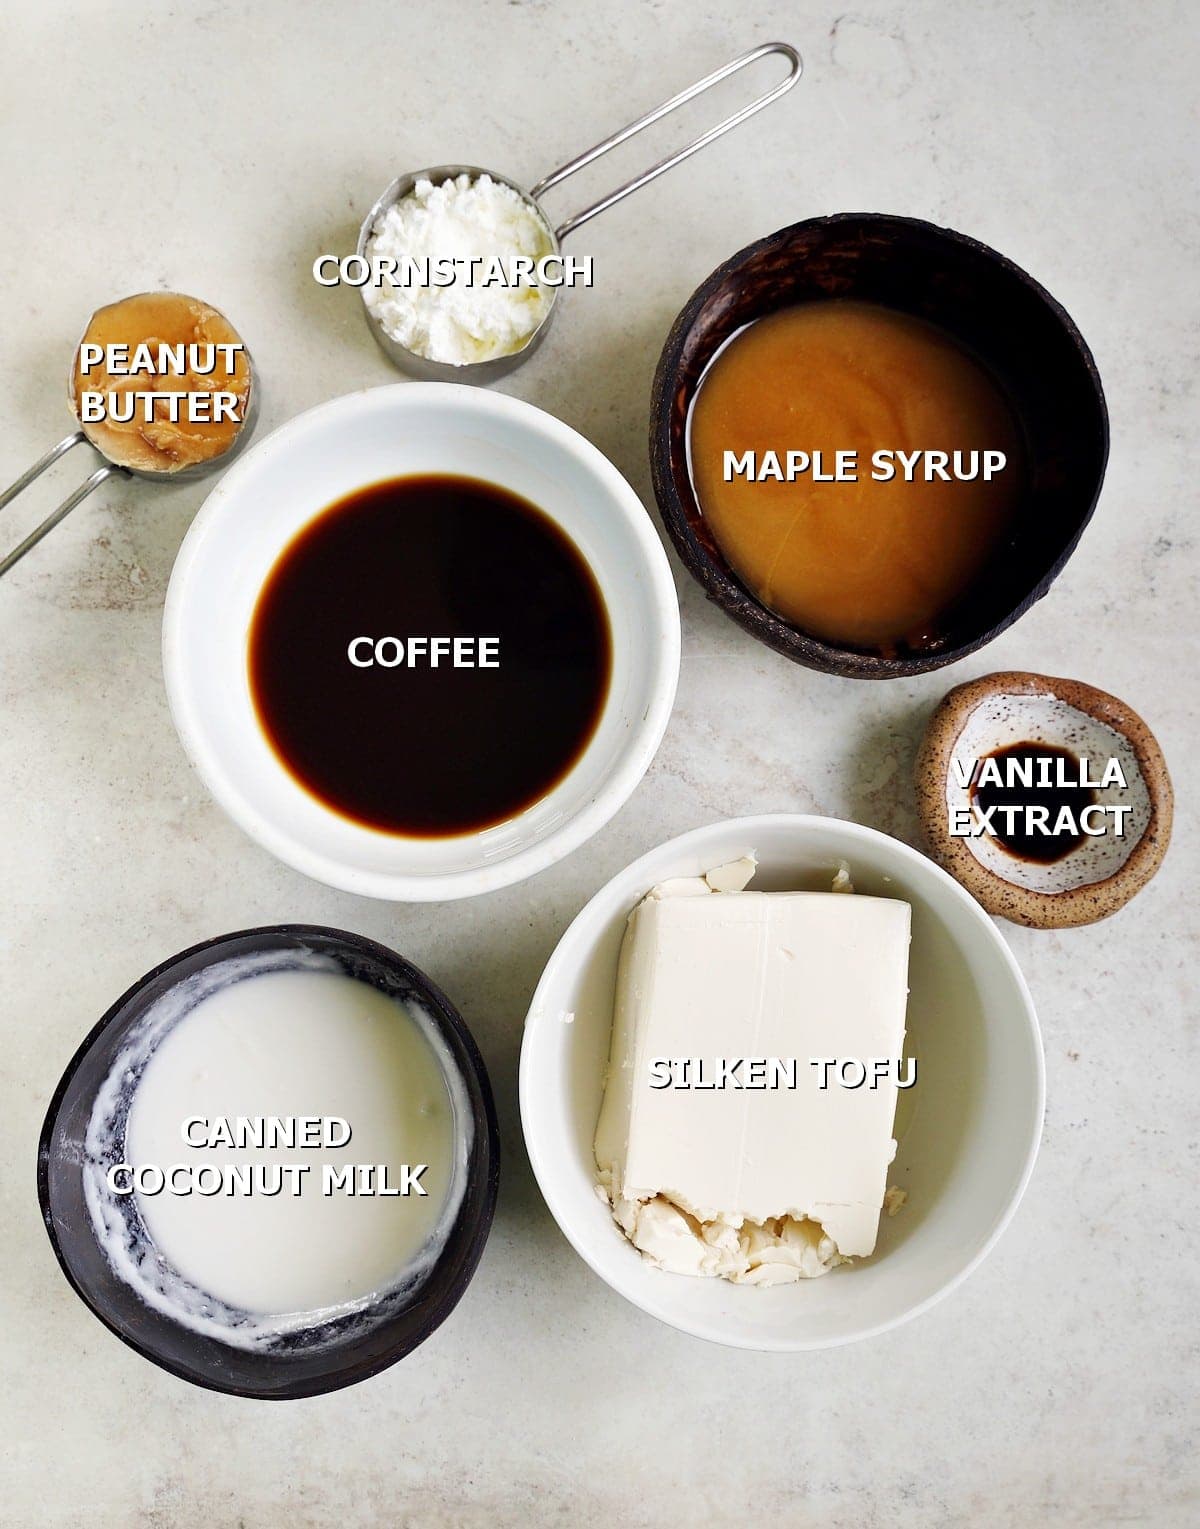
Coffee Cheesecake Cream:
- Silken tofu: You can use one package of silken tofu OR a neutral room-temperature vegan cream cheese (for a soy-free version). Try to use thick, full-fat cream cheese.
- Coconut milk: Use full-fat canned coconut milk for the best results.
- Maple syrup: Or the liquid sweetener of your choice – date syrup, brown rice syrup, agave nectar, etc.- though the flavor will vary.
- Nut butter: Use the nut butter of your choice; almond, cashew, peanut, etc. For a nut-free version, use sunflower seed butter.
- Coffee: You need ¼ cup of either espresso or very strongly brewed coffee. Alternatively, use 2 teaspoons of instant coffee granules (or instant espresso) with extra coconut milk for a richer and creamier cheesecake. Use decaf if preferred (for a late-night treat).
- Cornstarch: To thicken the mixture of this gelatin-free cheesecake.
Chocolate Ganache:
- Nut butter: Any nut (or seed) butter of your choice.
- Dairy-free chocolate: Choose one that’s high-quality/you like the flavor of.
- Coffee: (Optional) ¼ tsp instant coffee granules. This will enhance the flavor of the ganache.
Optional add-ins and recipe variations
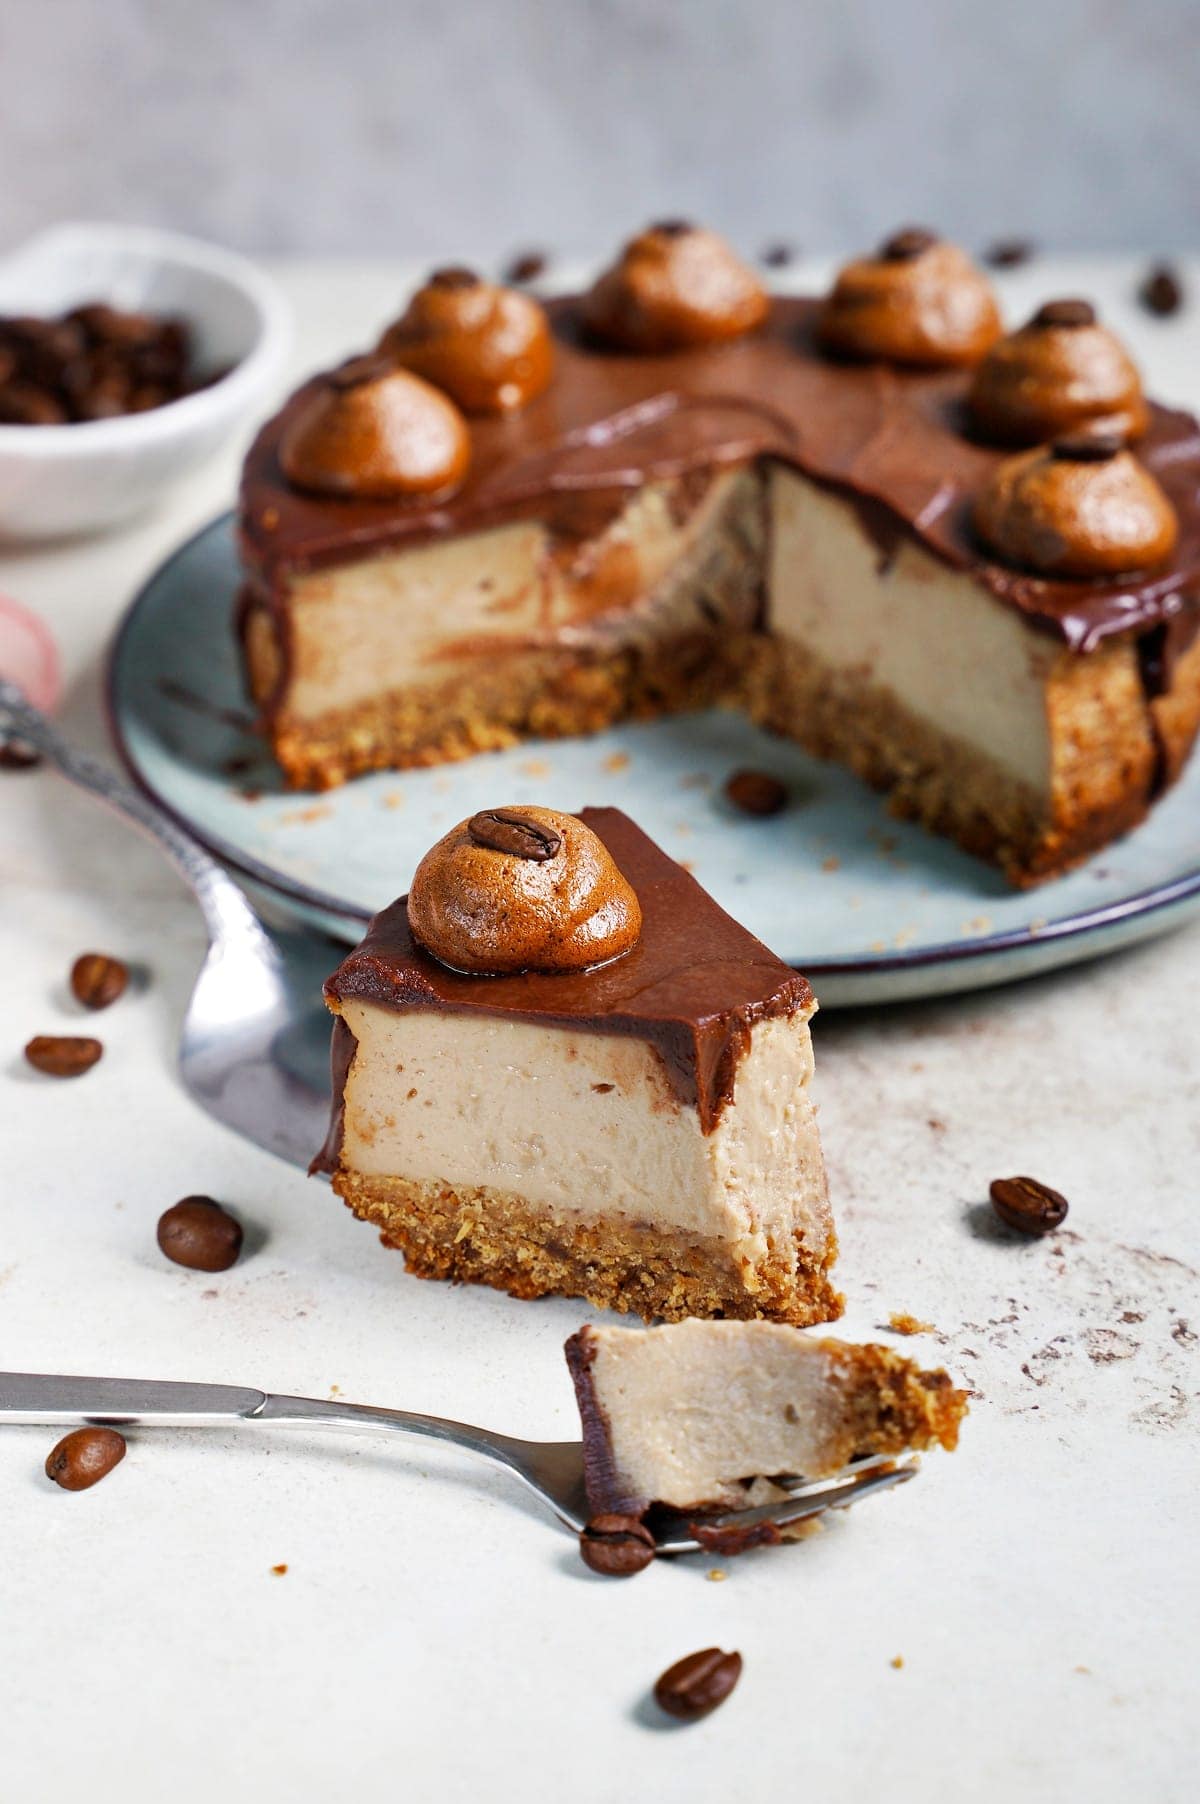
- Dalgona latte topping: You can optionally decorate the coffee/ espresso cheesecake with Dalgona-style whipped coffee cream by combining equal parts instant coffee/espresso, hot water, and sugar (or Xylitol) and whipping until soft peaks. Alternatively, combine around 1 tsp instant coffee powder with ½ cup whipped coconut cream and a little powdered sugar. Alternatively, use powdered Xylitol or Erythritol).
- Other Toppings: Chocolate shavings (using a vegetable peeler) or chocolate-covered espresso beans work particularly well. You could also top each slice with a drizzle of toffee/ caramel sauce.
- Oreo Crust: If you aren’t gluten-free and want something a little more decadent, you could use a whole crushed Oreo biscuit and dairy-free butter crust (just enough for a ‘wet sand’ consistency).
- Coffee liqueur: You can add a little of your favorite coffee liqueur to the chocolate ganache or the espresso cheesecake filling (I recommend 1 tbsp to the ganache and 2-4 for the filling). Remember to adjust the liquid content, though, if adding to the filling.
- Spices: Pumpkin spice or gingerbread spice blends could be added to the coffee cheesecake filling for a Fall themed coffee ‘latte’ cheesecake (with or without the chocolate ganache topping).
Read the recipe card below for the full ingredients list, measurements, complete recipe method, and nutritional information.
How to Make Chocolate Mocha Cheesecake?
- First, preheat the oven to 360F/180C and line a 6 or 7-inch round springform tin with parchment paper, greasing the sides with a bit of oil or cooking spray.
To use an 8 or 9-inch pan, I recommend doubling the recipe.
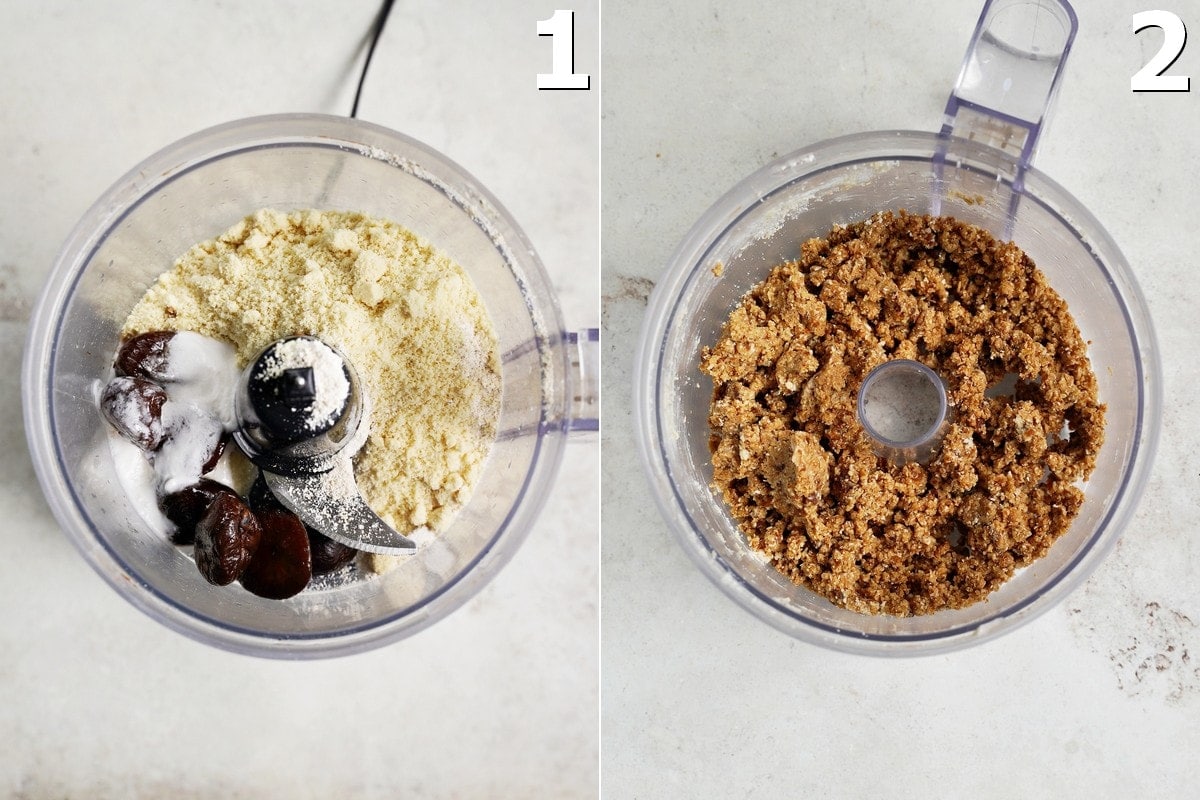
Step 1: Prepare the gluten-free cheesecake crust
- Add the crust ingredients to a food processor and process for around 20 seconds, or until the dough sticks together. You can check by pressing some in-between your fingers and seeing if it sticks together.
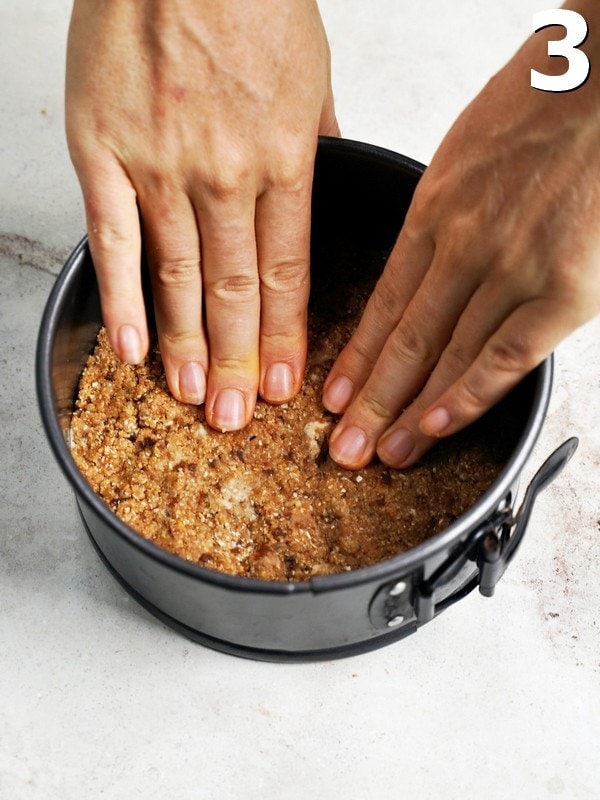
- Transfer the dough to your prepared pan and press it down with your fingers.
For more of an evenly leveled base, you can use the base of something flat (like a glass) to smooth it out.
- Then set aside, wiping the food processor down with some tissue and/or giving it a quick rinse.
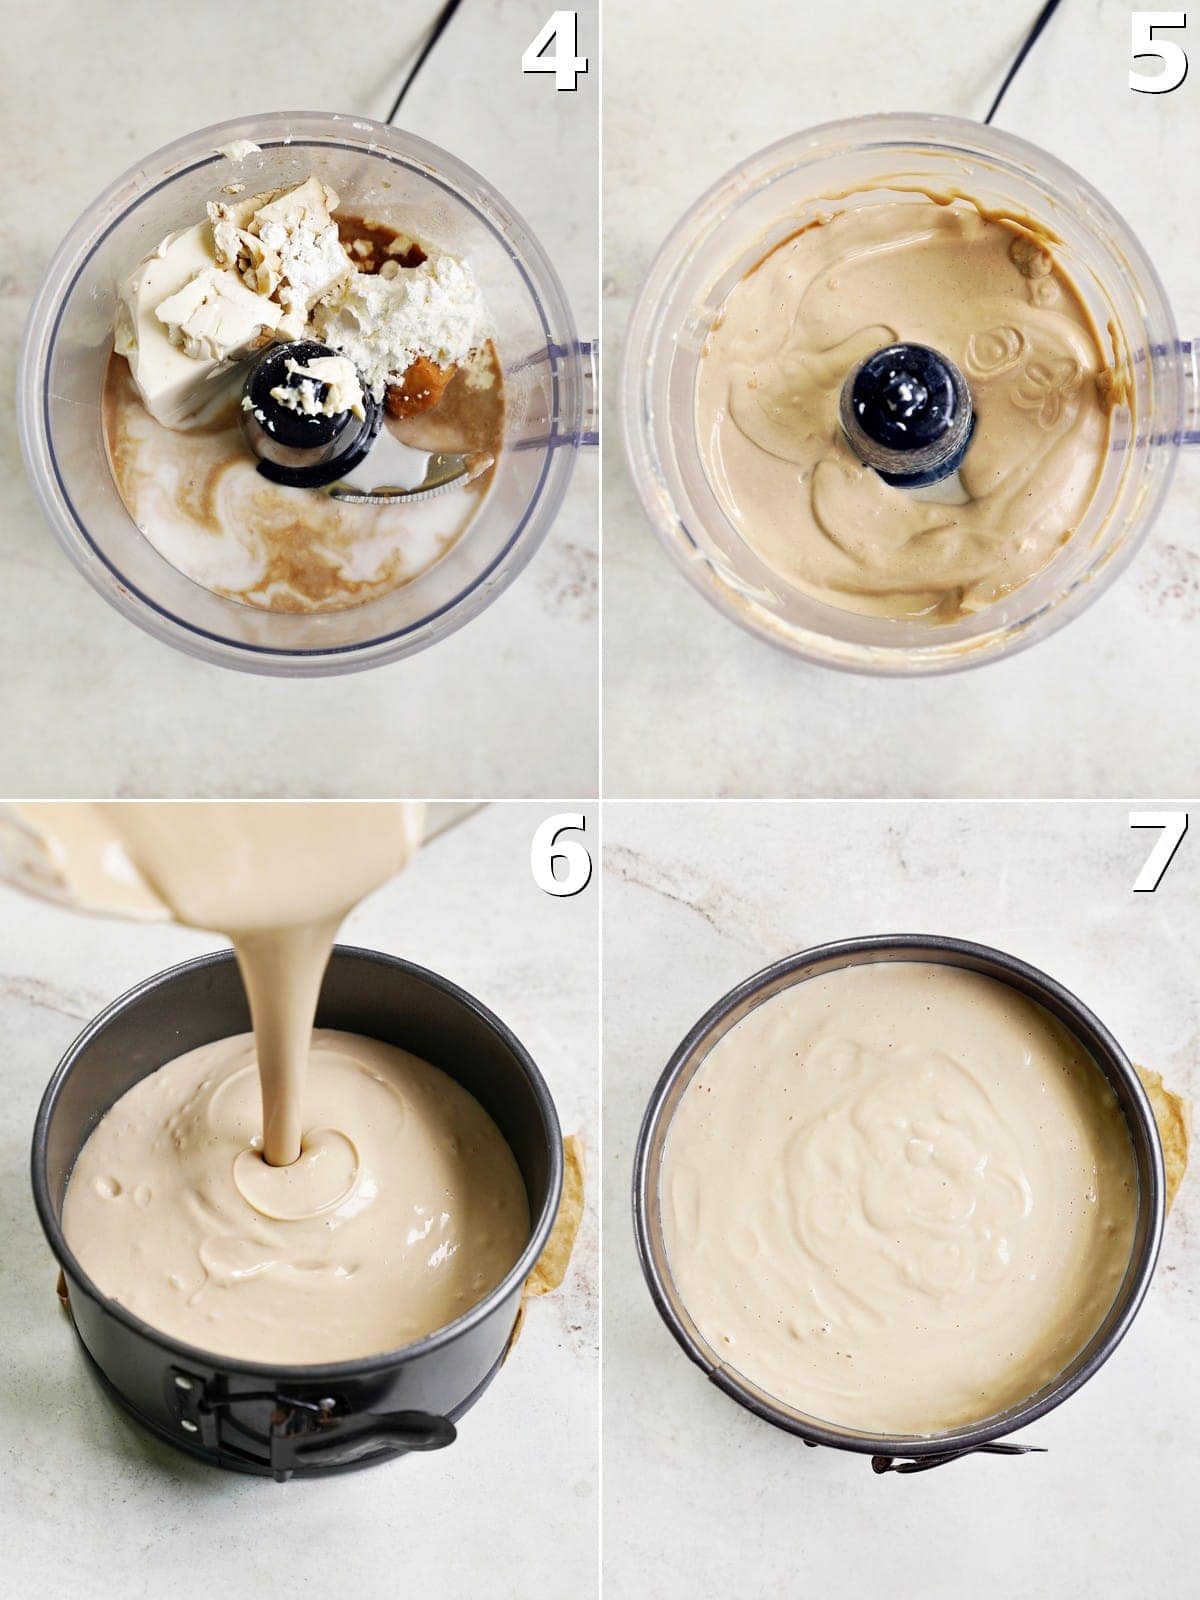
Step 2: Prepare the coffee/ espresso cheesecake filling
- Blend all the cheesecake filling ingredients in the food processor (or a blender) until smooth and creamy (30-60 seconds).
- Pour the mixture over the crust and tap it gently against the table-top several times to remove any air bubbles.
- Transfer the vegan cheesecake to the oven and bake for between 40-50 minutes. The exact time will depend on your oven and the size of your springform (a smaller tin will mean a taller mocha cheesecake, which will take longer to bake). It’s ready when the edges are golden brown, and the middle of the cheesecake is just slightly wobbly still.
If the edges are still wobbly, then allow it to bake for a few minutes longer.
- Then, turn off the heat, allowing the cheesecake to rest in the warm oven for a further 10 minutes. Then open the oven door a little and leave for a further 10 minutes. Finally, you can remove the espresso cheesecake from the oven and leave it to cool entirely (for around an hour) or place it in the freezer for 45-60 minutes.
The initial slow cooling will reduce the risk of big cracks in the baked cheesecake.
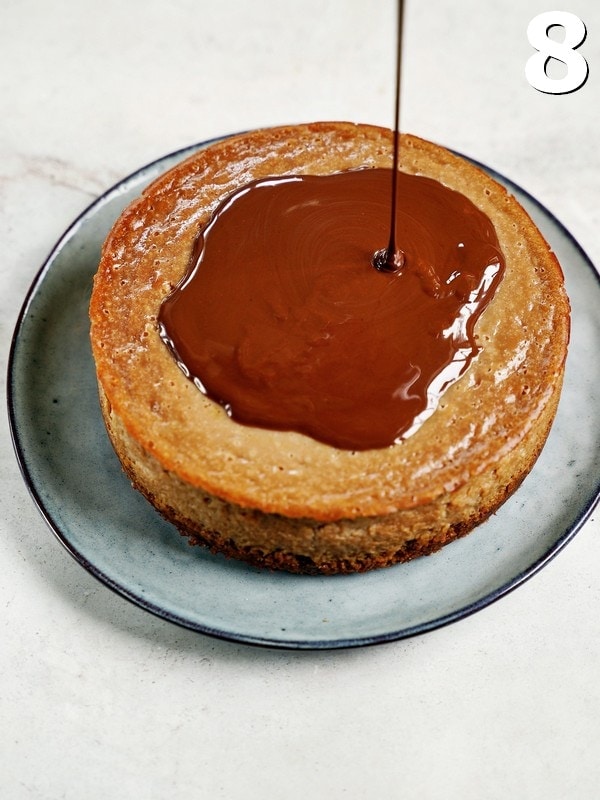
Step 3: Prepare the chocolate ganache topping
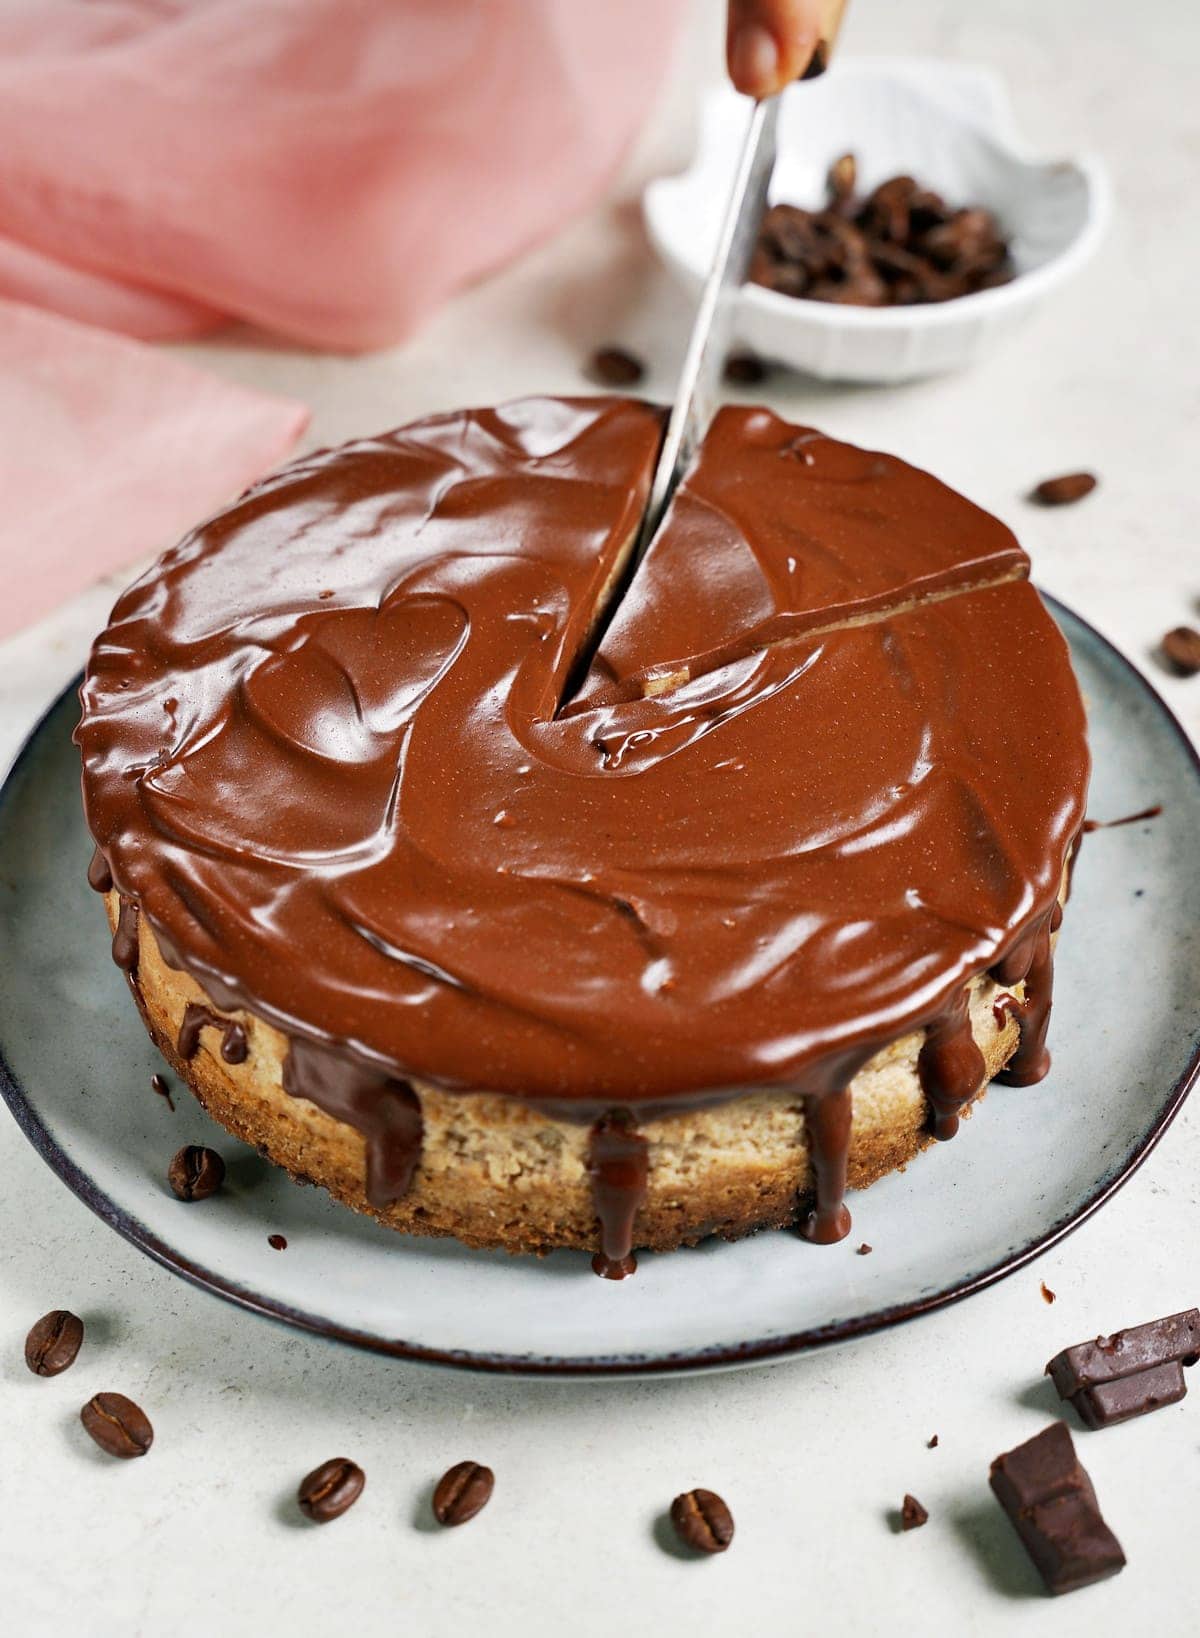
- Once the cheesecake has chilled, prepare the ganache topping. Add the chocolate and nut butter to a medium, heat-proof bowl, and place over a saucepan filled with a little boiling water (using a double-boiler method). Allow it to melt, stirring occasionally.
- Once melted, pour the ganache over the cheesecake, and allow it to chill for a further 25-30 minutes before slicing and enjoying!
How to Store
Make ahead: There are several ways you can prepare elements in advance. For example, you can prepare the crust 2-3 days in advance. Plus, because of the chill/rest time, I actually recommend you make this mocha cheesecake the day/evening before to chill overnight.
Store: Store the coffee cheesecake covered in the refrigerator for up to 5 days.
Freeze: I prefer slicing it before freezing (with parchment paper between each slice). Store well wrapped/in an airtight container for up to 3 months. To defrost, leave at room temperature to thaw for 40-60 minutes (or overnight in the fridge if defrosting the entire cheesecake).
Recipe Notes and FAQs
- Brewed vs. Instant Coffee: Decide which you’d like based on how creamy and robust you want the cheesecake to be. Instant coffee uses a lot less liquid, thus has a more robust flavor and creamier cheesecake.
- Make mini cheesecakes: You could use small dessert rings or a large muffin pan (with liners) to make mini coffee cheesecakes. However, be aware that the baking time will need to be adjusted (it will differ based on the dessert size you’re making. However, somewhere between 20-30 minutes is likely).
- For a layered mocha cheesecake: Divide the plain cheesecake filling in half and use only half the coffee (added to only one half). To the other half, add 1/2 cup dairy-free chocolate chips (melted and slightly cooled before folded into the mixture). Pour in the first layer, spoon over the second – so they don’t mix-, then bake and chill.
- Don’t skip the slow cooling: Quick cooling will often result in cracking, so don’t be tempted to skip these steps. A small/medium ceramic bowl filled with water can be also placed in the oven (at the lowest rack/ under the springform). This will create steam and can prevent cracks. Cracks can still happen though, however, there is nothing to worry about, because of the chocolate ganache layer!
- To slice clean slices: Dip your knife into a cup of hot water and wipe dry between each piece.
- Coffee vs. espresso: The stronger the coffee, the stronger your coffee-flavored cake layer. For the strongest results, use instant espresso powder with just enough hot water (1-2 tbsp) to mostly dissolve the granules before whipping it into the filling.

More Vegan Cheesecake Desserts
- Cheesecake Brownies
- Eggless Cheesecake
- Lemon Cheesecake Tart
- Mango Pie
- Strawberry Coconut Cheesecake Bars
- Raw Vegan Blueberry Cheesecake
- Chocolate Strawberry Cheesecake
- Caramel Apple Cheesecake
- Mini Cheesecake Tarts
If you try this easy vegan coffee cheesecake recipe, I’d love a comment and ★★★★★ recipe rating below. Also, please don’t forget to tag me in re-creations on Instagram or Facebook with @elavegan and #elavegan – I love seeing them.

Coffee Cheesecake
Video
Ingredients
Crust
- 1 cup (90 g) ground oats (oat flour), gluten-free if needed
- ⅝ cup (60 g) almond flour (see notes)
- ½ cup (100 g) soft dried fruit e.g. dates or figs
- 1 tsp vanilla extract
- 2 tbsp (30 ml) canned coconut milk or use oil
Coffee Cheesecake Cream
- 1 (12.3 oz) package (350 g) silken tofu drained (see notes)
- ⅓ cup (80 g) canned coconut milk
- ⅓ cup (105 g) maple syrup (see notes)
- ¼ cup (60 g) nut butter of choice (see notes)
- 2 tsp vanilla extract
- ¼ cup very strong (60 ml) coffee or espresso (see notes)
- 3 tbsp (24 g) cornstarch
Chocolate Ganache
- 3 tbsp (50 g) nut butter of choice (see notes)
- 2 oz (55 g) dairy-free chocolate
- ¼ tsp of instant coffee granules (optional)
Instructions
Crust
- You can watch the video in the post for visual instructions.Preheat the oven to 360 degrees Fahrenheit (180 degrees Celsius). Line the bottom of a 6 or 7-inch (I used 6) springform with parchment paper and grease the sides with a little oil. I recommend doubling the recipe if using a 9-inch pan.
- Process all crust ingredients in a large food processor for about 20 seconds, or until the dough sticks together. Transfer the dough into the lined springform and press it down with your fingers. Set aside and wipe down the food processor with a tissue and give it a quick rinse with water.
Coffee Cheesecake Cream
- Blend all ingredients for the cheesecake cream in the food processor until super creamy and lump-free (about 30-60 seconds). You can also use a blender.
- Pour the cream into the springform and tap it gently against the table-top several times to remove any air bubbles.
- Bake in the oven for about 40-50 minutes. The baking time depends on your oven and the size of the springform (a smaller pan yields to a taller cake and longer baking time). When the edges of the cheesecake are golden brown and the middle of the cake is still a little wobbly, then you can turn off the oven. If the cake is also wobbly on the edges, you need to bake it longer.
- Turn off the oven, but leave the cake in the oven for a further 10 minutes. Then open the oven door a little and leave it in the oven for a further 10 minutes. Finally, take it out of the oven and let it cool for about 1 hour, then transfer it to your fridge to set (a couple of hours). It's possible to speed up the process in the freezer (45-60 minutes).
Chocolate Ganache
- Add the chocolate and nut butter to a medium bowl and place it over a saucepan filled with hot/boiling water. Let it melt, stirring occasionally.
- Pour the ganache over the cheesecake and chill it in the fridge for about 25-30 minutes. Slice and enjoy!
Notes
- Almond flour: It's possible to use any finely ground nuts or seeds of choice instead of almond flour.
- Silken tofu: For a soy-free version, use vegan cream cheese, or make my homemade soy-free silken tofu.
- Nut butter: You can use any nut butter of choice, e.g. cashew butter, almond butter, peanut butter. Use sunflower seed butter for a nut-free version.
- Maple syrup: Any liquid sweetener like date syrup, agave syrup, etc. is fine.
- Coffee: For a richer/creamier cheesecake, replace the coffee with more canned coconut milk and add 2 teaspoons of instant coffee granules.
- You can decorate the cake with Dalgona whipped coffee cream.
- Store the cake covered in the fridge for up to 5 days.
Nutrition information is an estimate and has been calculated automatically
 „Simple and Delicious Vegan“ Cookbook by ElaVeganCLICK HERE to order!
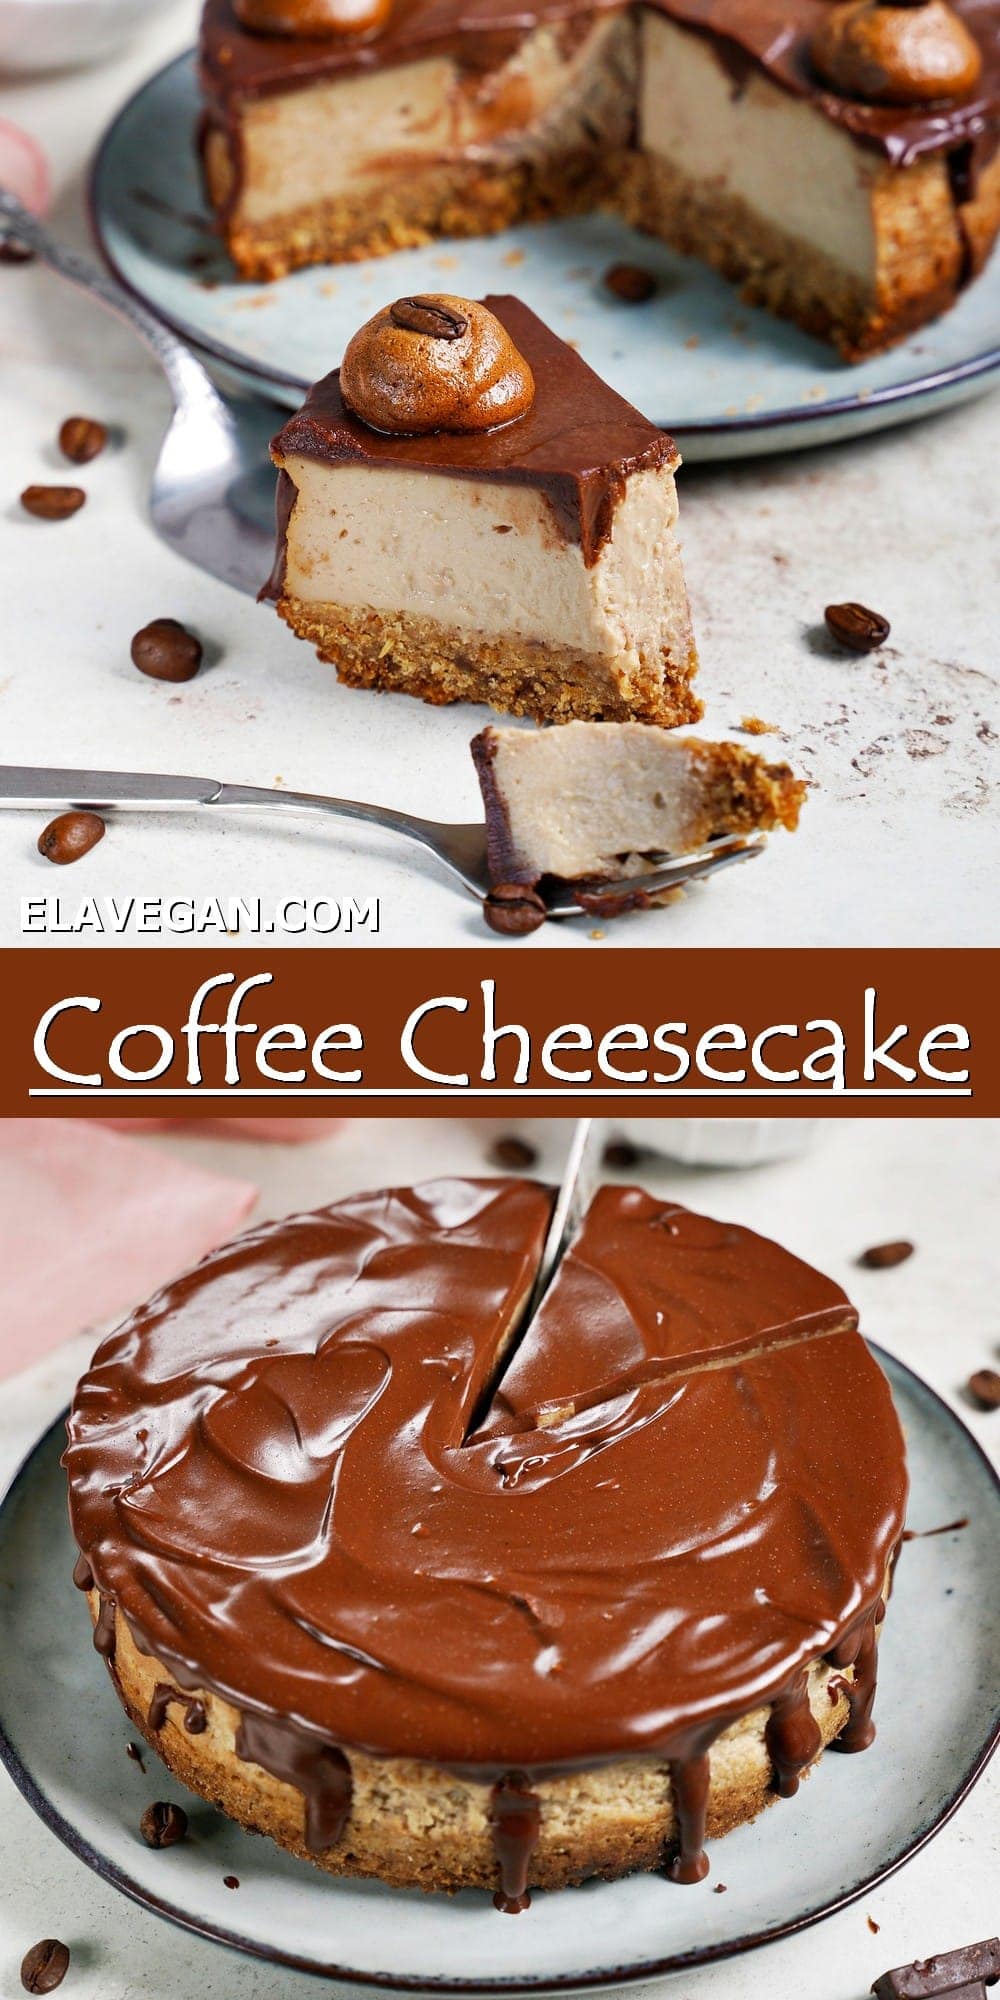
Hi Ela,
I want to substitute the tofu with cream cheese as you noted in your NOTES. Is the amount of cream cheese the same as the tofu (12.3 oz)?
Thank you,
Audrey
Hi Audrey, yes, same amount. 🙂
Super appreciate the quick reply, thank you! Looking forward to giving this a try 🙂
Yumm, it turned out delicious! Thank you for the recipe!
A question, in the cream layer I can taste the silken tofu flavour over the coffee.. I did use instant coffee flakes as the notes suggested for alternative. Is that the reason for it do you think? Thanks 🙂
Hi Fanni, I am glad you like it. It might taste more neutral on the second day. I don’t think the instant coffee is the reason. 🙂
Hi Ela, Yes you are right, it is the second day today, and I can’t taste the tofu at all 🙂 yay!
Awesome! Thank you very much for reporting back, Fanni. 🙂
Can I use gluten free flour instead of cornstarch?
No, but you can use potato starch. Arrowroot starch might work, too.
The best vegan cheesecake! Easy and delicious recipe
So glad you liked it, Marcela! 🙂
Hi Ela, could I substitute the coconut milk with soy milk & coconut essence? I don’t use oil in my cooking.
Hi Gail, you can use any other dairy-free milk that is high in fat, like homemade cashew milk or almond milk (with about 17% fat). There is no need to add coconut essence, I am using canned coconut milk because it’s high in fat and will make the cheesecake cream creamy and rich. I hope this helps. 🙂
I made this for my husband’s bday this past weekend. It was totally delish and a big hit at his party. I did double the recipe because I only had a 9 inch springform pan. It did not have a strong coffee taste—i could taste the peanut butter more–so next time around I think I will need to make the coffee stronger!
That’s awesome, Heidi! Yes, you can certainly add instant coffee powder next time. 🙂
Hallo Ela!
Müsste ich bei einer Backformgrösse 26 cm die Mengen verdoppeln oder gar verdreifachen?
Danke schon mal und liebe Grüsse aus der Schweiz
Maria
Hallo Maria, du kannst die Mengen verdreifachen, falls du möchtest, dass der Kuchen genauso hoch ist wie bei mir. Oder du verdoppelst die Mengen und hast dann einen etwas flacheren Kuchen. 🙂
LG, Ela
This looks amazing!
I don’t have access to silken tofu (nor vegan cream cheese)… Would regular tofu work?
Hi Melissa, you could try using the softest tofu you can find and add a little bit more canned coconut milk, to improve the taste.
PS: I will be sharing a recipe for homemade (soy-free) silken tofu soon. 🙂