A simple guide on how to make chocolate with cocoa powder in just 10 minutes: Make plain, flavored, or topped vegan milk chocolate or dark chocolate with just 3 base ingredients!
I’m no stranger to making homemade copycat candy like vegan Bounty bars, healthy Snickers, gummy bears, and vegan white chocolate. However, it was only recently that I discovered that making homemade chocolate is surprisingly easy (enough for even kids to get involved!) – no additives or dairy are necessary for perfectly melt-in-the-mouth results.
How Do You Make Chocolate?
Traditionally, making chocolate is a long, complex process that involves fermenting, dehydrating, roasting, and grinding/conching cocoa beans with a special tool called a melanger. But why go through all that when you can learn how to make chocolate from cocoa powder at home in just 10 minutes? I love it a choco-LOT!
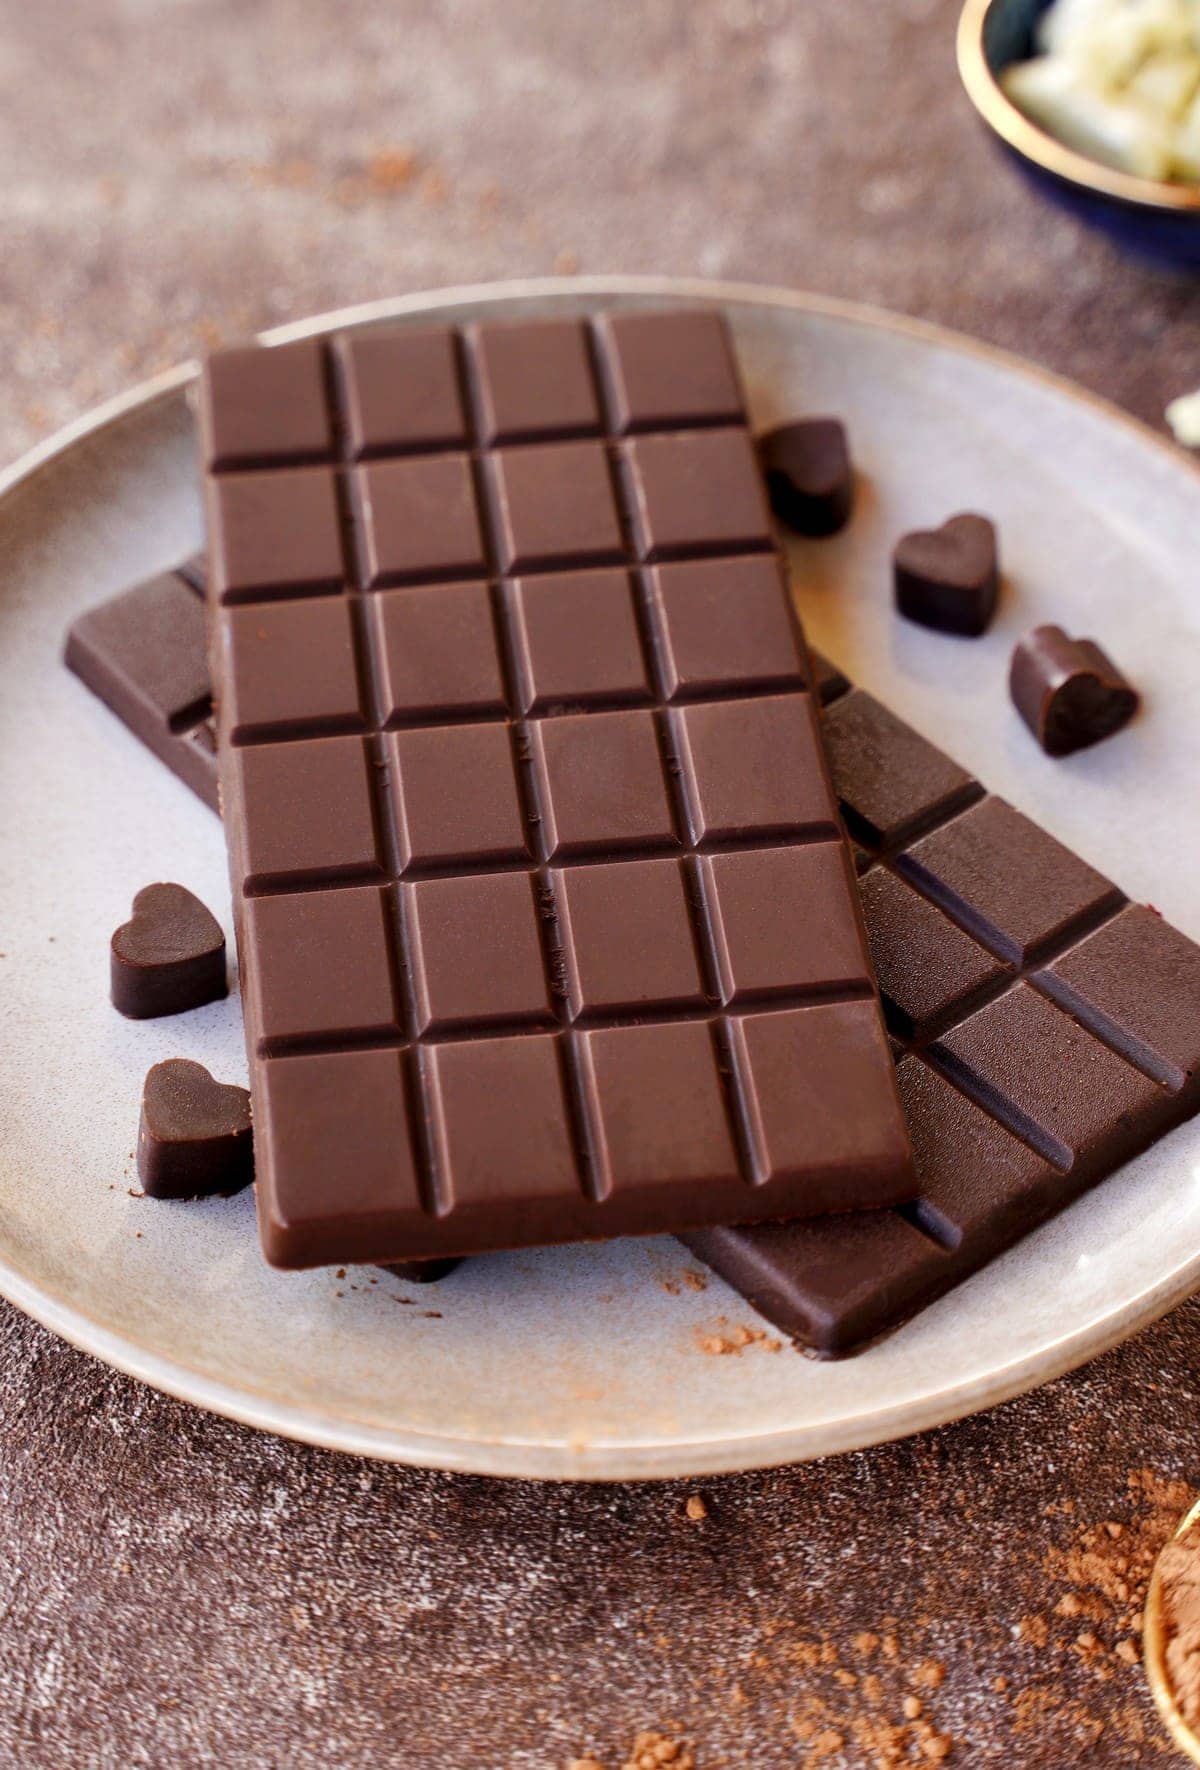
Homemade dark chocolate is quick and easy, requiring just 3 base ingredients—4 for homemade milk chocolate. Either way, skip the fuss, dodge the additives, customize it to diet and sweetness, then flavor, top, and shape it as desired—bars, bonbons, and beyond!
Looking for more homemade vegan candy? You might enjoy my homemade Ferrero Rocher, date Snickers, or 2-ingredients vegan condensed milk truffles.
The Ingredients
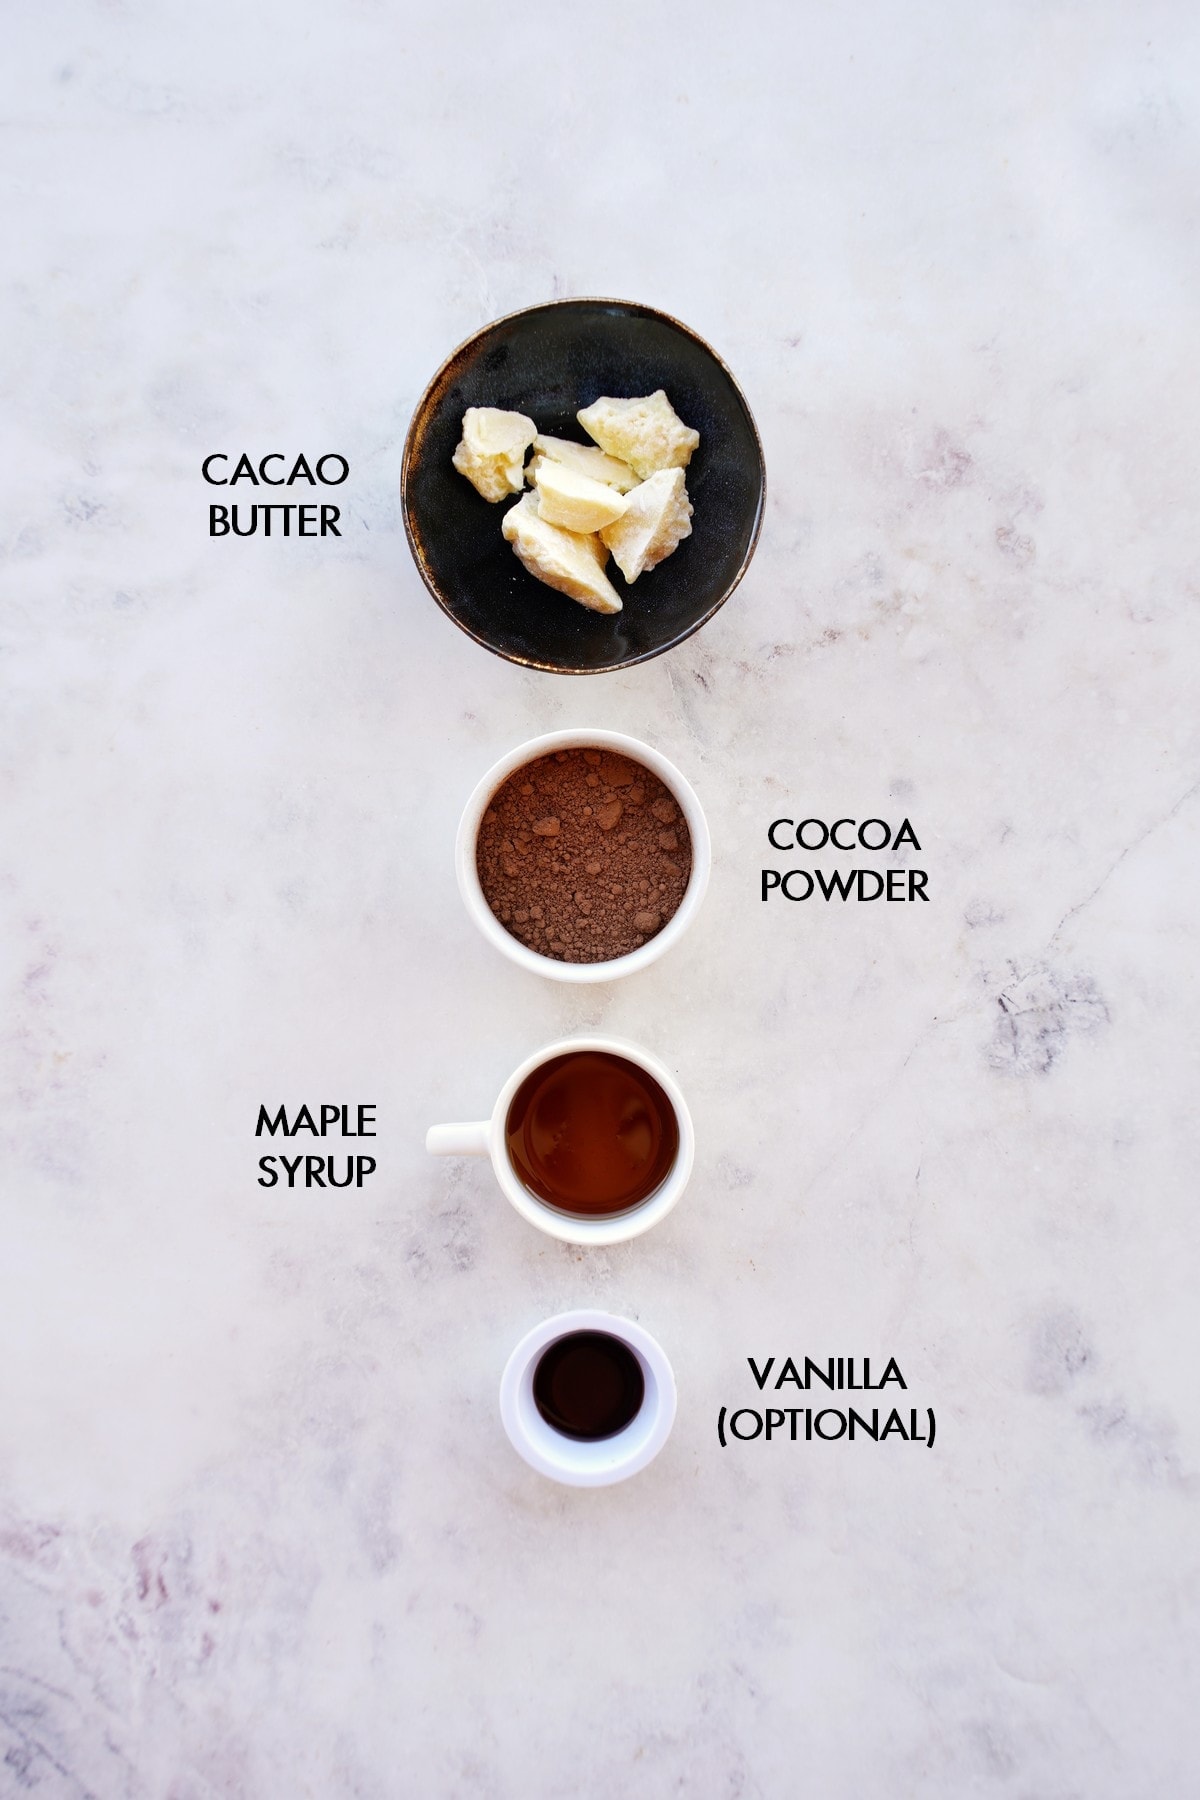
Just three simple ingredients form the base of this easy homemade chocolate recipe.
- Cacao butter: Make sure it’s food-grade cocoa butter. This gives chocolate its smooth texture, and it can be tempered for a firmer snap. Coconut oil works, too, but melts faster.
- Cocoa powder: Use unsweetened cocoa powder or cacao powder (less processed and has more antioxidants, but also more bitter).
- Maple syrup: Sweetens the chocolate to taste. Agave syrup or honey (if you’re not vegan) will also work.
- Milk powder (optional): For homemade milk chocolate, add 2 tbsp milk powder. I use coconut, soy, or rice milk powder to make it dairy-free/vegan.
For the full ingredients list, measurements, complete recipe method, and nutritional information read the recipe card below.
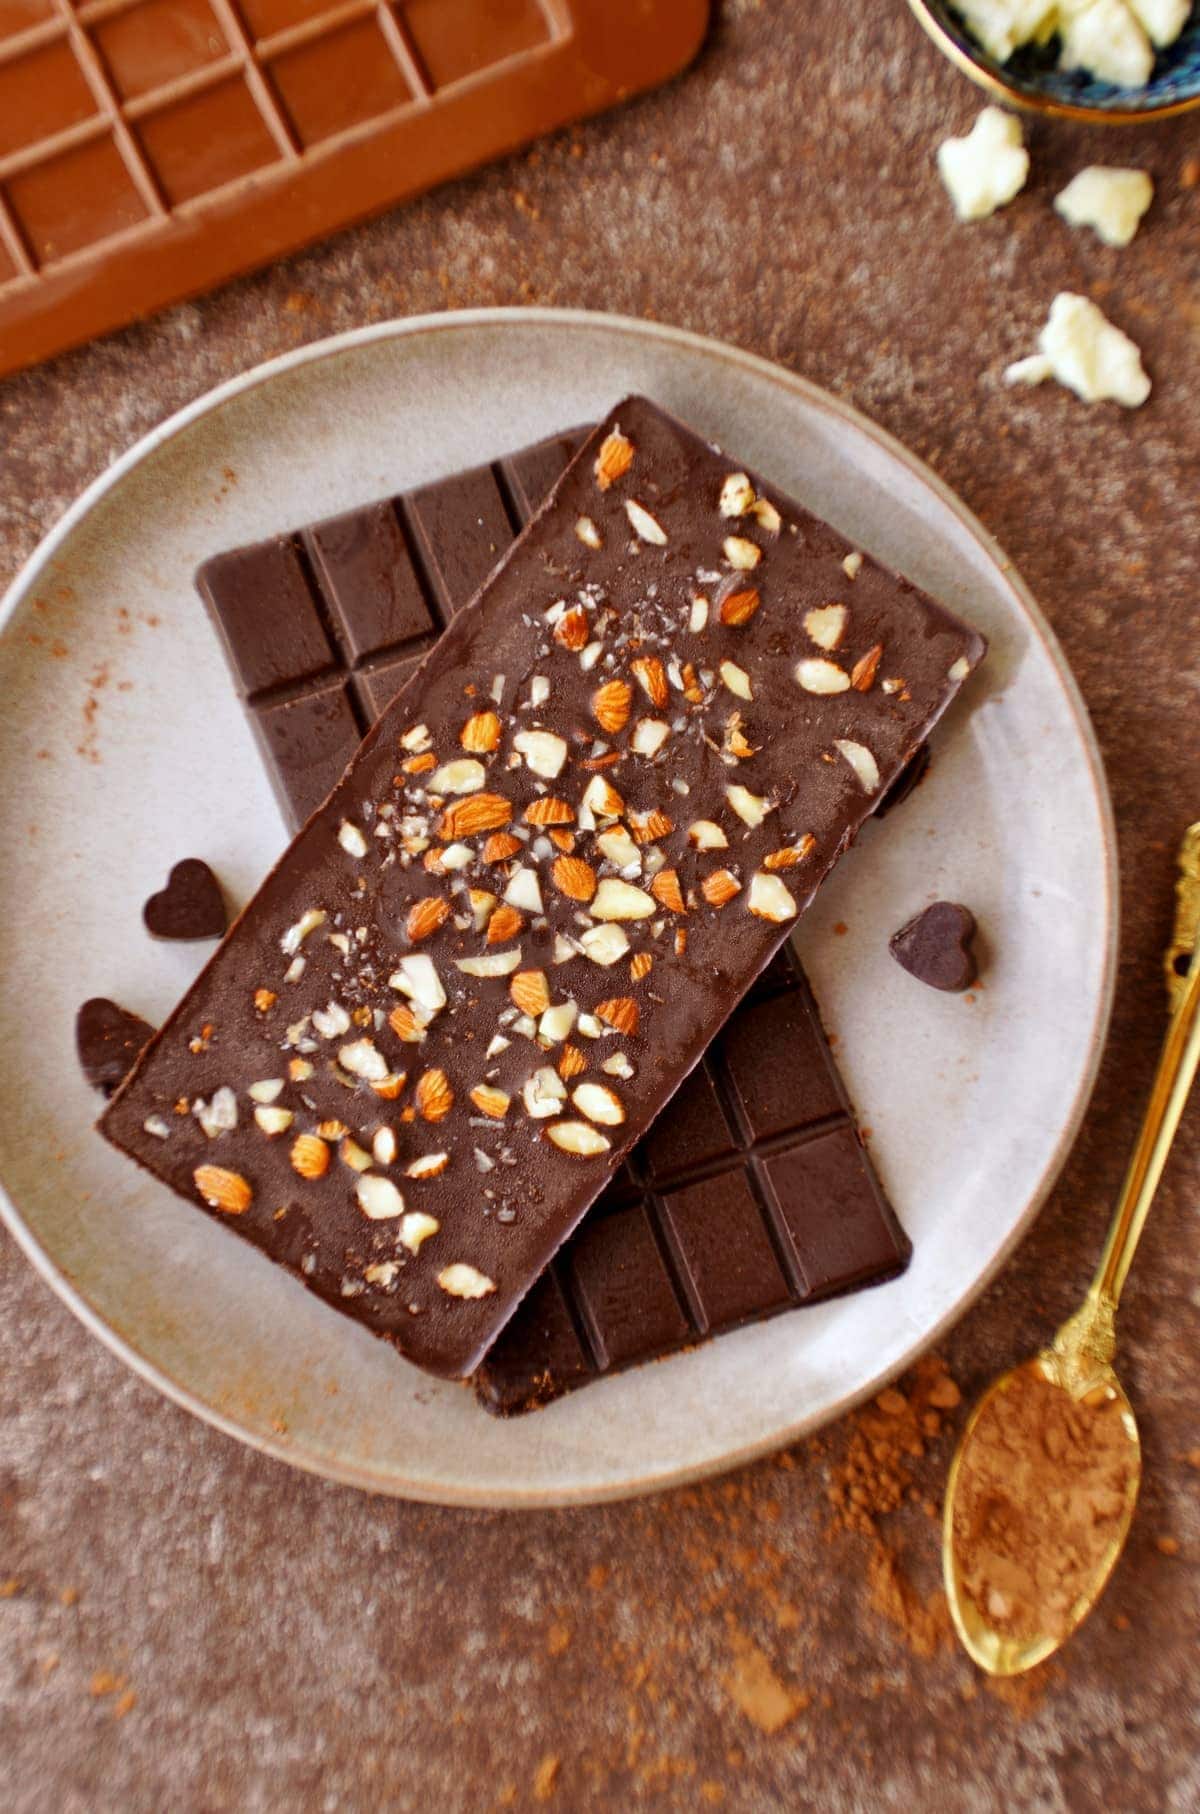
Flavorings, Toppings, and Mix-Ins
- Flavorings: A pinch of salt (perfect for enhancing and balancing the flavor), espresso powder, oil-based extracts (mint, orange, vanilla), spices (cinnamon, cardamom, chili), orange zest, or nut butter (peanut butter, almond, or hazelnut).
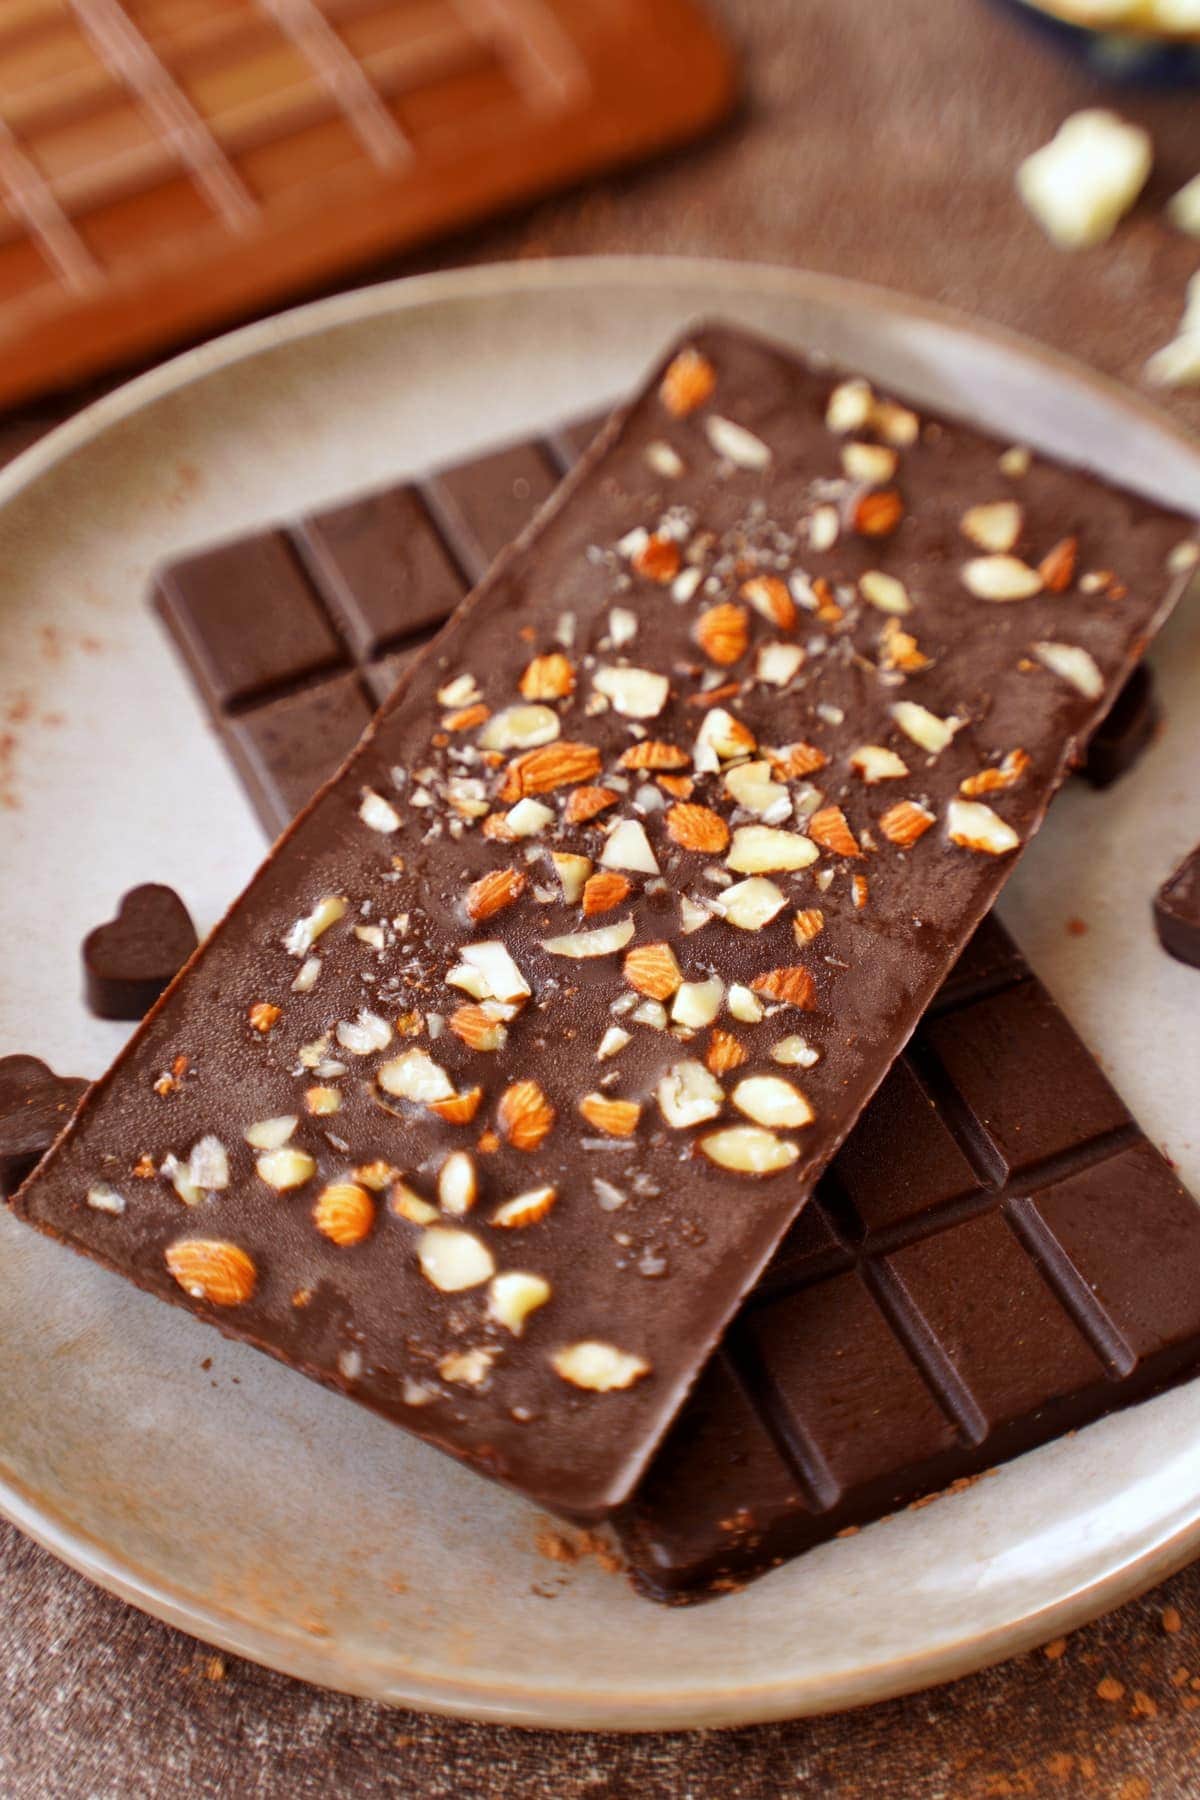
- Toppings & Mix-ins: Nuts/seeds, puffed quinoa/rice, dried fruit (like raisins, cranberries, apricots, etc.), banana chips, candied orange peel, flaky salt, crushed biscuits (Oreos, Biscoff, etc.), coconut flakes/shreds, or crushed candy canes/candy.
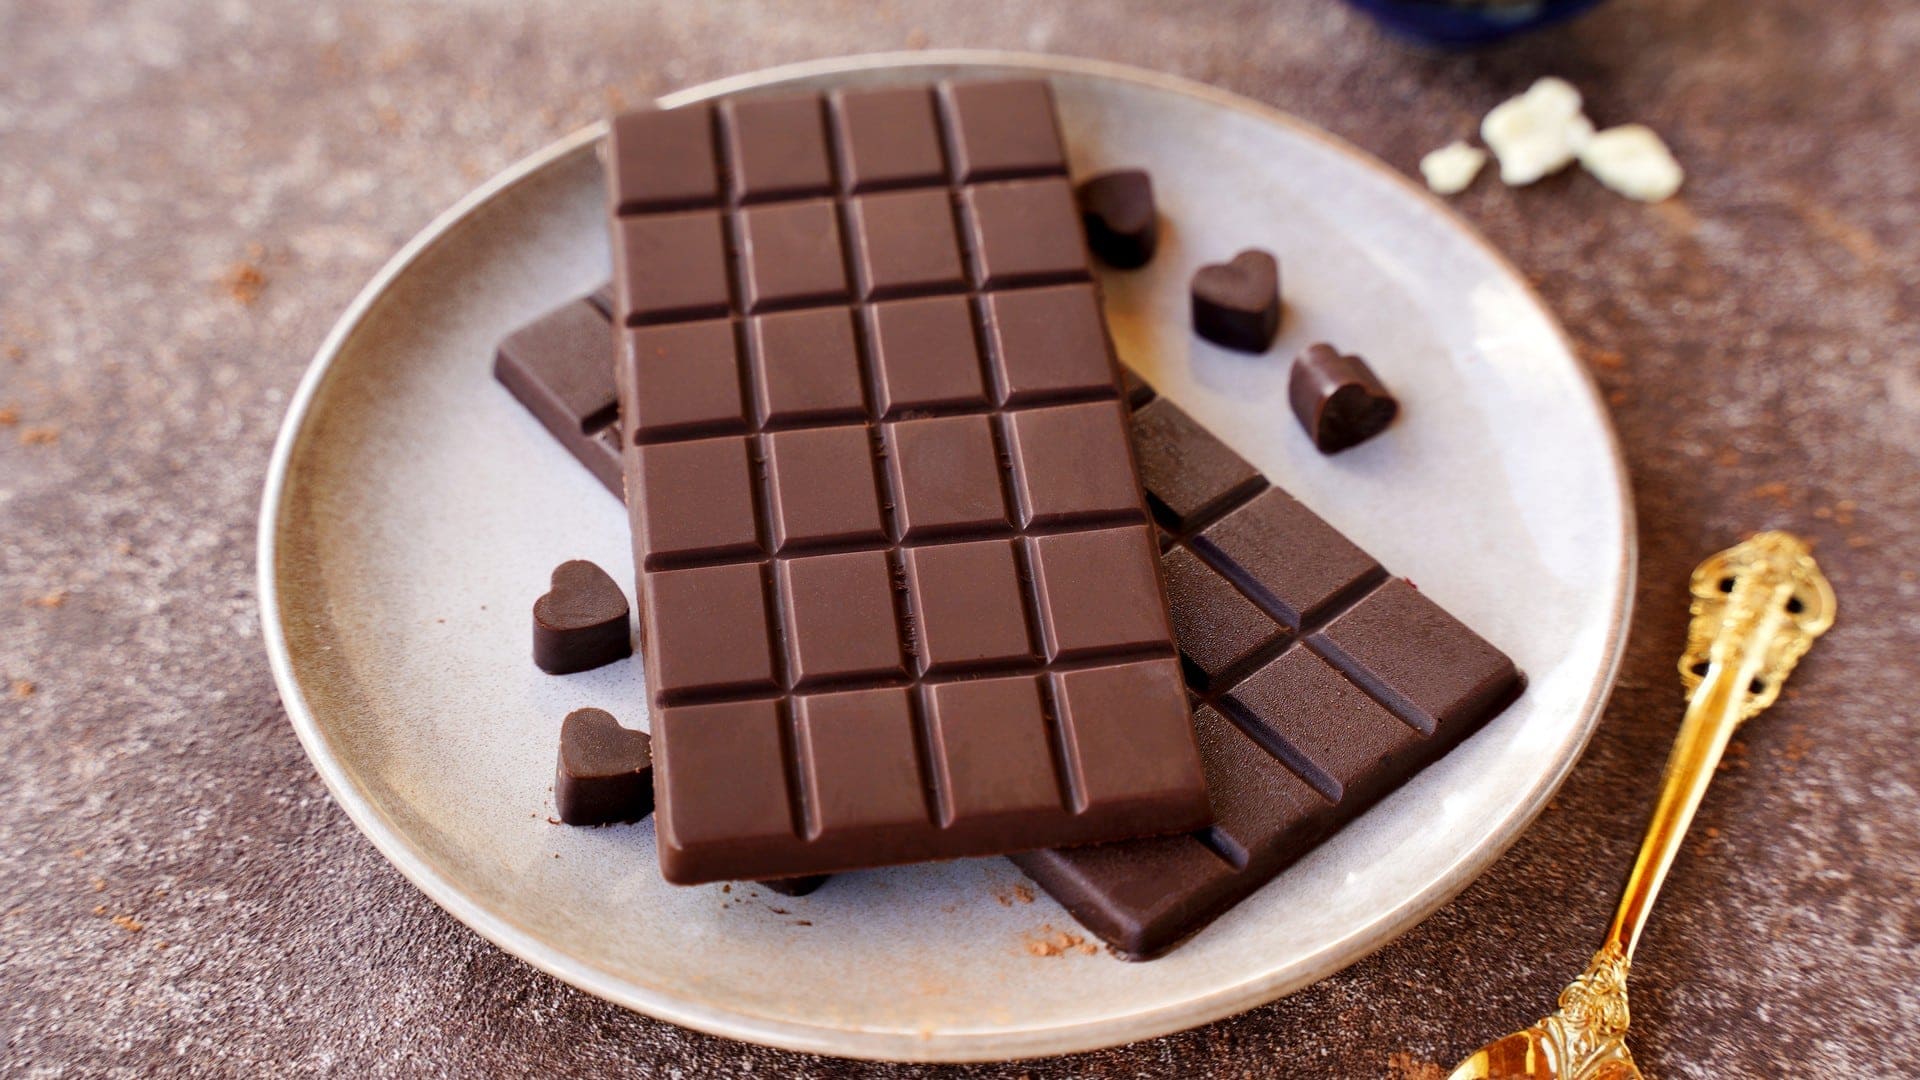
How to Make Chocolate With Cocoa Powder
Follow just five low-effort steps to learn how to make chocolate at home!
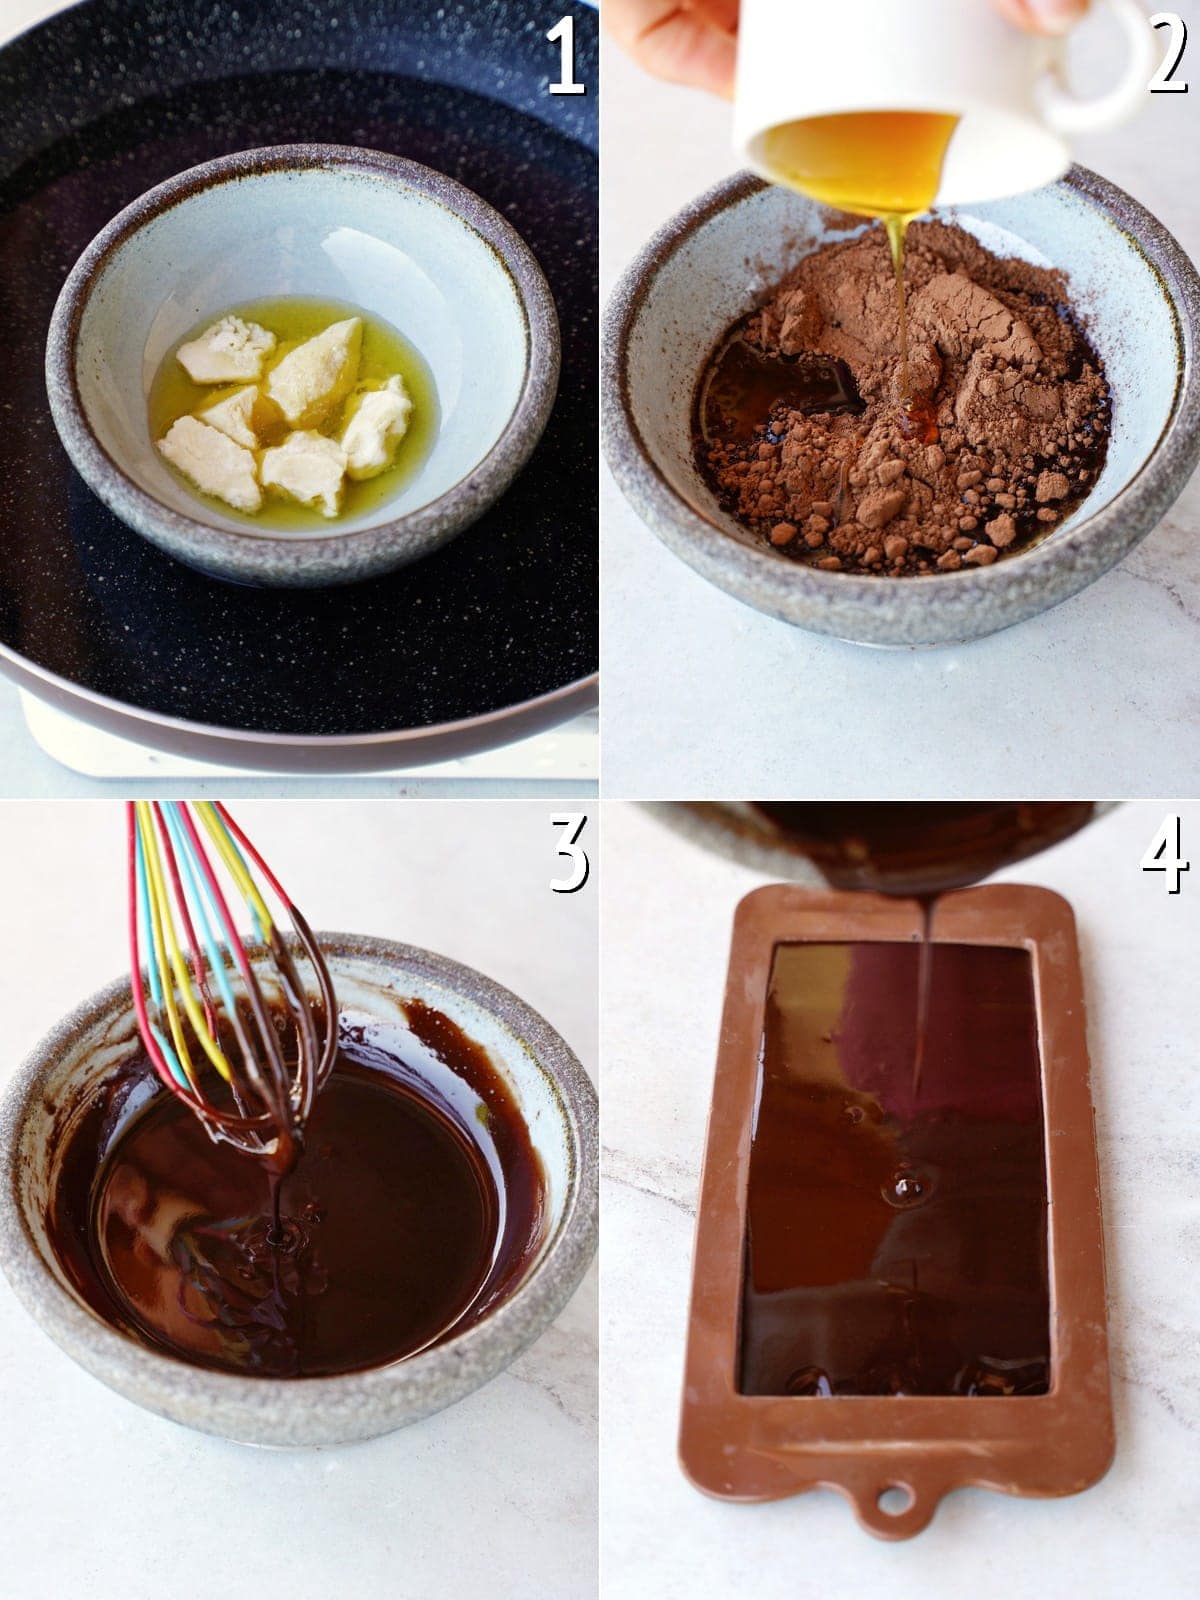
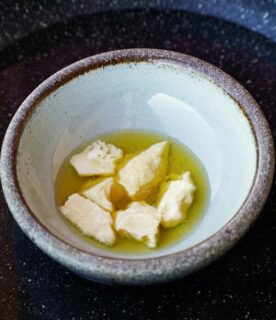
- Grate or finely chop the cacao butter and melt it over a double boiler, stirring/whisking often. Once melted, remove it from the heat.
To prepare a double boiler: Add an inch of water to a small-medium saucepan, bring to a simmer, and top with a heat-proof bowl, ensuring it doesn’t touch the water.
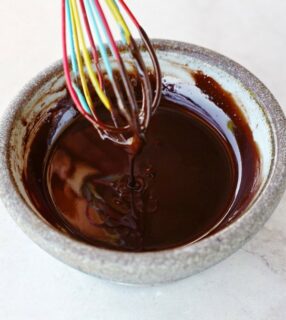
- Stir in the cocoa powder, maple syrup, and vanilla (if using). Whisk until smooth. Optionally add the milk powder for homemade milk chocolate.
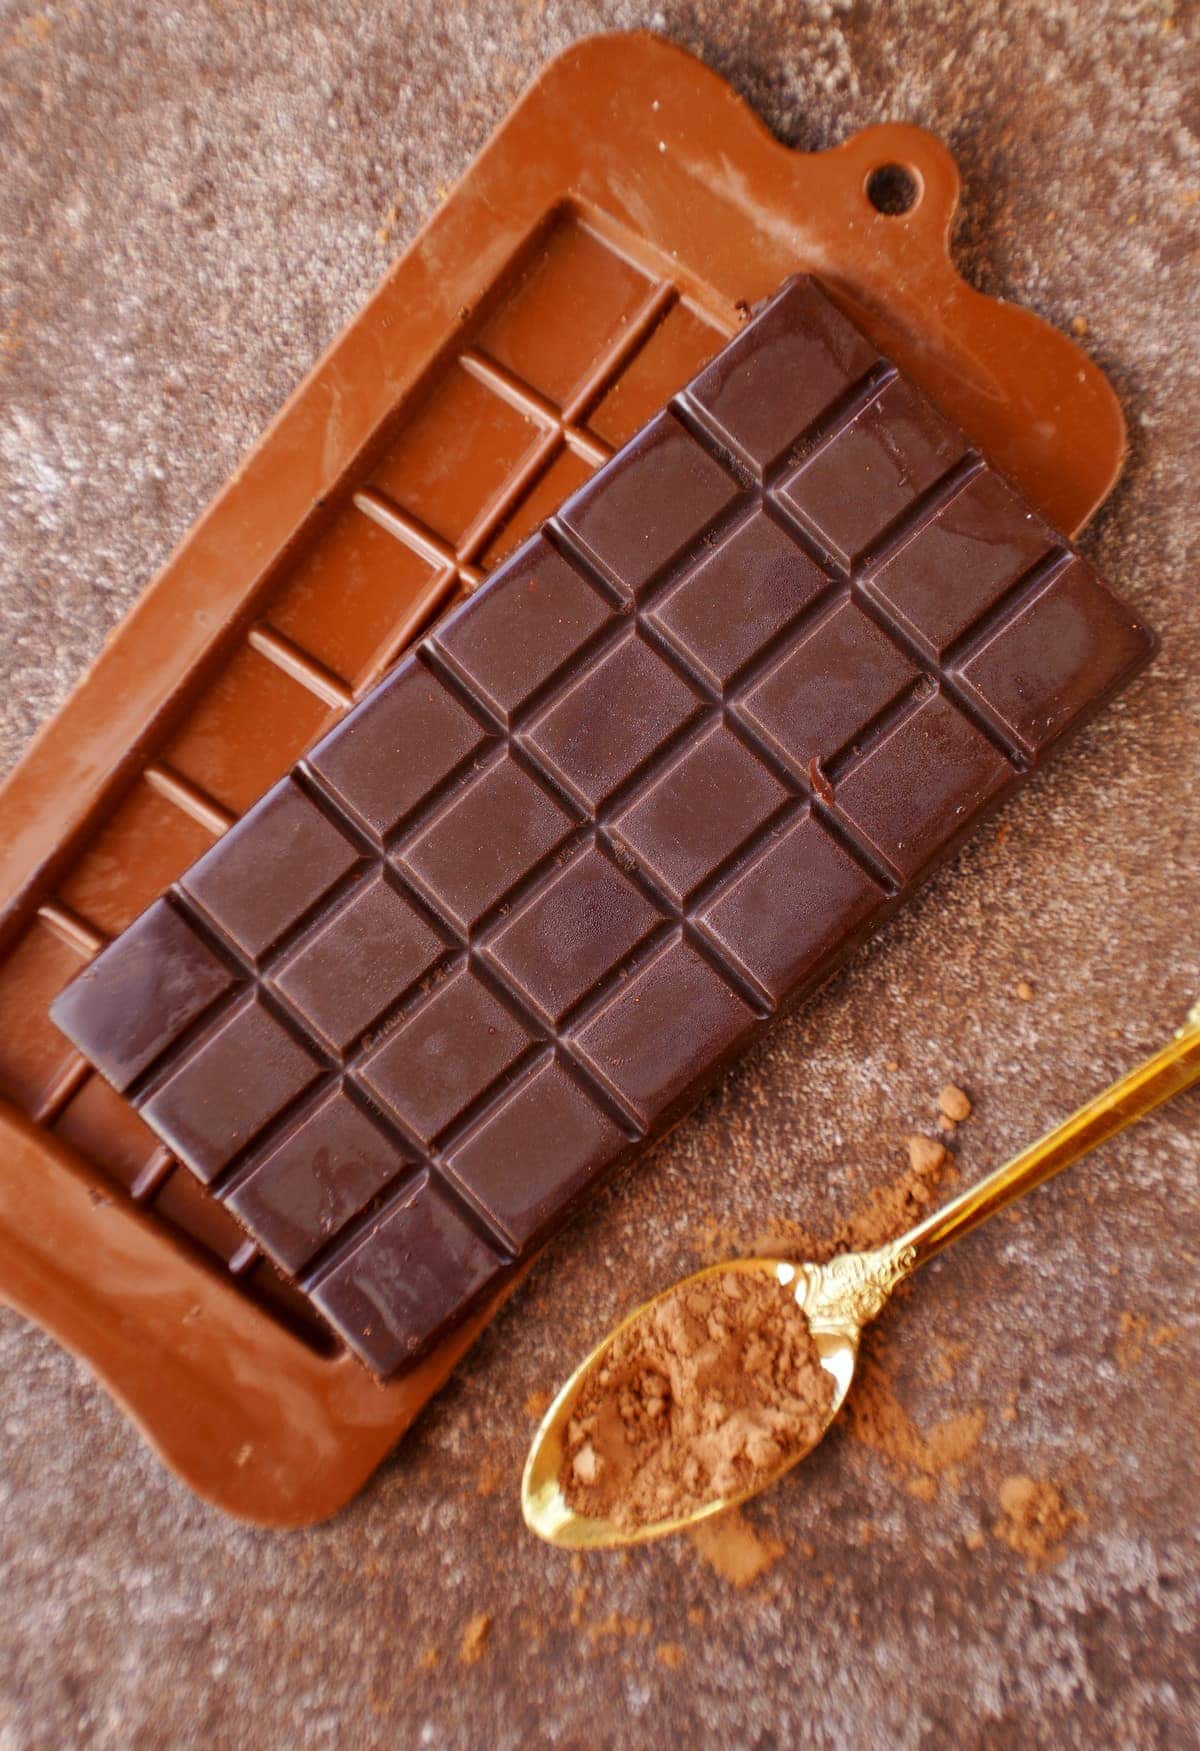
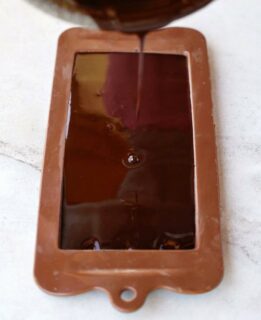
- Pour the homemade chocolate mixture into silicone molds (use a silicone spatula to help get it all out of the bowl).
- Let it set for several hours in the fridge or 20-30 minutes in the freezer.
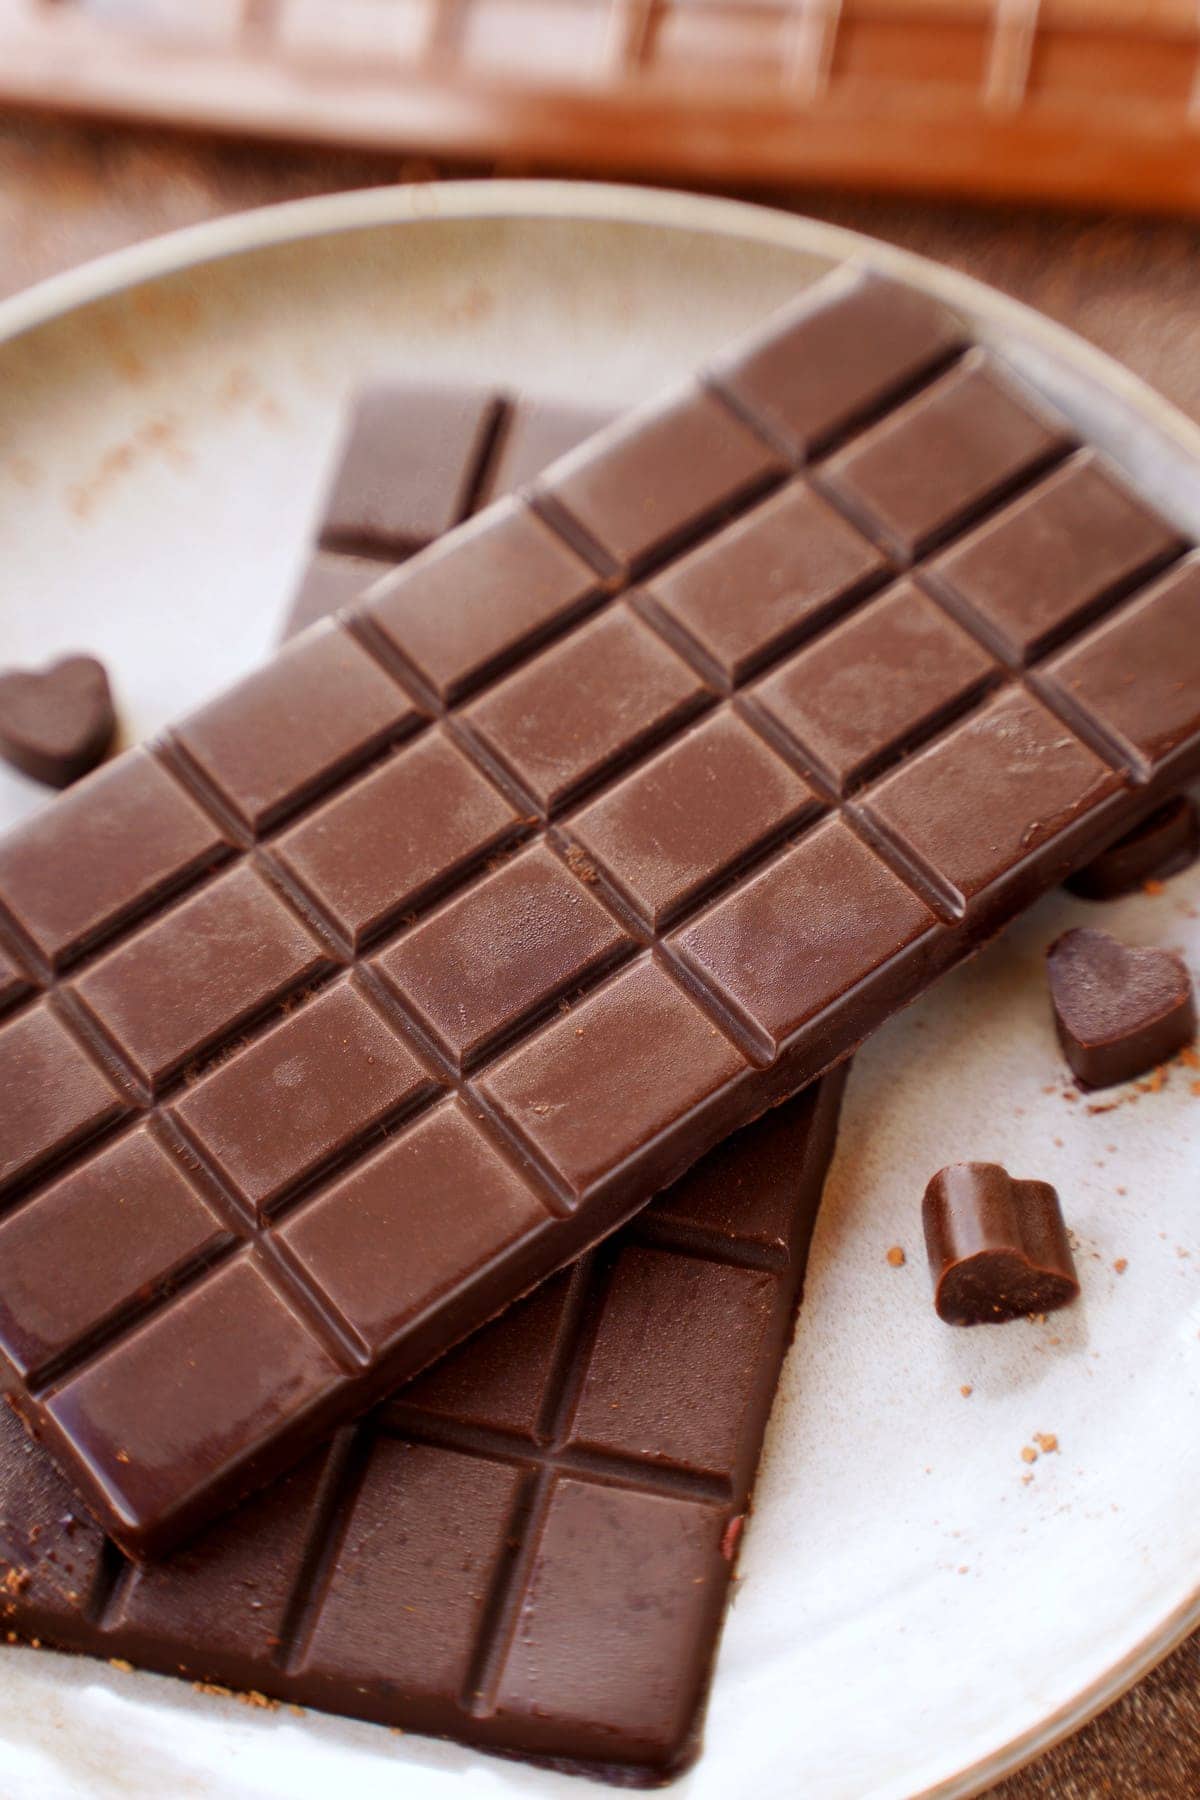
- When ready, release the homemade chocolate bars/shapes from the molds and enjoy!
Storage Instructions
Room temperature: Not recommended for untempered chocolate, as it melts easily.
Fridge: Store in an airtight container for 2-3 weeks.
Freezer: Store for 3-4 months in a Ziplock/airtight container to avoid condensation.
FAQs and Troubleshooting
What is dark vs. milk chocolate?
Milk chocolate usually contains 30-50% cocoa (cocoa powder and cocoa butter), with the remaining % made up of milk powder and sugar. Dark chocolate usually contains 50-90% cocoa, usually without dairy.
Why has my chocolate seized?
Overheating it, adding cold ingredients, and adding liquids to chocolate can cause it to seize.
In practice, I’ve never had issues using room-temperature maple syrup or agave when making homemade chocolate bars. However, if you have issues, try heating the syrup with the cocoa butter. If that doesn’t help, try powdered sweetener (powdered sugar or erythritol) in the future.
How to fix seized chocolate?
Stir in extra cacao butter (or vegetable shortening) one teaspoon at a time. If liquid caused the seizing, add boiling water until it smooths and repurpose it as a sauce or for vegan hot chocolate, as it won’t set firmly.
Why Is it so soft/ melty?
When you make your own chocolate, it isn’t tempered, so it is best enjoyed straight from the fridge/freezer. For a firmer snap and more stable texture, temper it.
Can I use homemade dark chocolate for truffles/bonbons?
Sure! Just ensure you temper the chocolate first (using the method in my homemade white chocolate recipe).
Top Tips For The Best Homemade Chocolate
- Avoid porous utensils: Wooden/porous materials can hold onto moisture and cause chocolate to seize.
- For flavored chocolates: Only add flavoring once the homemade chocolate is off-heat.
- For smoother chocolate: If you can source it, use cacao paste or cocoa liquor in place of cacao powder for a significantly smoother texture.
- If you don’t have a silicone mold: Line a shallow baking ish with parchment paper.
- To add toppings: Sprinkle the toppings over the melted mixture and let set.
- To avoid bloomed chocolate: Let it cool at room temp before chilling. Otherwise, it may bloom (white steaks/patches and dullness). It’s fine to eat but doesn’t look great.
More Vegan Chocolate Recipes
- 3 Ingredient chocolate rice cakes
- No-bake chocolate salami
- Keto chocolate truffles
- Vegan chocolate mousse
- Healthy avocado chocolate pudding
- 4-ingredient chocolate panna cotta
If you try this homemade chocolate recipe (milk or dark), I’d love a comment and ★★★★★ recipe rating below. Also, please don’t forget to tag me in re-creations on Instagram or Facebook with @elavegan #elavegan—I love seeing them.


How To Make Chocolate (Dark or Milk)
Video
Ingredients
- 1 ½ oz (40 g) cacao butter (see notes)
- 3-4 Tbsp (20 g) cocoa powder (I used Dutch processed)
- 1 1/2-2 Tbsp (35 g) pure maple syrup room temperature, not cold (see notes)
- ½ tsp vanilla extract (optional)
Instructions
- You can watch the short video for visual instructions.
- First, melt the cacao butter (finely chop it if it's in big pieces) over a double boiler, stirring/whisking often. Once melted, remove it from the heat.To prepare a double boiler, add a couple of inches of water to a small-medium saucepan and top it with a heat-proof bowl, ensuring the water doesn’t come in contact with the bowl, then bring the water to a gentle simmer over medium to medium-low heat.
- Stir in the cocoa powder, maple syrup, and vanilla extract (if using) and whisk until lump-free.
- Pour the homemade chocolate mixture into the silicone mold of your choice (using a silicone spatula helps to get it all out of the bowl) and leave it to set for several hours in the fridge or 20-30 minutes in the freezer.
- When ready, release the homemade chocolate bar from the mold and enjoy!
Notes
- Cacao Butter: Using food-grade cacao butter gives homemade chocolate that smooth, luxurious mouthfeel you get with high-quality chocolate. You can also use coconut oil as an alternative, but keep in mind the chocolate will be softer and more prone to melting.
- Sweetener: Agave syrup (or honey if you're not vegan) will also work.
- Optional add-ins: Add a few spoons of nuts/seeds, puffed quinoa/rice, or raisins/dried fruit to your homemade chocolate.
- For keto chocolate: You could try using powdered Erythritol. Avoid adding any keto syrups (water-based) as they will cause the chocolate to seize.
- Prefer milk chocolate? Add 2 Tbsp of coconut milk powder (or soy milk powder) to the mixture.
- You can store any leftovers in an airtight container in the fridge for 2-3 weeks or in the freezer for 3-4 months. I don’t recommend storing untempered chocolate at room temperature, as it melts easily.
Nutrition information is an estimate and has been calculated automatically
 „Simple and Delicious Vegan“ Cookbook by ElaVeganCLICK HERE to order!
IF YOU ARE USING PINTEREST, FEEL FREE TO PIN THE FOLLOWING PHOTO:


Great recipe but I think a small amount of salt would have made it even better, so I’m going to try that next time.
Can I Use Genuine Natural Honey instead of Maple Syrup.
Yes, you can use honey.
Simply the best recipe!
I only used Ceremonial Cacao and Cacao Butter….and created the most flavorsome chocolate!
You can explore the use of different spices to add dimension e.g. Pepper, Salt, Cinnamon or Cardamon. Or if needed, added sweetness by adding mature crystallized honey… it is a wonderful recipe for children to create their own healthy chocolate treat.
That sounds absolutely amazing 😍 Making homemade chocolate with kids sounds like such a fun activity 😊 Thanks so much for sharing your variation 💛
Hey Kate! Just a quick tip—cacao paste can seize if there’s moisture. Keep your date paste smooth and slightly warm, and add powders slowly. If it seizes, mix in a little warm cacao butter or coconut oil. Freezing is a great idea for a raw bar texture—let me know how it goes!
Sorry I didn’t mean to put one star, my son was fiddling and mucking about!!! 5 STARS!!!!
Thank you very much, Gen! 🙂
I love the taste, we have made it 3 times now. But each time it thickens as soon as I add dry ingredients, so it doesn’t pour into the moulds (fine for doing small shapes) but hard when trying to make bars. I have all the ingredient as per recipe and all at room temperature, so not sure why this keeps happening. Also have tried to keep the double boiler not to hot and not too cold..,Any ideas?
So happy to hear you love the taste and have made it three times already 😊
What’s happening is actually pretty normal. As soon as you add the cocoa powder and especially the maple syrup, the mixture cools down and thickens quickly. Maple syrup is water based, and when even a small amount of liquid is added to melted cacao butter, the chocolate can seize and become much thicker almost instantly.
A few things you can try:
• Make sure the cacao butter is fully melted and still quite warm when you whisk everything in.
• Warm the maple syrup slightly so it’s not just room temperature but gently warm.
• Add the maple syrup very slowly while whisking constantly.
• If it thickens too much, place the bowl back over the double boiler for a few seconds and whisk until smooth again.
Because this is untempered chocolate made with cacao butter and a liquid sweetener, it will always thicken faster than store bought chocolate. Working a bit quickly and keeping everything warm usually solves the issue.
Hope that helps and that your next batch pours perfectly into the bar molds 🙂
This homemade chocolate recipe is brilliant! I love how simple it is just 3 ingredients and no dairy, yet you get smooth, melt-in-the-mouth chocolate. I’m especially excited that you included tips for customizing with nuts, dried fruit or different flavorings I’m planning to try a hazelnut + sea salt version next. Thanks for making chocolate so easy and accessible to home cooks!
So happy you enjoyed it! 🥰
It’s amazing how much you can do with just a few simple ingredients. Your hazelnut + sea salt version sounds absolutely divine — that combo never disappoints.
Have fun customizing your next batch, and thank you for the lovely feedback! 💛
I haven’t tried this recipe yet, but I intend to. I want it to be stable and firm while out the fridge so I’ll need to temper it. However I have done some research and it sounds like you can’t temper the chocolate as the maple syrup contains too much water. I’m not 100% sure if this is correct so I was hoping you’d be able to help me out. I’m also unsure whether you temper the chocolate after you’ve made it first or temper it while making it.
Hey! If you want room-stable, tempered chocolate, you’d need to use a dry sweetener (like powdered sugar or powdered erythritol) instead of maple syrup.
And in that case, you would temper it after mixing the cacao butter + cocoa powder + powdered sweetener, just like regular chocolate.
the maple syrup keeps falling to the bottom, what can I do?
Hi, here’s how to fix it:
– Whisk continuously while cooling – once you remove the melted cacao butter from heat, let it cool for a minute, then add the maple syrup slowly while whisking constantly until it thickens slightly.
– Add a bit of dry ingredient (like 1 tsp cocoa powder extra or ½ tsp coconut milk powder) before pouring — it gives the syrup something to hold onto.
– Make sure the maple syrup isn’t cold, otherwise it’ll separate faster.
hello,just wanted to clarify, if I want to make an unsweetened version, and wants it to be pure 100% dark cocoa, so it’s 50/50 equal? like cacao butter/powder?
Hi! If you want to make it 100% unsweetened, you’ll need to replace the maple syrup with a combination of extra cacao butter and a bit of cocoa powder to keep the texture balanced.
For example, you could try something like:
65 g cacao butter
30 g cocoa powder
+ vanilla extract
This keeps the total weight roughly the same, gives a smooth texture, and keeps it rich and dark.
i love it
Happy to hear that you love the recipe. 🙂
hi i don’t like it
you are so mean
I like it
Great, I am so glad you like it, Stanley! 🙂
I am eager to try your recipe – have all ingredients except the cacao butter. I do have some unsweetened baking chocolate squares purchased a couple of weeks ago. what is the best way to add sweetener to this – I tried adding monk fruit/erythritol (granulated, not powdered) while it was melting and it was a more crunchy texture and not smooth. Am not familiar with working with chocolate and any suggestions you have would be greatly appreciated. thank you..
Hi Dianne! Thanks so much for your message and great question! Yes, you can use unsweetened baking chocolate squares as a base, but there are a few things to keep in mind for better texture and sweetness:
Sweetener Tip: Granulated monk fruit/erythritol doesn’t dissolve well in fat (like melted chocolate or cacao butter), which is why you ended up with a crunchy texture. To fix this:
Use powdered sweetener (like powdered erythritol or powdered monk fruit) you can even blend your granulated version in a dry blender or coffee grinder until fine.
Add the powdered sweetener after melting the chocolate, and stir it in thoroughly off the heat.
How to use your baking chocolate:
If your unsweetened chocolate contains only cacao solids and cacao butter (no sugar or milk), it can work well. Melt it gently over a double boiler.
Then add a bit of maple syrup or a powdered keto sweetener, along with any extra flavorings (vanilla, sea salt, etc.). Be careful not to overheat it, as liquid sweeteners can cause the chocolate to seize if added too quickly or at the wrong temp.
Hey Ela!! This was delicious, but once I removed this from the refrigerator, it got a bit melty. I followed the recipe exactly using a scale. Could coconut sugar be used instead? Is it the vanilla making it too liquidy? The other store bought chocolate bars in my house are solid for reference, so its not the temperature in the house…
Thanks so much for the feedback, I’m glad you enjoyed it! 💚
The melty texture is totally normal for homemade chocolate, it’s not tempered, which is why it softens quickly at room temperature. For a firmer, more stable texture like store-bought chocolate, you’ll need to temper it. I explain exactly how in the FAQs section of the blog post, so definitely check that out!
And yes, you can use coconut sugar, but it needs to be powdered (super fine), or it won’t melt properly and could affect the texture. Let me know if you try it again!
I love this recipe. I couldn’t find cocoa butter anywhere so I am using organic coconut oil and it works great.. I keep making it and store in an airtight glass container in the freezer. I’m going to try using it in some of my recipes instead of chocolate chips. I’ll see how that goes. 😊
Hi Lisa! I’m glad that you like the substitute with coconut oil! Storing it in the freezer sounds perfect to keep it fresh. Thanks for your feedback! 🙂
can I use this chocolate in baking ie muffins. I have a grandchild who’s allergic to soy
Hi Vivienne, yes, you can use this homemade chocolate in baking (like muffins), but with a few notes:
Homemade chocolate like this isn’t tempered, so it may melt unevenly or lose texture when baked inside muffins.
If baked directly into the batter, it might not hold up like chocolate chips (it could melt into the crumb).
.i am going to use some thick date paste i made. and cacao paste instead of cocoa
butter, am going to use raw carob powder, powdered spices, and maybe some powdered
mushroom( chaga, Reishi, etc.) in place of the chocolate powder. I am wanting to make
a bar that is raw. and pinches of vanilla powder. will let you know how it turns out. I also
think that the trick to this is popping it in the freezer when it’s done, to harden it up….it will
work and won’t be ‘pliable’ as some folks are commenting …will let you know how it goes..
Hey Kate! Just a heads-up though: cacao paste can be tricky and the mixture might seize, especially if there’s any moisture in the date paste or powders.
To help prevent that, make sure your date paste is really smooth and dry, warm it slightly before mixing, and try adding the powders slowly. If it does seize, you can often fix it by whisking in a little warm cacao butter or coconut oil.
Freezing it to firm up is a smart move, especially since you’re aiming for a raw bar texture. Can’t wait to hear how it turns out, keep me posted!