The ultimate guide on how to make sauerkraut the German way! This 2-ingredient homemade sauerkraut recipe is an easy, affordable, tangy side, rich in gut-friendly bacteria!

What Is Sauerkraut?
Sauerkraut (German from ‘sour cabbage’) is a type of lacto-fermented cabbage made by salting thinly shredded cabbage. The salt draws out moisture, becoming a brine that encourages the good bacteria present on the cabbage to breed and convert the cabbage’s natural sugars into lactic acid.
The salt and lactobacillus bacteria preserves the cabbage for long-term storage, giving it a tart, tangy flavor and heaps of gut-friendly bacteria (check out the health benefits of sauerkraut).
Why I Love Sauerkraut
Now, I hate to be a stereotype but it turns out I’m one of those Germans who basically have sauerkraut in my DNA. As a kid, I devoured it warm with potato dumplings (called Schupfnudeln in Germany) and Bratwurst. These days, I’m also all about the raw stuff—it’s tangy, crunchy, and packed with vitamins C and K, fiber, and gut-friendly, dairy-free probiotics. Plus, it’s so easy to learn how to make sauerkraut at home.
All you need is 15 minutes of hands-on prep and TWO base ingredients for homemade sauerkraut (cabbage and salt!). It’s barely a recipe – just follow my method and top tips learned over YEARS of making kraut, and the lacto-fermentation does the rest. It’s cheaper than store-bought and so much more delicious.
Love tangy crunch in your meals? Try my quick pickled red onions, too.
The Ingredients
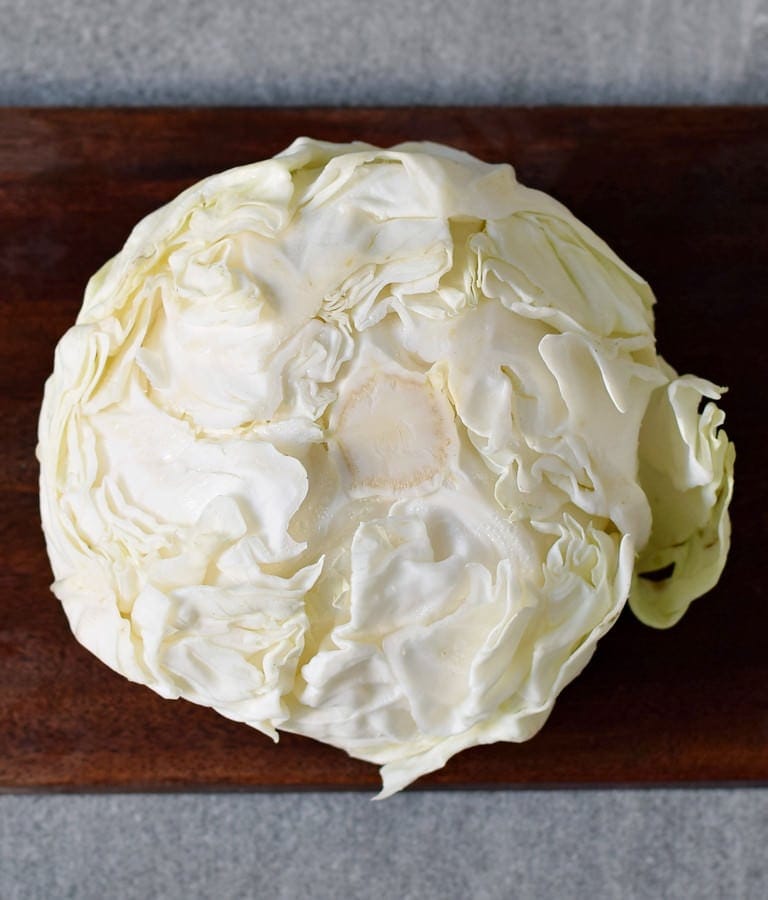
- Cabbage: Use fresh cabbage (organic is great), as they release the most liquid. I usually use green or white cabbage, though red cabbage will work, for ‘Rotkraut’!
- Salt: Use non-iodized salt, as iodine can affect fermentation. I usually use additive-free sea salt or pink Himalayan salt. Pickling salt also works.
- Flavorings: While optional, German sauerkraut often contains caraway seeds. I sometimes add bay leaves and juniper berries for savory, slightly fruity, aromatic depth.
Please read the recipe card below for the full ingredients list, measurements, complete recipe method, and nutritional information.
How To Make This German Sauerkraut Recipe
First, ensure that all utensils and tools are clean (see FAQs) to avoid unwanted bacteria.
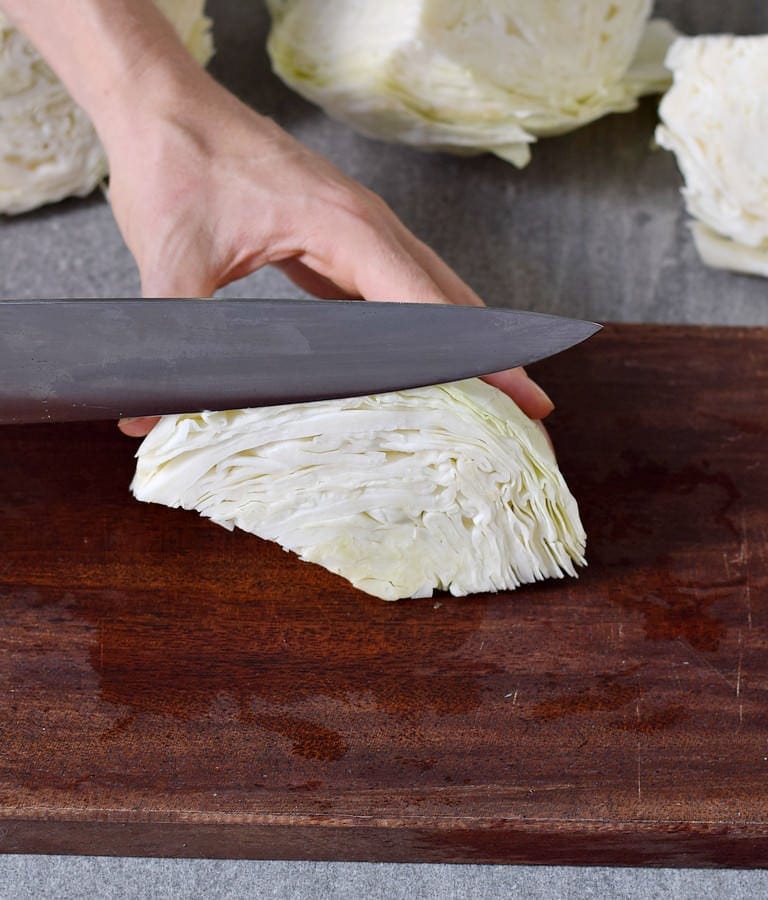
- Remove the outer leaves of the cabbage (save one), quarter the cabbage, and cut out the tough core.
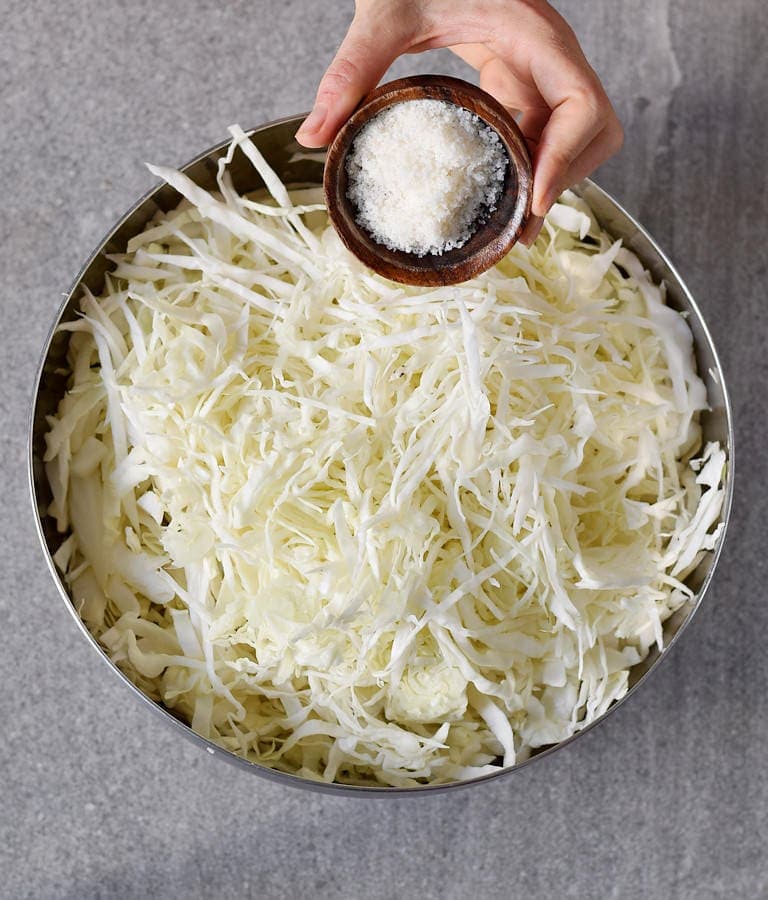
- Then, use a long, sharp knife (or mandoline) to shred the cabbage into very thin ribbons (about 1/8-inch) and weigh the cabbage to see how much salt you’ll need (see FAQs for salt amount!).
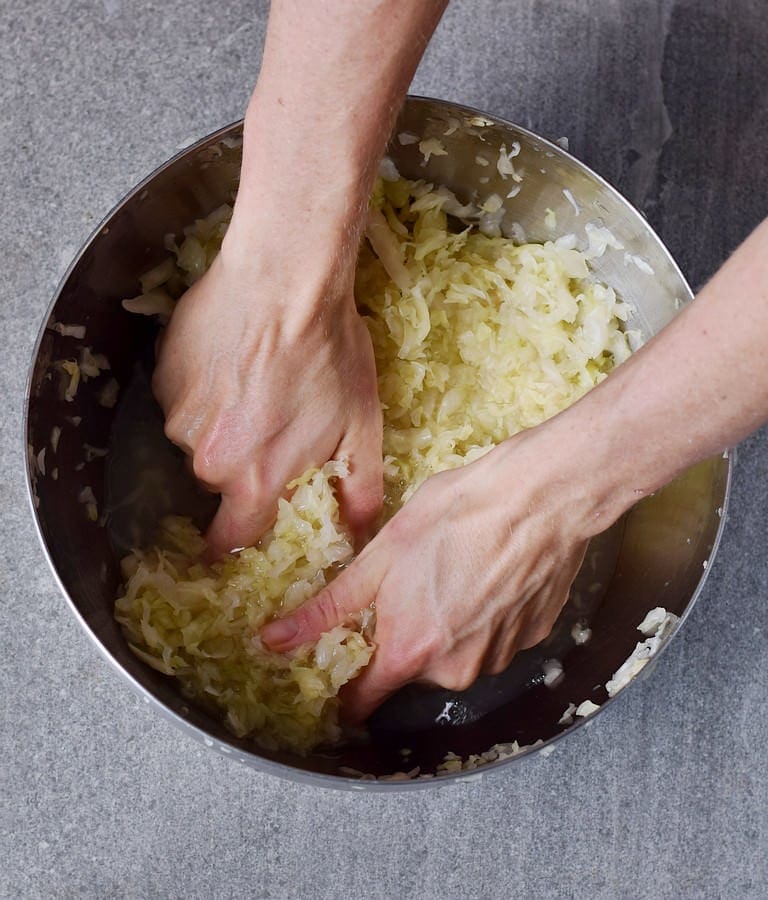
- Transfer the cabbage and salt to a large bowl and use clean hands to massage it for 5-10 minutes until it releases lots of liquid – the more liquid, the better (don’t be gentle).
It can make it quicker to massage if you let it sit for 10-15 minutes before massaging.
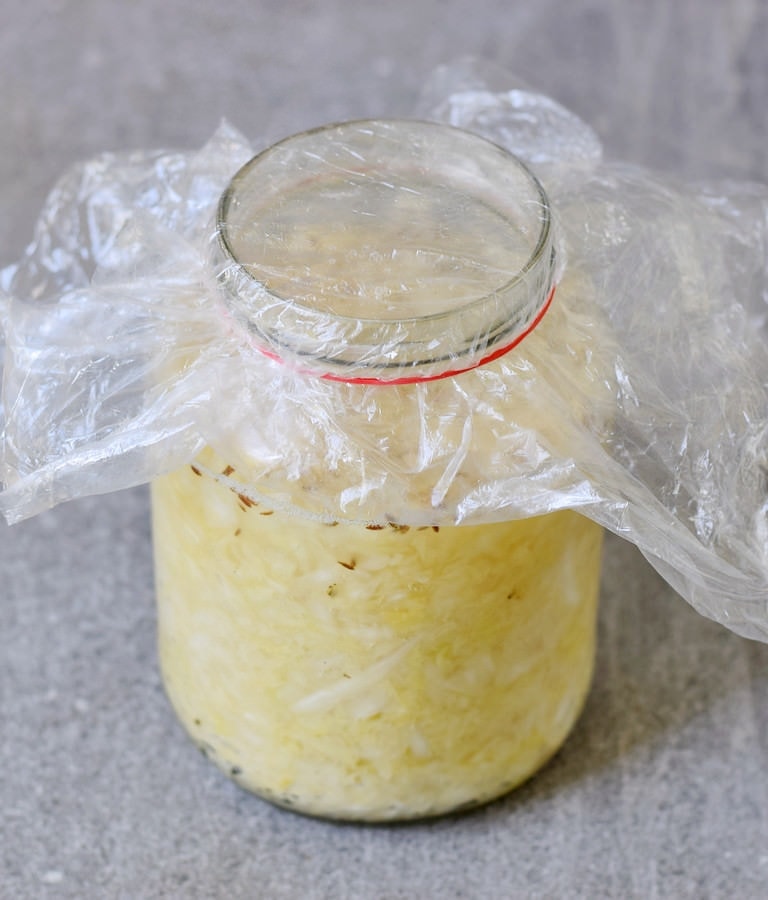
- Pack the cabbage and its liquid into a large mason jar, using a pestle or similar tool to pack it down so it’s fully submerged.
Don’t overfill the jar—the mixture will fizz and expand as it ferments.
- If using, add the bay leaves, caraway seeds, and juniper berries to the cabbage mixture. Then, weigh down the cabbage with 1-2 stones (in a clean Ziplock) or fermentation weights to ensure the cabbage shreds remain fully submerged. A cut-out cabbage leaf circle placed beneath the weights can help keep the shreds in place.


- Cover the jar with a clean cloth or plastic wrap secured with a rubber band (or use an airlock lid). Leave it to ferment in a cool, dark place (ideally 64–72°F / 18–22°C) for 2–3 weeks (see FAQs for different temperatures and fermentation times).
It’s important to ‘burp’ it daily to release gas, and press the cabbage to keep it submerged. If the liquid gets too low, top up with a 2% saltwater brine. If scum appears on top, skim it.
- Once you’re happy with the flavor (level of sourness), screw on the cap and refrigerate. I often continue fermenting it in the fridge for 2-3 weeks (to boost probiotics) before enjoying it.
The longer raw sauerkraut ferments in the refrigerator, the more probiotic bacteria can develop—however, fermentation slows down significantly after about 2 to 3 weeks, and bacterial growth then increases only slowly or stabilizes.
How Do I Know Sauerkraut Is Ready?
Honestly, it’s up to you and when you like its flavor. However, as a general rule, sauerkraut is ready when the cabbage transforms from green to pale beige and the flavor shifts from salty to pleasantly tart. The longer it ferments, the tangier the flavor becomes.
Sauerkraut ferments faster in warmer climates, so I taste it first at 3 days (as I live in the tropics) then every day until it reaches my preferred tanginess. However, in the ideal temperature range of 64-72°F (18- 22°C), it’s often fermented for at least two weeks.
How Long Does Homemade Sauerkraut Last?
When properly prepared (with clean equipment), stored in an airtight container in the refrigerator, only accessed with clean utensils, and the kraut is kept submerged beneath the brine, homemade sauerkraut can last 6+ months.
Monitor for spoilage; if it starts to smell rotten, becomes mushy or slimy, darkens, or shows signs of pink or black mold, please discard. White mold on top is often safe, and can be scooped away and discarded.
I don’t recommend freezing sauerkraut as it impacts texture and probiotic content.

Serving Suggestions
This easy sauerkraut recipe makes a fairly versatile side dish, great with:
- Vegan Bratwurst or Schnitzel – alone, in a bun, or with mashed potatoes
- Bratkartoffeln
- Dumplings (or pierogi) – like Schupfnudeln (potato dumplings) or Gnocchi
- Bread – like hearty rye bread sandwiches (i.e., a vegan Reuben), a vegan grilled cheese, burger, hotdog, or wraps. It even works over avocado toast.
You can also use it to brighten ‘heavy’ mains like mushroom stroganoff or vegan mac n cheese, add it to soups/stews, or enjoy alongside vegetable fritters, cauliflower patties, or taco cups.
FAQs
How to prepare and clean utensils for sauerkraut making
Cutting board, knives, bowls: Wash with hot water and dish soap.
Fermentation jar or crock: Rinse well, then clean by pouring boiling water inside or using a vinegar solution (1 part vinegar to 3 parts water), rinse again.
Make sure all utensils and jars are completely dry before use to avoid unwanted bacteria growth.
Can I cook sauerkraut?
Absolutely, though it will drastically reduce the probiotic content – it tastes great, though.
How much salt to use in sauerkraut?
The amount of salt needed depends on the fermentation temperature. The general guideline is 2% salt by weight of cabbage. For more precise figures (per 1kg cabbage):
- At 15–18 °C (59–64 °F) use 1.5% (15g/kg) – takes 3-5 weeks
- 18–22 °C (64–72 °F) use 1.8-2.0% (18-20g/kg) – takes 2-3 weeks
- 22–25 °C (72–77 °F) use 2.0% (20g/kg) – takes 7-10 days
- 25–28 °C (77–82°F) use 2.2–2.5% (22–25g/kg) – takes 3-6 days
- > 28 °C (> 82 °F) use 2.5 % (25 g/kg) – takes 2-4 days
Temperatures above 28°C (82°F) can cause fermentation to occur too quickly, potentially affecting flavor and texture. Using the correct amount of salt is important to inhibit bad microbe/mold growth and benefits the cabbage texture. If preferred, test with pH strips—aim for a pH below 4.0, ideally 3.5–3.8.
My sauerkraut has mold, is it ruined?
If cabbage shreds rise above the brine during fermentation, it may form mold on top. While it’s not ideal, most of the time you can scoop the top layer off and continue. If you notice pink or black mold, however, err on the side of caution and discard.

Top Tips for Making Homemade Sauerkraut
- Clean everything: To avoid mold/bad bacteria. (See FAQs for how-to.)
- Slice cabbage thinly: The thinner, the better! A mandoline or food processor shredding disk works great (and so quickly!).
- Keep it submerged: Fully cover the cabbage with its liquid to prevent mold. If needed, top up with a 2% brine (2g salt per 100g water – about 1 tsp per cup).
- Use enough salt: Salt acts as a preservative and supports the fermentation process. (See FAQs for the proper ratio.)
- Taste as you go: Start checking after a few days and taste it daily until you like the flavor. I often make two jars and let one ferment longer for extra tang.
- Never run out! Prepare two jars at a time. Once you’ve finished the first jar, prepare the third and fourth batch. That way, you’ll always have sauerkraut to hand (yippee!).
- Don’t overfill jars: Fill only ¾ full to prevent any overflow as it bubbles up during fermentation.
More Vegan Cabbage Recipes
- Vegan cabbage soup
- Vegan cabbage rolls
- Keto coleslaw
- Vermicelli Noodles Stir-Fry
- Vegetable Gyoza
- Rice Paper Dumplings
- Baked Vegan Spring Rolls
- Vegetable Chop Suey
If you try this homemade German sauerkraut recipe, I’d love a comment and ★★★★★ recipe rating below. Also, please don’t forget to tag me in recreations on Instagram or Facebook with @elavegan #elavegan – I love seeing them.


German Sauerkraut Recipe
Video
Ingredients
- 1 medium head (1 kg) white cabbage (outer leaves removed)
- 1 Tbsp (18 g) salt (see notes)
- A few bay leaves (optional)
- ½ tsp caraway seeds (optional)
Instructions
- You can check out the video for visual instructions.First, ensure that all utensils and tools are clean (see FAQs) to avoid unwanted bacteria.Remove the outer leaves of the cabbage (save one), quarter the cabbage, and cut out the tough core.
- Then, use a long, sharp knife (or mandoline) to shred the cabbage into very thin ribbons (about 1/8-inch = 3mm) and weigh the cabbage to see how much salt you'll need (see recipe notes for salt amount!).
- Transfer the cabbage and salt to a large bowl and use clean hands to massage it for 5-10 minutes until it releases lots of liquid – the more liquid, the better (don't be gentle).It can make it quicker to massage if you let it sit for 10-15 minutes before massaging.
- Pack the cabbage and its liquid into a large mason jar, using a pestle or similar tool to pack it down so it's fully submerged.Don't overfill the jar—the mixture will fizz and expand as it ferments.
- If using, add the bay leaves, caraway seeds, and juniper berries to the cabbage mixture. Then, weigh down the cabbage with 1-2 stones (in a clean Ziplock) or fermentation weights to ensure the cabbage shreds remain fully submerged. A cut-out cabbage leaf circle placed beneath the weights can help keep the shreds in place.
- Cover the jar with a clean cloth or plastic wrap secured with a rubber band (or use an airlock lid). Leave it to ferment in a cool, dark place (ideally 64–72°F / 18–22°C) for 2–3 weeks (see notes for different temperatures and fermentation times).It's important to 'burp' it daily to release gas, and press the cabbage to keep it submerged. If the liquid gets too low, top up with a 2% saltwater brine. If scum appears on top, skim it.
- Once you're happy with the flavor (level of sourness), screw on the cap and refrigerate. I often continue fermenting it in the fridge for 2-3 weeks (to boost probiotics) before enjoying it.
Notes
- Always clean all equipment (especially the mason jar). Simply pour boiling water over it, then let it dry naturally.
- Make sure the cabbage is covered with its liquid (brine) to avoid that mold starts growing. If your sauerkraut doesn't release enough liquid to stay submerged, it's perfectly fine to add a 2% brine to top it off.
- Do not skip the salt as it's very important and also acts as a preservative. I always use sea salt or Himalayan salt.
- How much salt to use: The amount of salt needed depends on the fermentation temperature. The general guideline is 2% salt by weight of cabbage. For more precise figures (per 1kg cabbage):
- At 15–18 °C (59–64 °F) use 1.5% (15g/kg) (takes 3-5 weeks)
- 18–22 °C (64–72 °F) use 1.8-2.0% (18-20g/kg) (takes 2-3 weeks)
- 22–25 °C (72–77 °F) use 2.0% (20g/kg) (takes 7-10 days)
- 25–28 °C (77–82°F) use 2.2–2.5% (22–25g/kg) (takes 3-6 days)
- > 28 °C (> 82 °F) use 2.5 % (25 g/kg) (takes 2-4 days)
- Make two jars at the same time. Ferment the second one longer than the first one and see which one you like more. Once you finish eating the first batch, start the third one and eat the second batch. This way, you always have fresh homemade sauerkraut on hand.
- Season the fermented sauerkraut with a little smoked paprika which adds a wonderful flavor.
- Recipe serves 12. Nutrition facts are for one serving.
Nutrition information is an estimate and has been calculated automatically
 „Simple and Delicious Vegan“ Cookbook by ElaVeganCLICK HERE to order!
If you are using Pinterest, feel free to pin the following photo:


hi – I need help here. i made two jars a week ago, but they just taste like salty wet cabbage?
All under the brine/water, in the dark at about 17/18°.
What have I done wrong and are they salvageable?
thanks
Hi! What you’re describing actually sounds totally normal for sauerkraut that’s only been fermenting for a week. At 17–18°C, fermentation is much slower. It usually takes 3 to 5 weeks (as mentioned in my recipe notes) at that temperature. After just one week, it’s still in the very early phase.
A few things to check:
• Make sure everything stays fully submerged under the brine.
• Burp the jar daily to release gas.
• If the cabbage didn’t release enough liquid, top up with a 2% brine.
• A light cabbage smell is normal, just no mold.
Are your jars salvageable?
Yes, absolutely! As long as there’s no mold and everything is kept under the liquid, just let them ferment longer. The flavor changes week by week. Around week 2 it starts to get slightly tangy, and after 3–4 weeks it usually tastes great.
I’m pretty sure your sauerkraut just needs more time. Give it a bit longer and it should turn out perfect! 😊💛
A very complete and well written article!
I made my first batch and was confident it would turn out. And it did!
Thank you!
So happy to hear that your first batch was a success! Thank you for the lovely feedback, it means a lot. 😊💛
Entschuldigung, I can’t seem to edit!
*Schnie Pie*
Entschuldigung, mein Deutsch is nicht aus gut wie Ihre Englisch, aber ich will versuchen! Englisch ist meine erste Lange, und Franzosich meine zweiten. Also, wann ich der Wort sagt nicht, ich will in Englisch schreiben.
Die Familie meinen Vater ist hier als Kanada gekommt, bevor der erste Krieg. Wir haben Kontakt mit unsere Familie gelost, aber seine Mutti hat alle Deutche Essen gemacht.
Wann irh hat meine Mutter *married*, Mutti *had to* 2 Rezepten lernen. Nommer Ein: *Schnee piewei*. Nommer zwei: Sauerkraut!
Bevor er ist getodt, ich habe Ihre Rezept gegebt.
Erste: Ich habe den Kohl in *squares* geschneid.
Dass war nicht richtig! Also, der zweite, ich habe den Kohl in Scheiben geschneid. Dass war Korrekt!
Dass ist *a lot*, ich weiss, aber ich wollte sagen, dass sie haben mir helfen *connect* meinen Vater mit seinen *roots*.
Heute, es ist 2 Jahre ohne menen Vater.
Viele Dank.
Hallo Heather! Ich finde es ganz wunderbar, dass du die Rezepte deiner Familie nachkochst und dadurch eine Verbindung zu deinem Vater und seinen Wurzeln spürst. Essen kann so viel mehr sein als nur Nahrung.
Danke, dass du diese persönliche Geschichte geteilt hast. Es bedeutet mir sehr viel zu wissen, dass meine Rezepte dir auf so eine schöne Weise helfen konnten.
Ganz liebe Grüße
Ela
Vielen Dank!
Ich muss sagen, ihre Rezept ‘lentil stew with mashed potatoes’ ist meinen Favorit! Wie Mann auf Englisch sagt: comfort food!!
Wie schön, das freut mich total! 🥰 Ja, genau – comfort food passt perfekt dazu! So schön, dass dir der Linsen-Eintopf so gut schmeckt. 💚
Just made my first two jars! Does the cabbage leaf on top need to be fully submerged also? Or just the shreds? Thank you!
Great job on making your first two jars, Lindsey! 😊
Yes, ideally the cabbage leaf on top should also be submerged in the brine. The main goal is to keep everything under the liquid to prevent mold or spoilage.
Here’s how it works:
The shredded cabbage must be fully submerged at all times.
The whole leaf on top acts like a protective barrier—it helps hold the shreds down and adds an extra layer between the cabbage and air.
But if that top leaf is sticking out above the brine, it can start to mold. So try to push it under the liquid using a fermentation weight or a clean Ziplock bag filled with water.
If it just won’t stay under, you can skip the leaf and use another method to weigh down the shredded cabbage directly.
Let me know how it ferments!
love sauercraut eat it about every day caraway seed very nice I put a few pepper corns and mustard seed with mine, i got a specialpot to fermented the sauercraut. . Thanks Ela
You are very welcome, Leonie. 🙂
Gostei muito da receita, está bem explicadinha, vou animar a preparar essa receita!
Que bom saber disso! Fico muito feliz que você tenha gostado da receita — tenho certeza de que vai ficar uma delícia quando você preparar. Depois me conta como ficou! 😊
Hi. I have big cabbage at home and will definitely try this receipe.
it’s winter time is Sydney. can you please tellkl me the best place to leave it to ferment straight after making it.
some says hot place some says in cold place?
thanks Bhakti
Hi Bhakti! 😊 So great that you’re giving this sauerkraut recipe a try—and that big cabbage will be perfect!
Since it’s winter in Sydney, and cooler temps can slow down fermentation, here’s what you can do:
Sauerkraut ferments best between 18–24°C (65–75°F). Below 15°C (59°F), fermentation slows significantly, and above 26°C (79°F), it can go too fast and affect flavor or texture.
Best Place to Ferment in Winter:
– Inside a kitchen cupboard or pantry (away from direct light and drafts)
– On top of the fridge (it’s often a little warmer there)
– A warm, but not hot, corner of your kitchen
– Near a heater, but not directly next to it
If your home is very cool, try wrapping the jar in a towel to insulate it a bit.
Let it ferment for at least 5–7 days (longer if it’s quite cold), and start tasting around day 5. Once you like the taste, move it to the fridge where it can continue to develop more probiotic goodness.
Let me know how it turns out! 💚
Very delicious and easy to make!
I was under the impression that the original German Sauerkraut contained raisons, am I correct?
Thank you, glad you liked it! Traditional German Sauerkraut doesn’t usually contain raisins. However, there are regional variations and some sweeter recipes, especially in southern Germany or Alsace, that may include ingredients like apples or raisins. So you’re not entirely wrong, it’s just not the standard version. 🙂
Have just made this recipe. I am hoping it will help my ulcerative colitis.
super, thanks🤗
You’re very welcome! 🤗💛
Much better than buying from the store and was easy to make from your instructions. 👍
Wonderful! Thanks so much for your amazing feedback! 🙂
Hi. Good recipe, thanks but pouring boiling water over a jar does not sterilise it. It needs to be submerged in a pan of boiling water for ten minutes to sterilise it properly.
Can you substitute the white cabbage for red cabbage?
Yes, you can
Really delicious and easy to make!
Thanks for your feedback. 🙂
Do you wash the cabbage before slicing and salting?
I didn’t wash it, just removed the outer leaves.
Thanks for this easy & well explained recipe
Hey Martin, you are very welcome. 🙂
Getting ready to make this for thanksgiving I am of German descent ant all my grandmas are gone so I finally want to make this will a 2 gallon beer fermentation bucket with a airlock work so I don’t have to expose air to the cabbage and just put a large weight in bucket to hold down the cabbage?
Hi Michael, I think it should work fine! 🙂
I’ve read through this recipe several times quickly and I don’t think you know what you’re talking about.. With sauerkraut you can have too much salt and you can have too little salt. The thing is to have just the right amount of salt. I can’t find a place where you say how much salt you should use for 5 lbs of shredded cabbage. You should forget about the flowey details and provide basic.
Hi, have you checked the recipe card? The exact amount of salt is mentioned there.
Ela, you were very polite with this rude poster. I can’t believe they attacked you without even bothering to read your well written article. Greetings from Australia, I made a catch of Sauerkraut & its delicious.
Thank you Martin. I am so glad it came out delicious! Thanks for your great feedback. 🙂
I recently bought a fermentation container they usually use for making kimchi, would this be the same process but in a box instead? It does come with a piece inside that holds the veggies down to keep it under the liquid
Never tried it but it should be the same process.