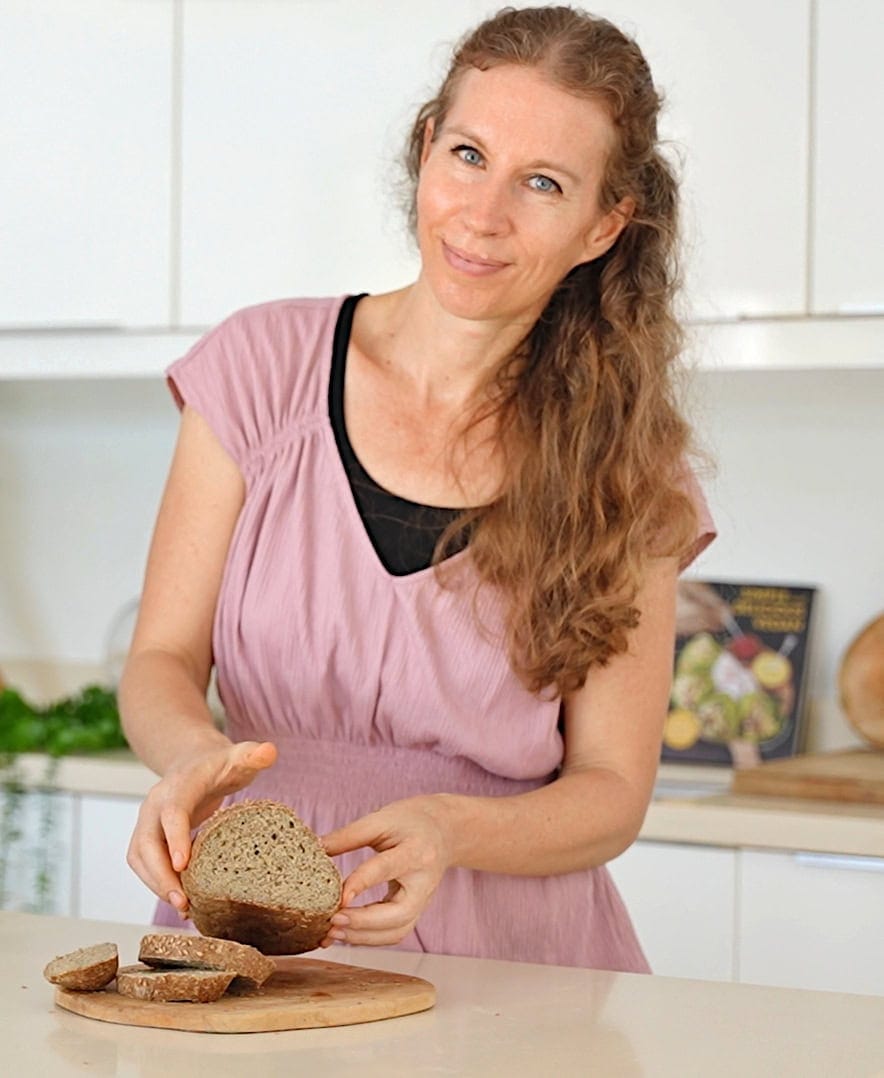
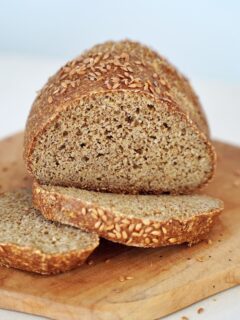
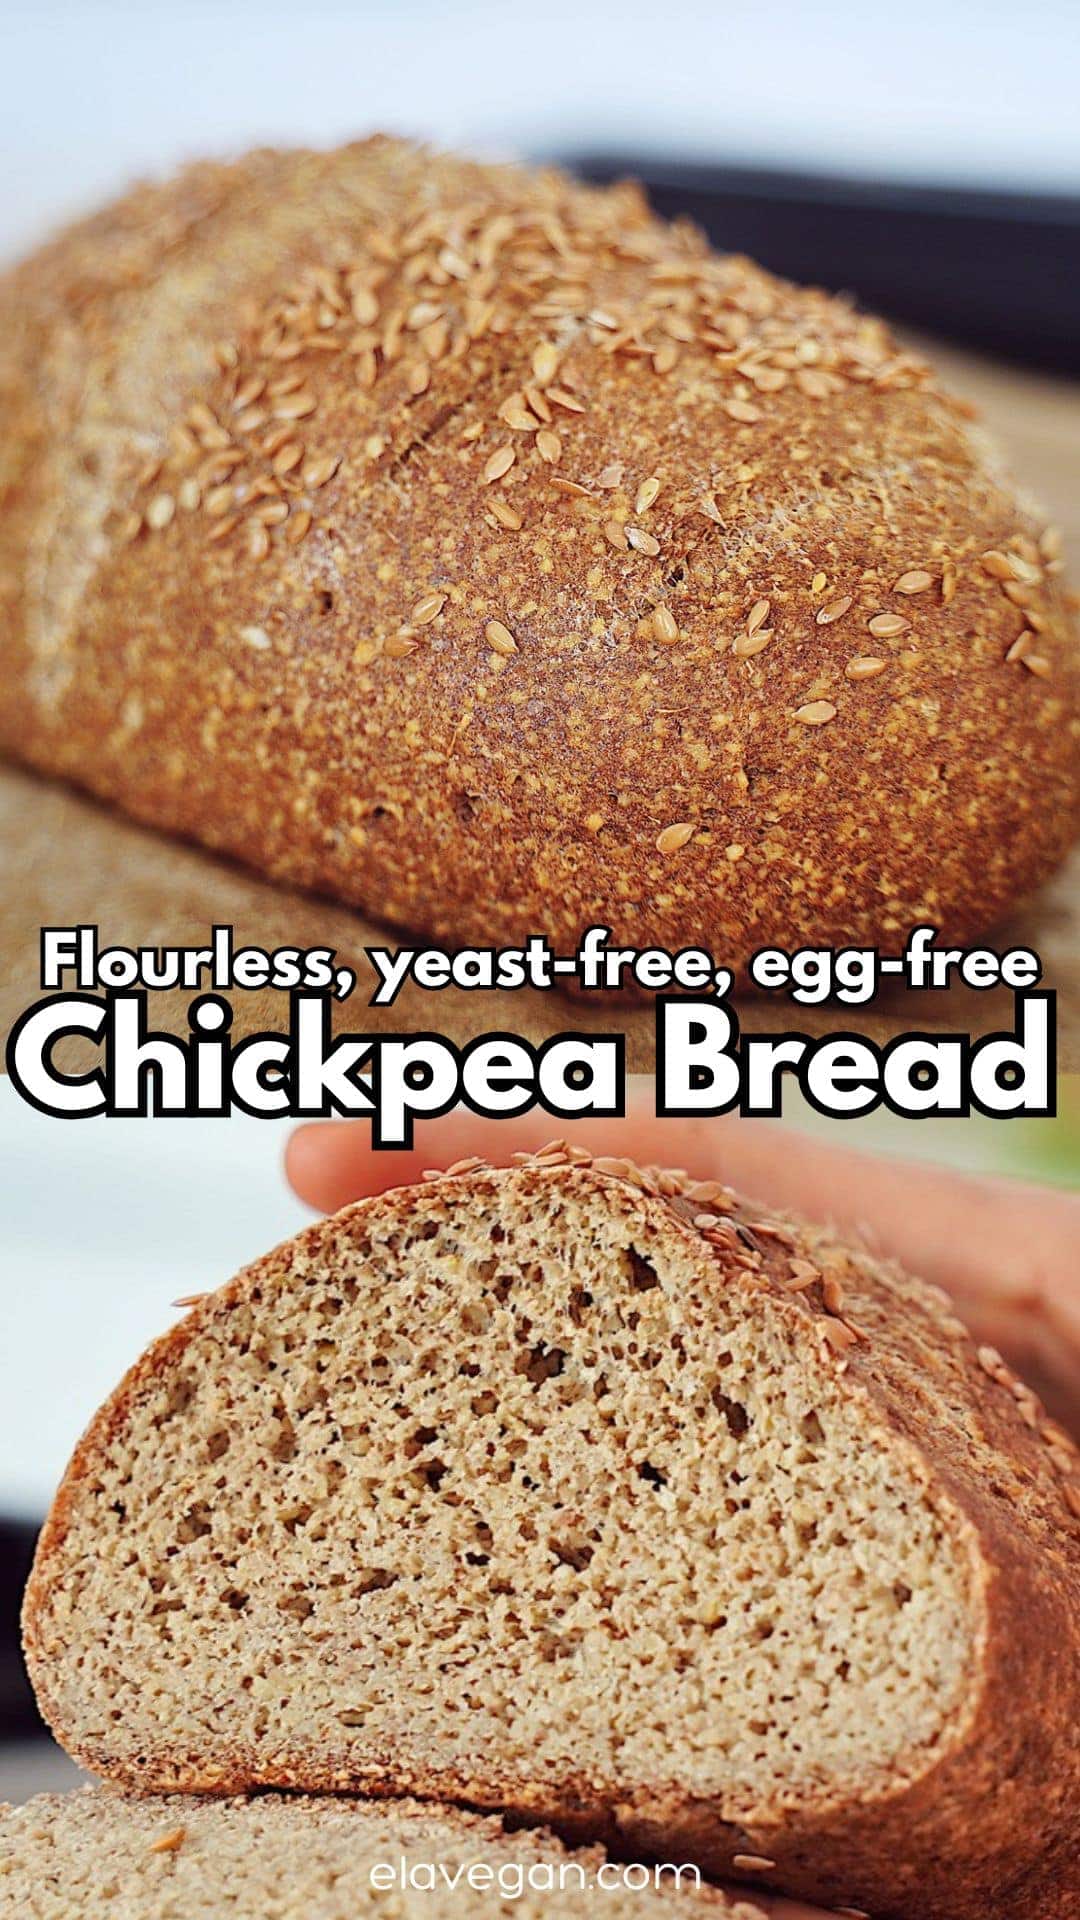
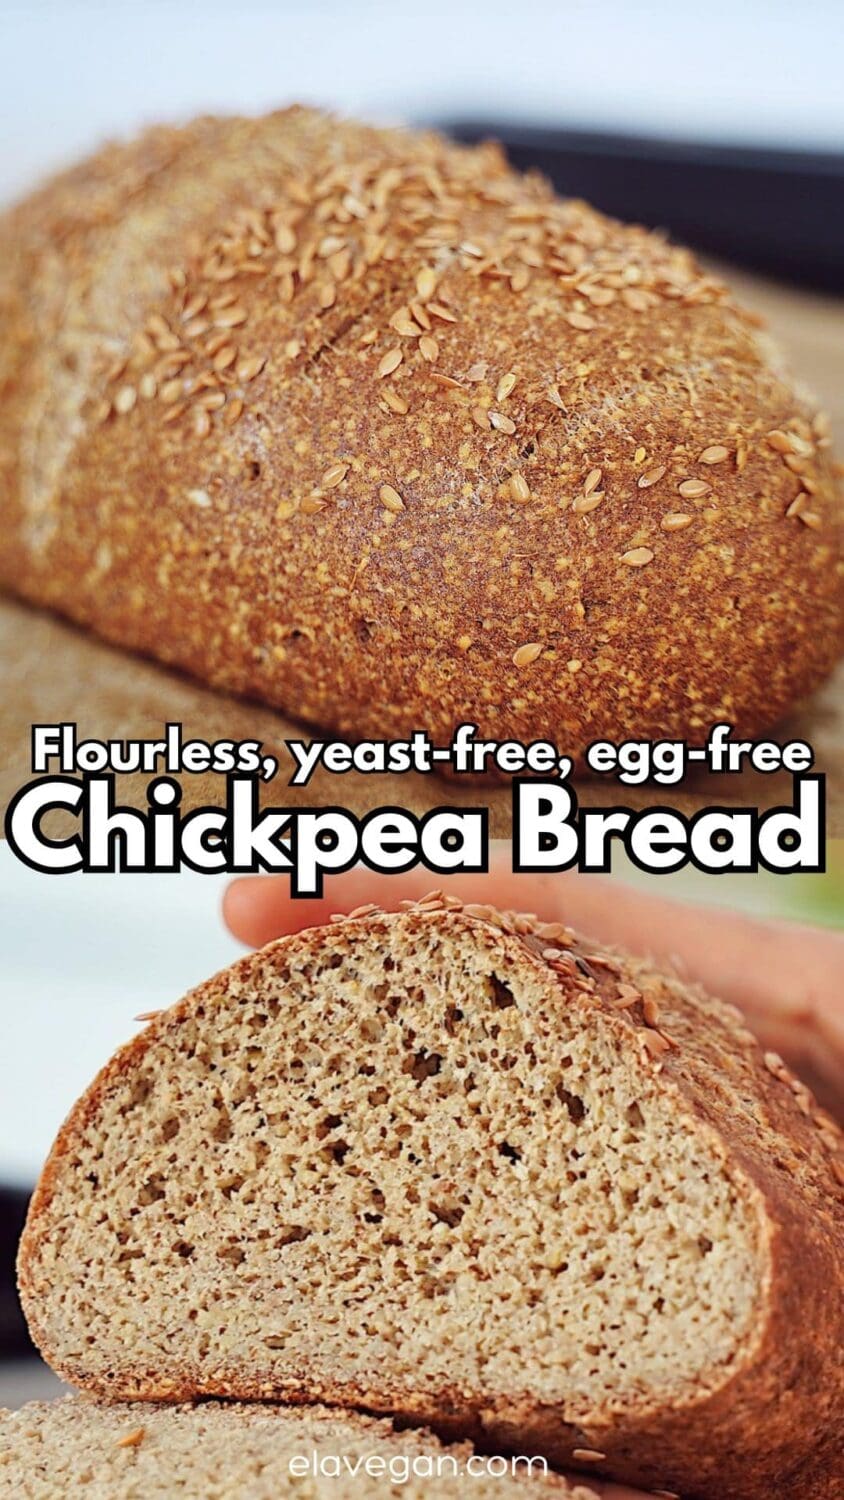
This simple chickpea bread transforms soaked chickpeas into a surprisingly fluffy yet hearty loaf that’s gluten-free, grain-free and toasts, dips, and slices well!
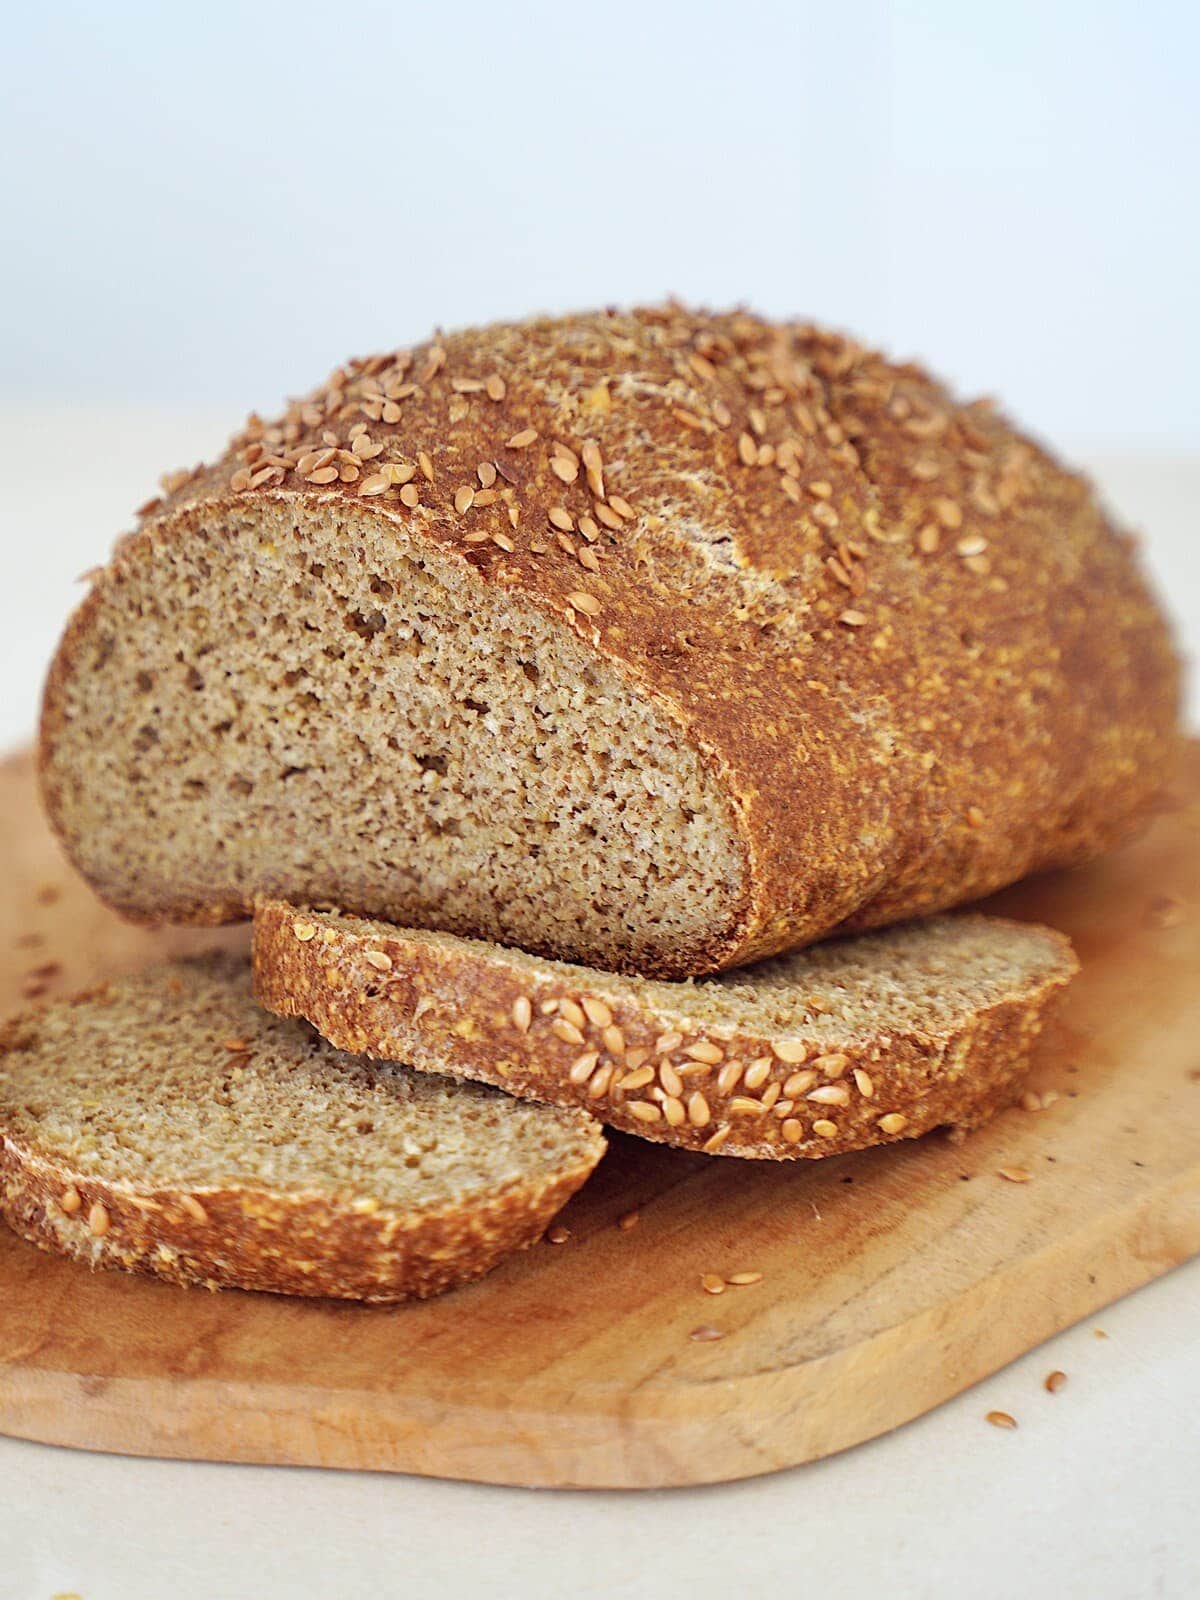
Guess who’s back with another fun gluten-free bread? After quinoa bread, lentil protein bread, and oatmeal seed bread, my recent chickpea crackers recipe led straight to this fluffy, savory flourless chickpea bread. Unlike most chickpea bread recipes, mine uses whole dried chickpeas, not chickpea flour. The result is surprisingly bread-like (soft and fluffy!) with a savory nuttiness and just enough texture to feel hearty and satisfying.
Even better, this loaf is yeast-free, requires no kneading or rising, and is incredibly easy to make. It’s also grain-free, gluten-free, sugar-free, oil-free, AND high in fiber and some protein. Plus, its savory, nutty, almost buttery flavor is perfect for slicing, toasting, and dunking.
If you love creative chickpea recipes, don’t miss my chickpea tofu, chickpea cookie dough, or chickpea blondies.
The Ingredients
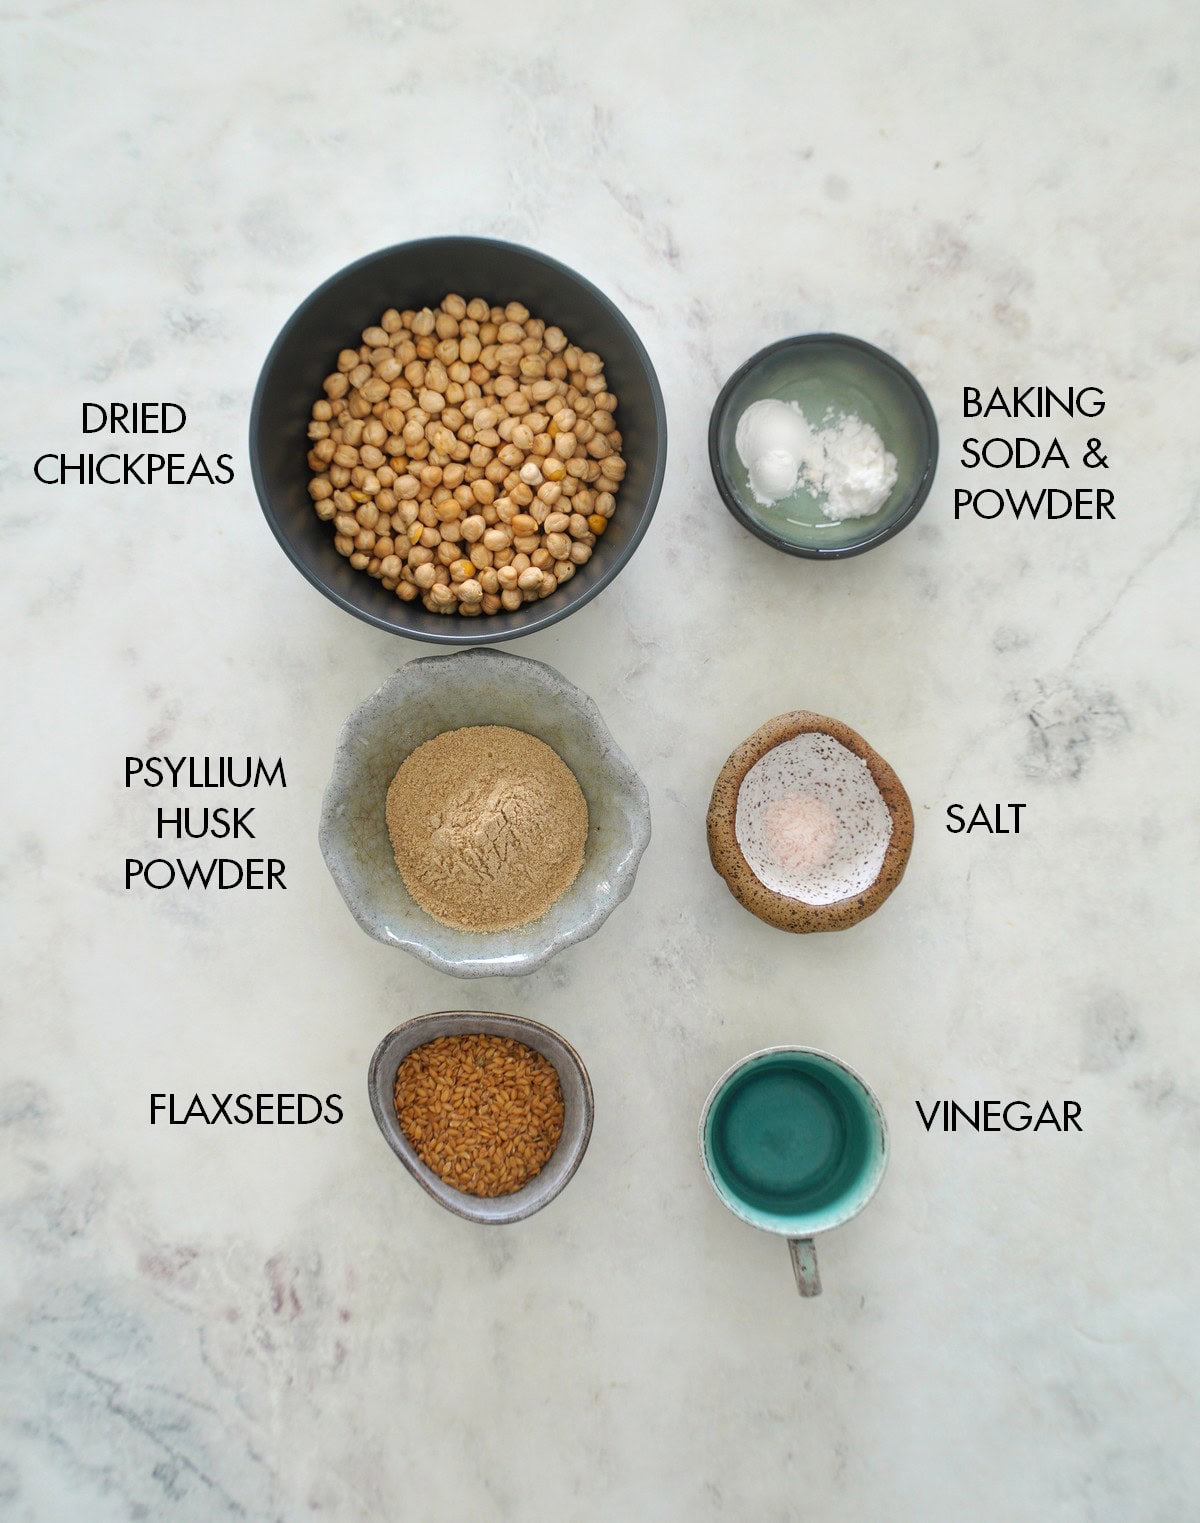
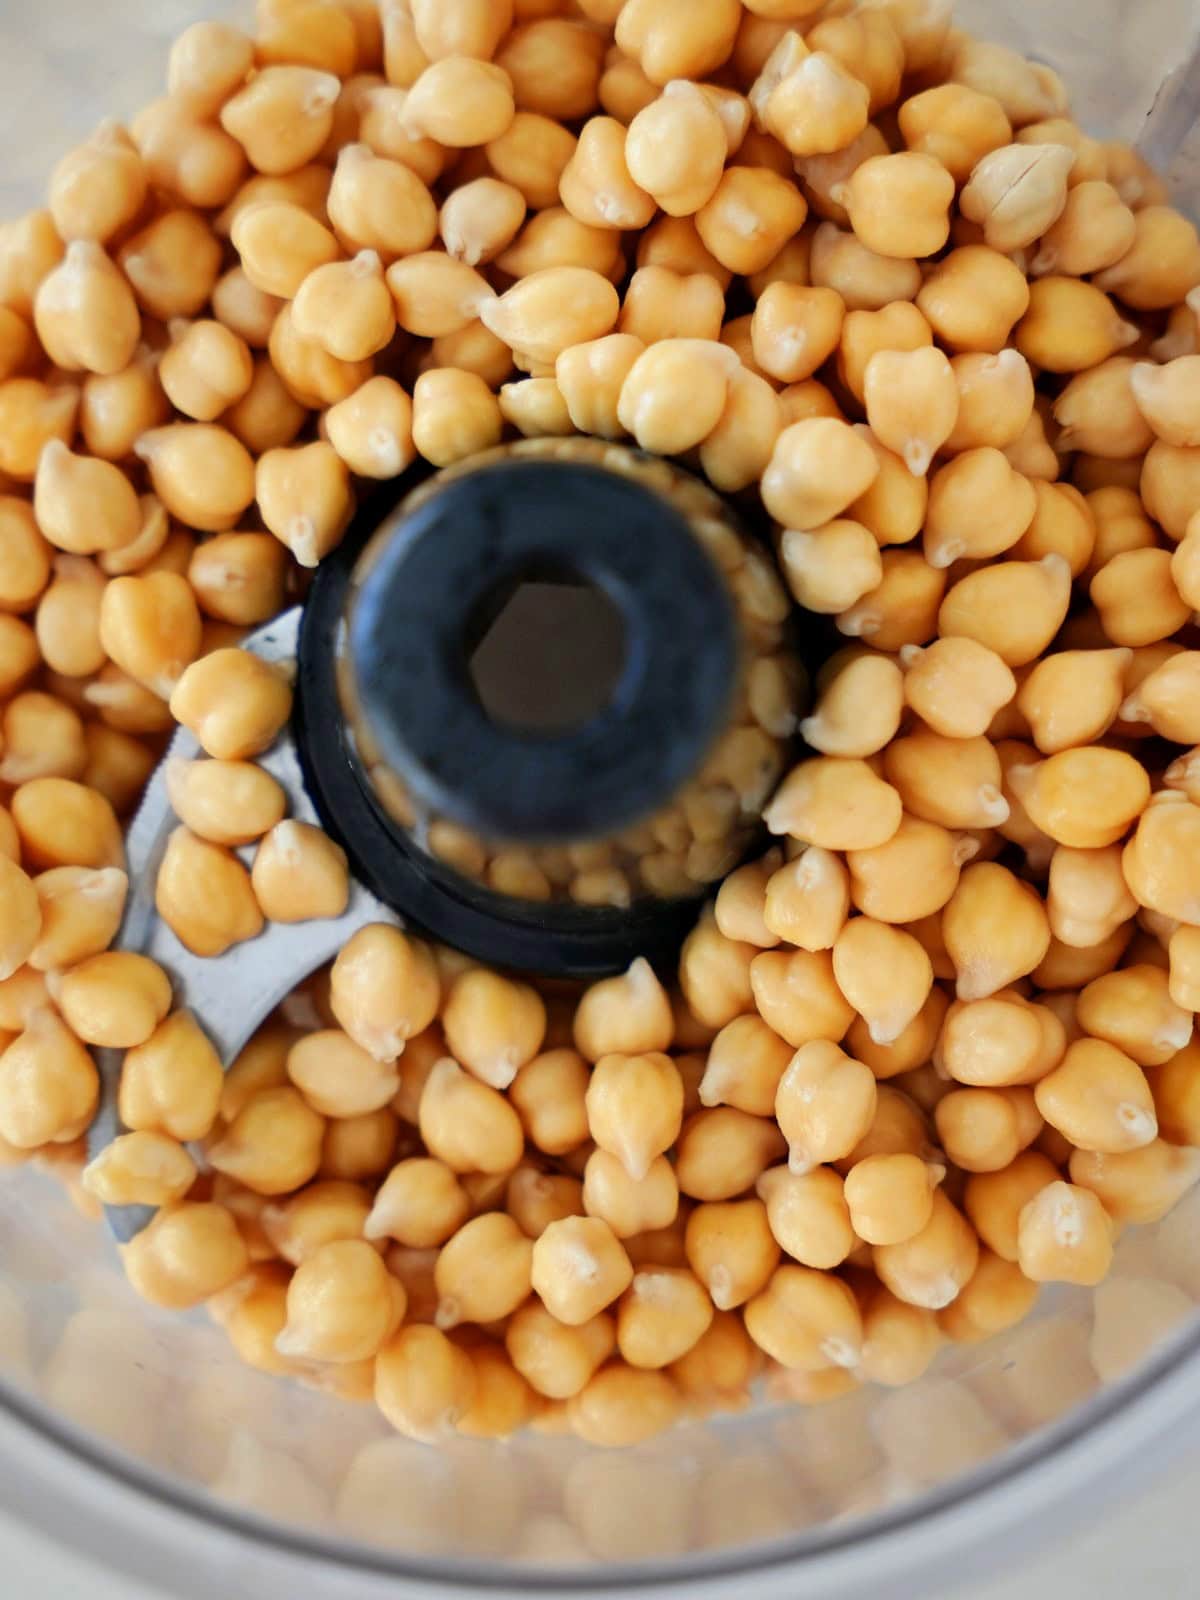
- Chickpeas: Dried chickpeas, soaked overnight, provide the best texture (like in falafels!) for this whole chickpea bread.
- Psyllium husk powder: Use POWDER, not whole psyllium husk. Otherwise, blend them into a fine powder first. This helps mimic wheat dough’s elasticity and softness.
- Ground flaxseed: To bind the loaf while adding nutrients.
- Leavening agents: This yeast-free chickpea bread uses both baking powder and baking soda for rise and fluffiness without yeast.
- Vinegar: Like apple cider vinegar (or lemon/lime juice).
- Salt
- Water
For the full ingredients list, measurements, complete recipe method, and nutritional information, read the recipe card below.
To Flavor The Bread
This savory, soaked chickpea bread makes a versatile canvas.
- Herbs: For falafel-inspired flavor, add plenty of fresh parsley and cilantro with optional dill/mint. Rosemary, thyme, or Italian seasoning also works.
- Seasonings: Garlic powder is a simple way to add savory depth. However, onion powder, smoked paprika, cumin, black pepper, and/or cayenne/red pepper flakes also work. Blends like curry powder also work. Coarse sea salt over the top is also delicious.
- Nutritional yeast: For a cheesy, umami flavor.
- Chunky add-ins: Like a few finely chopped sun-dried tomatoes, roasted garlic, caramelized onions, preserves lemon peel, and/or olives. Pat them dry.

How to Make Chickpea Bread
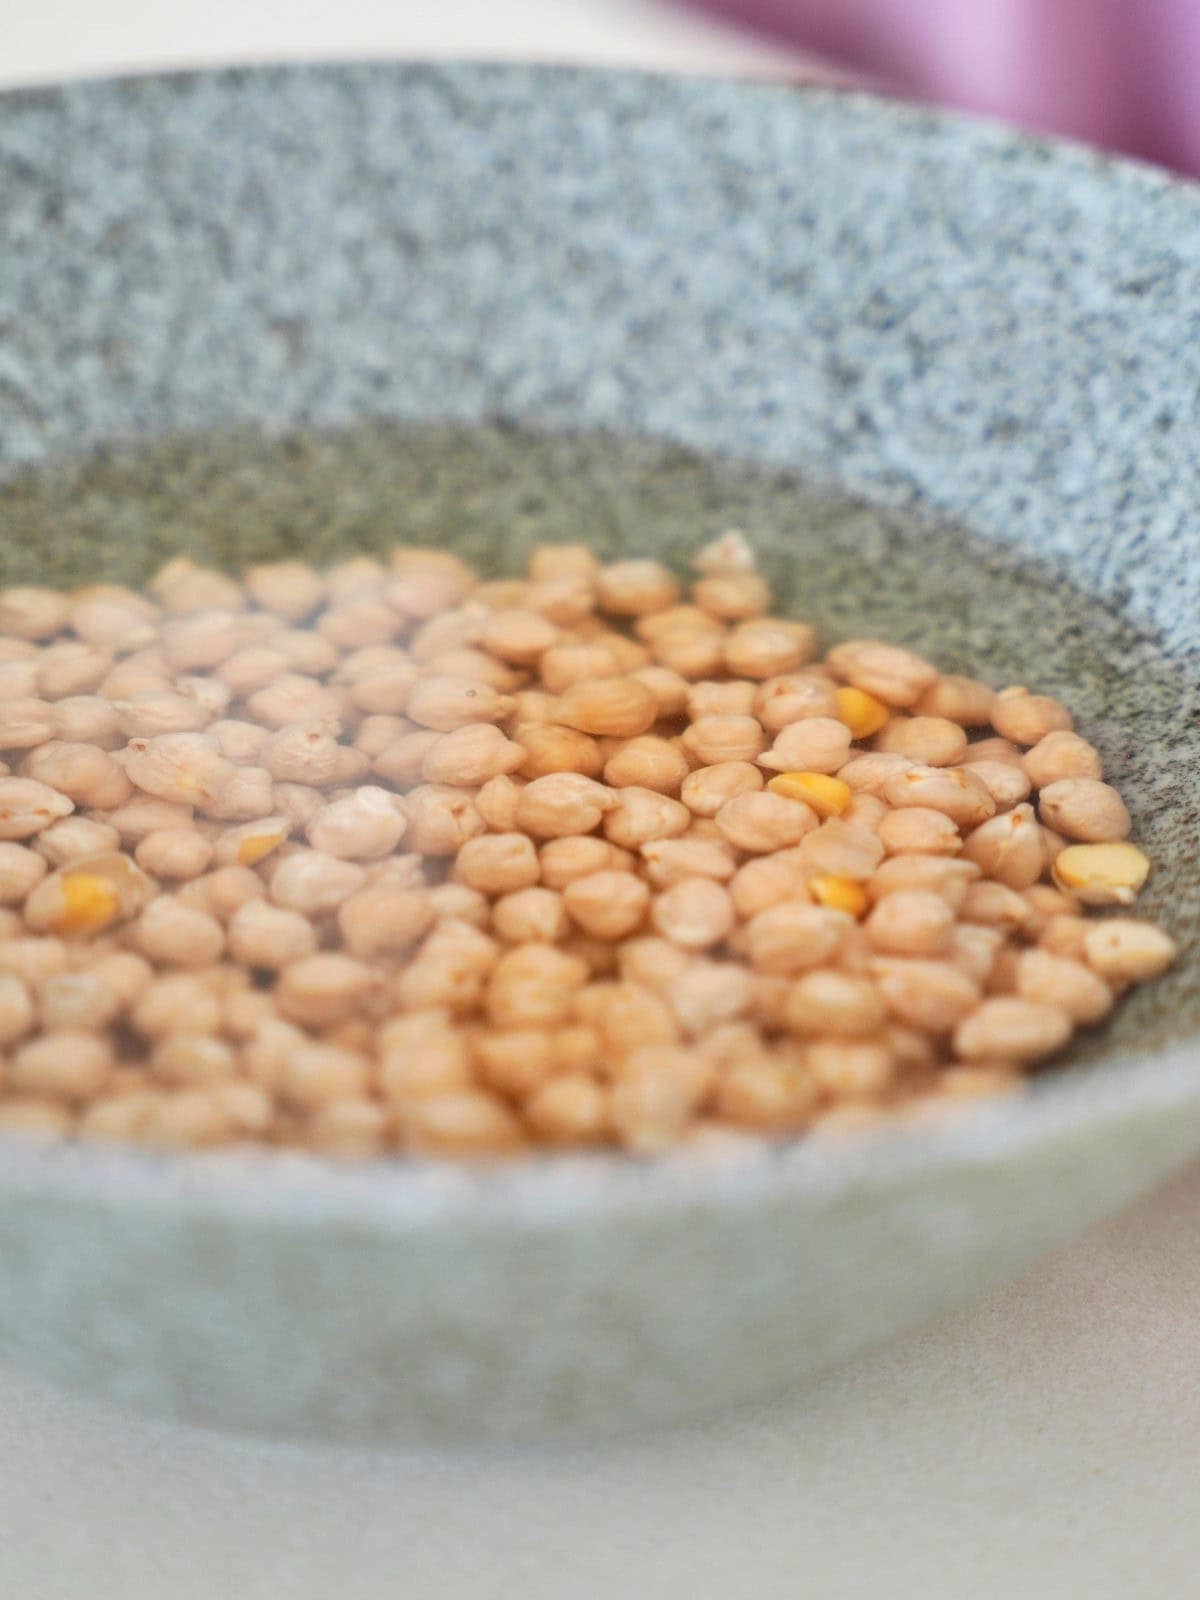
- First, soak the dried chickpeas overnight (9-12 hours) in plenty of water until they have noticeably expanded and roughly doubled in weight. Then, drain and rinse thoroughly.
- Next, preheat the oven to 360F/180C and line a baking sheet with parchment paper.
- Blend the chickpeas and water in a food processor until smooth, pausing to scrape down the sides as needed.

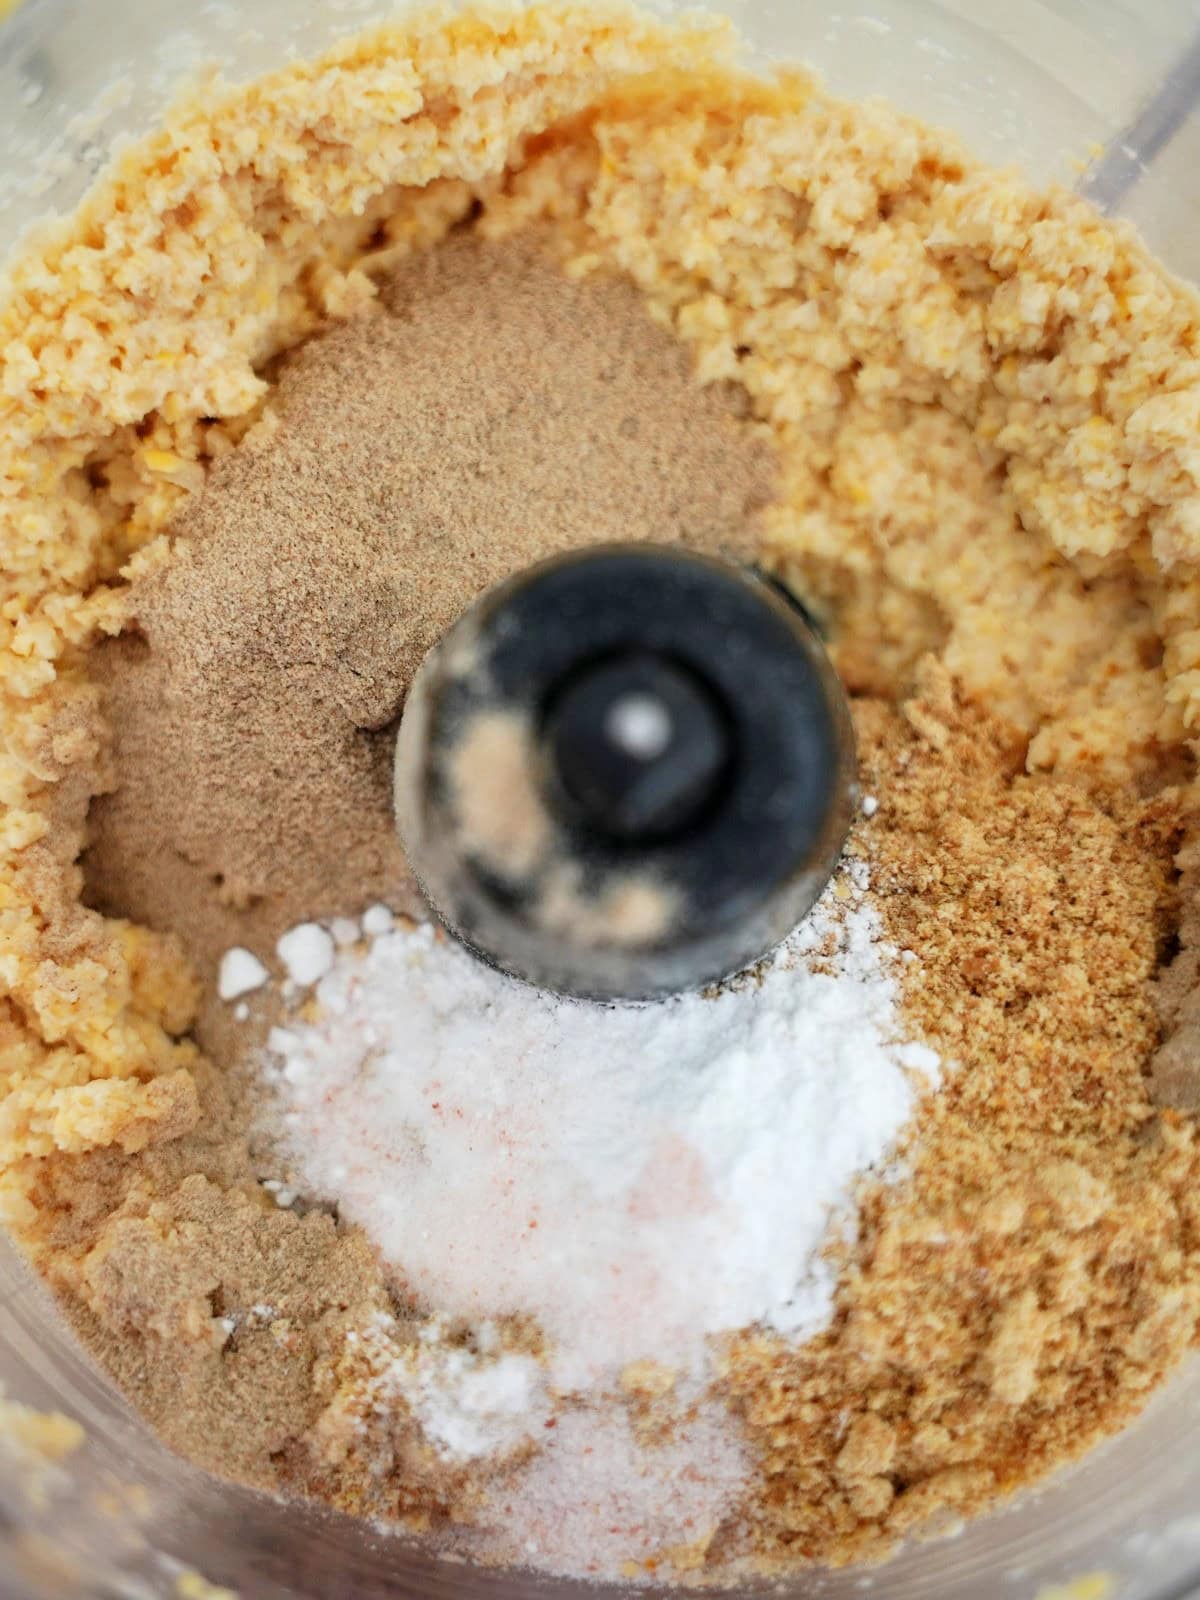
- Add the ground flaxseeds, psyllium husk powder, salt, baking powder, and baking soda. Then, pour the vinegar directly over the baking powder and baking soda.
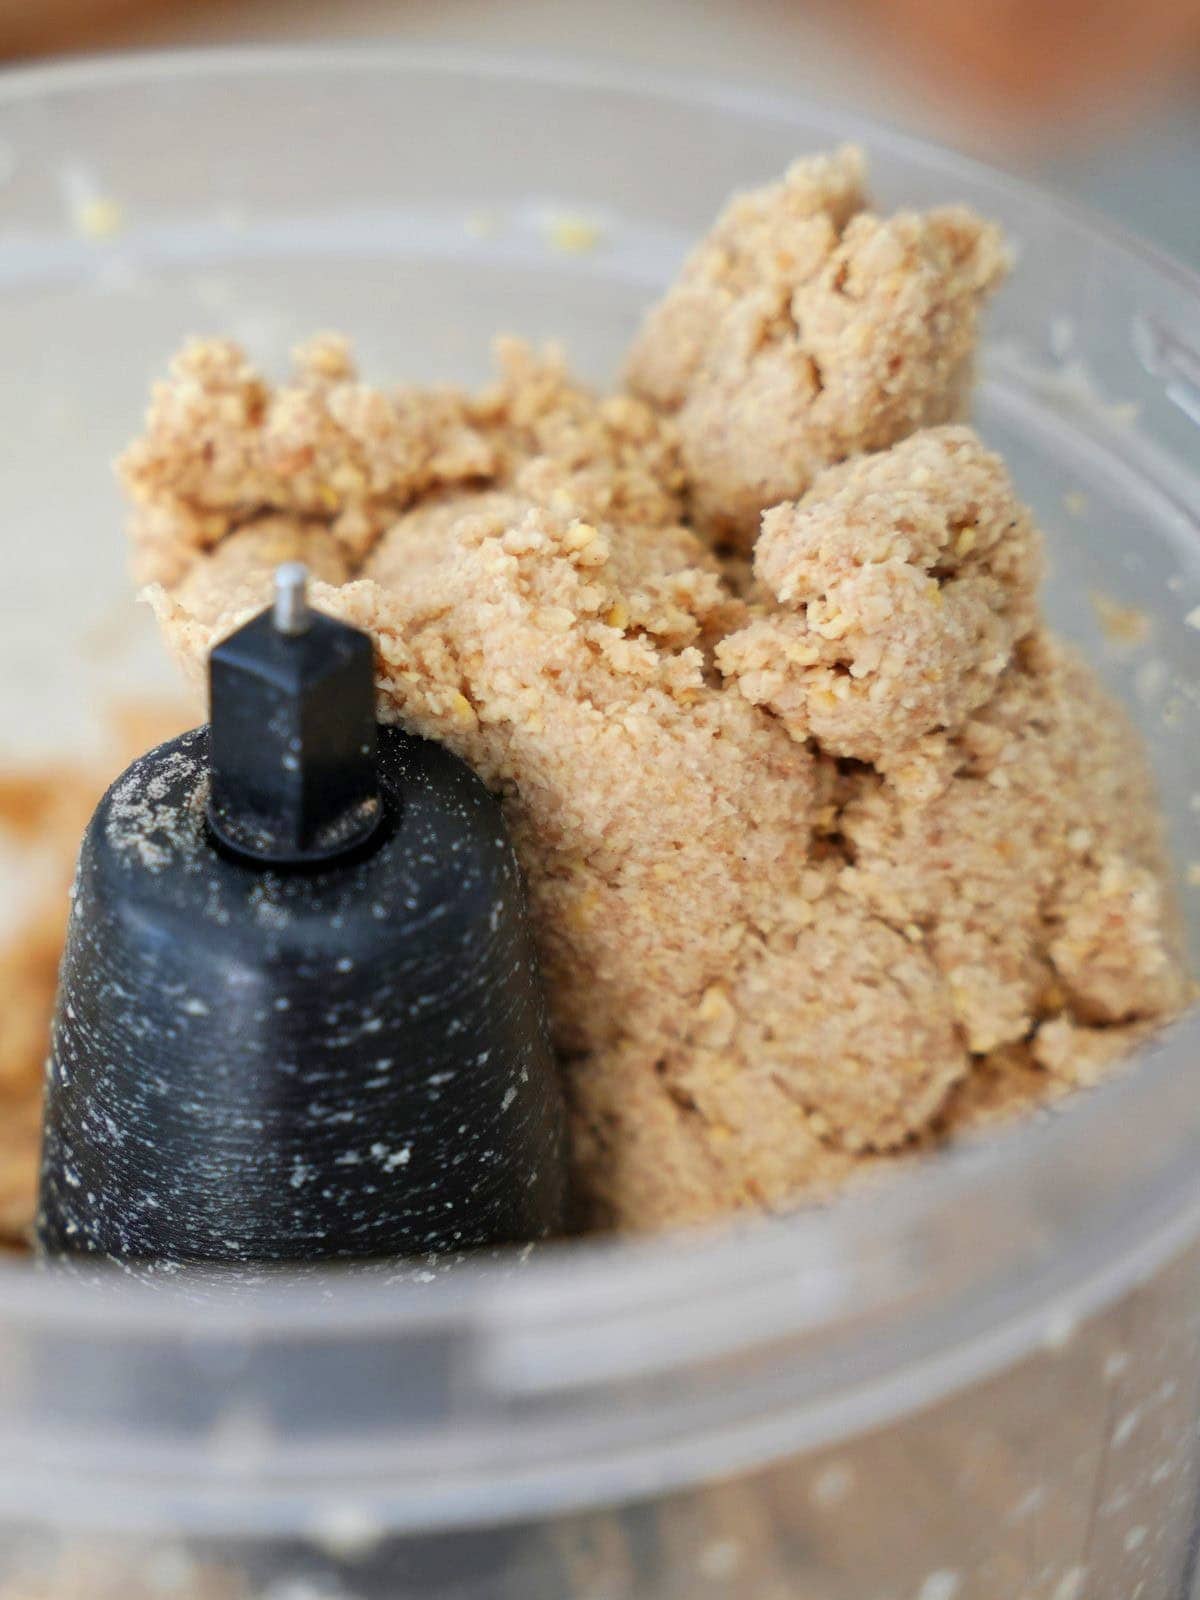
- Blend again, scraping down the sides if needed. The batter will thicken quickly.
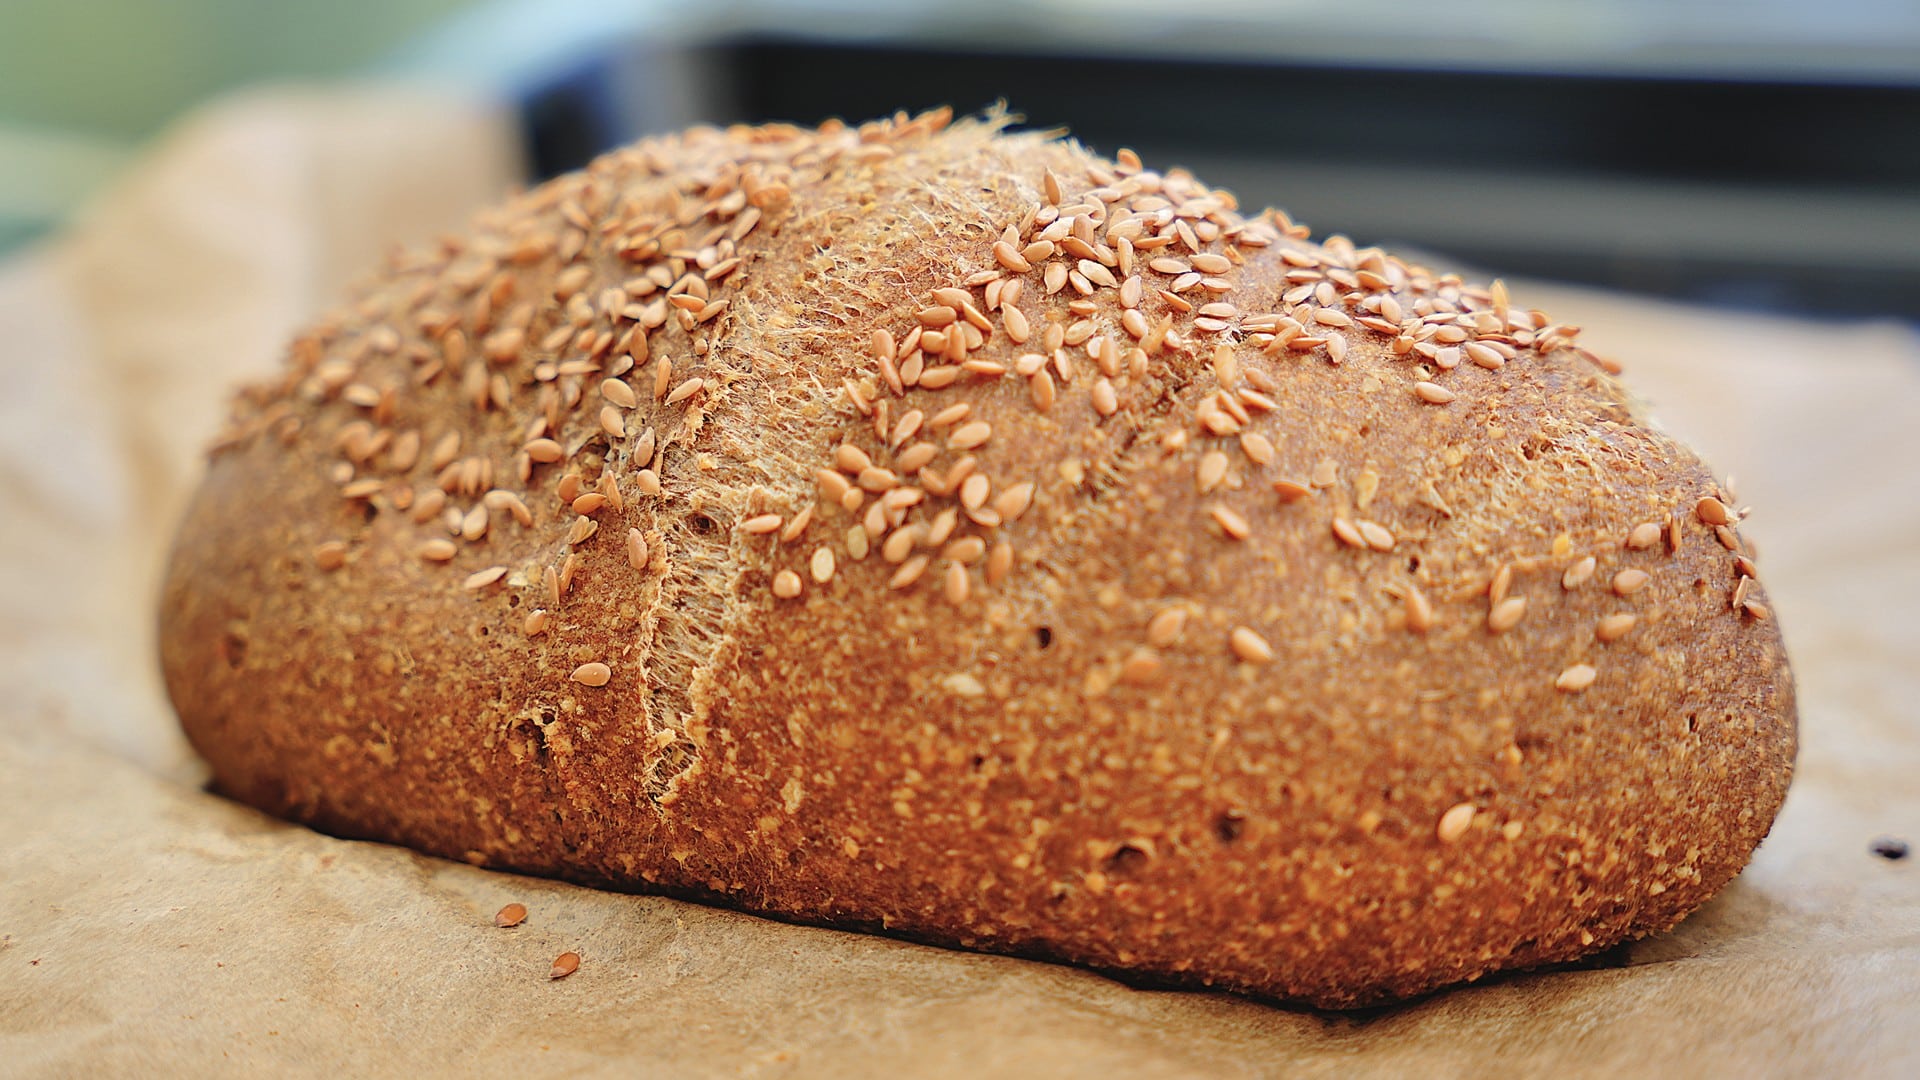
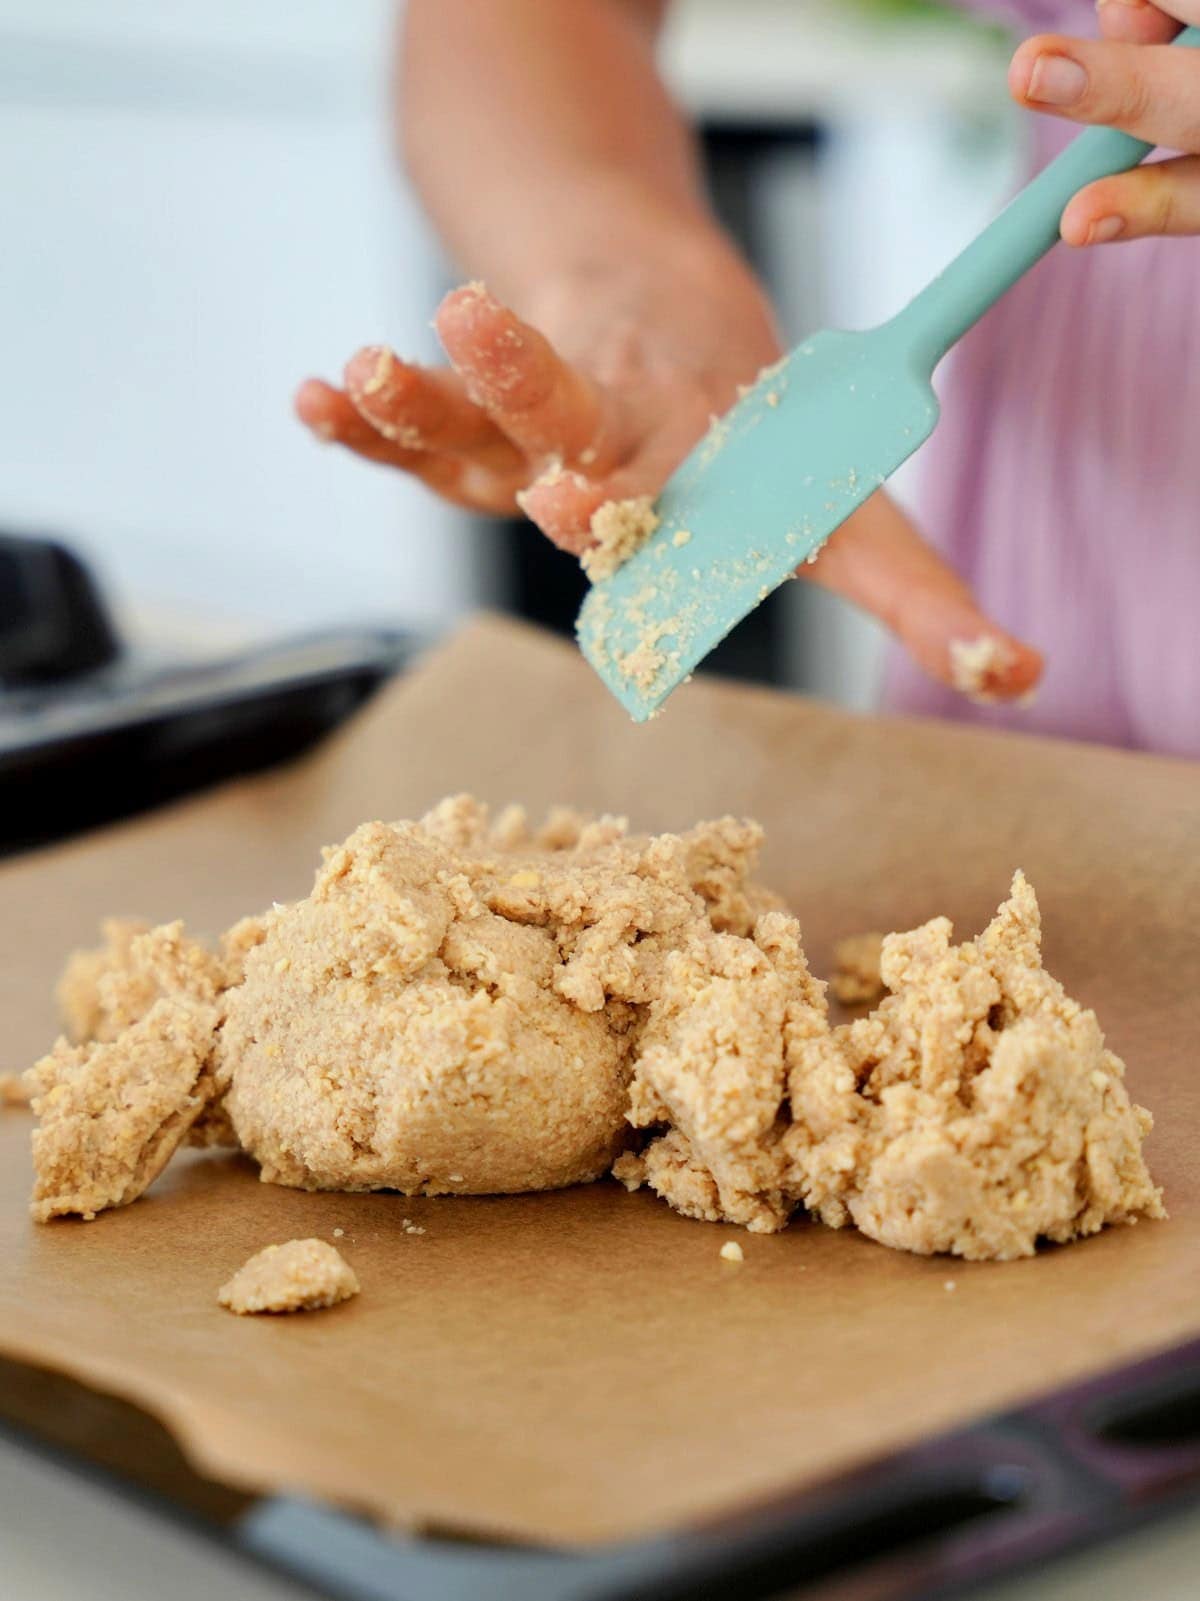
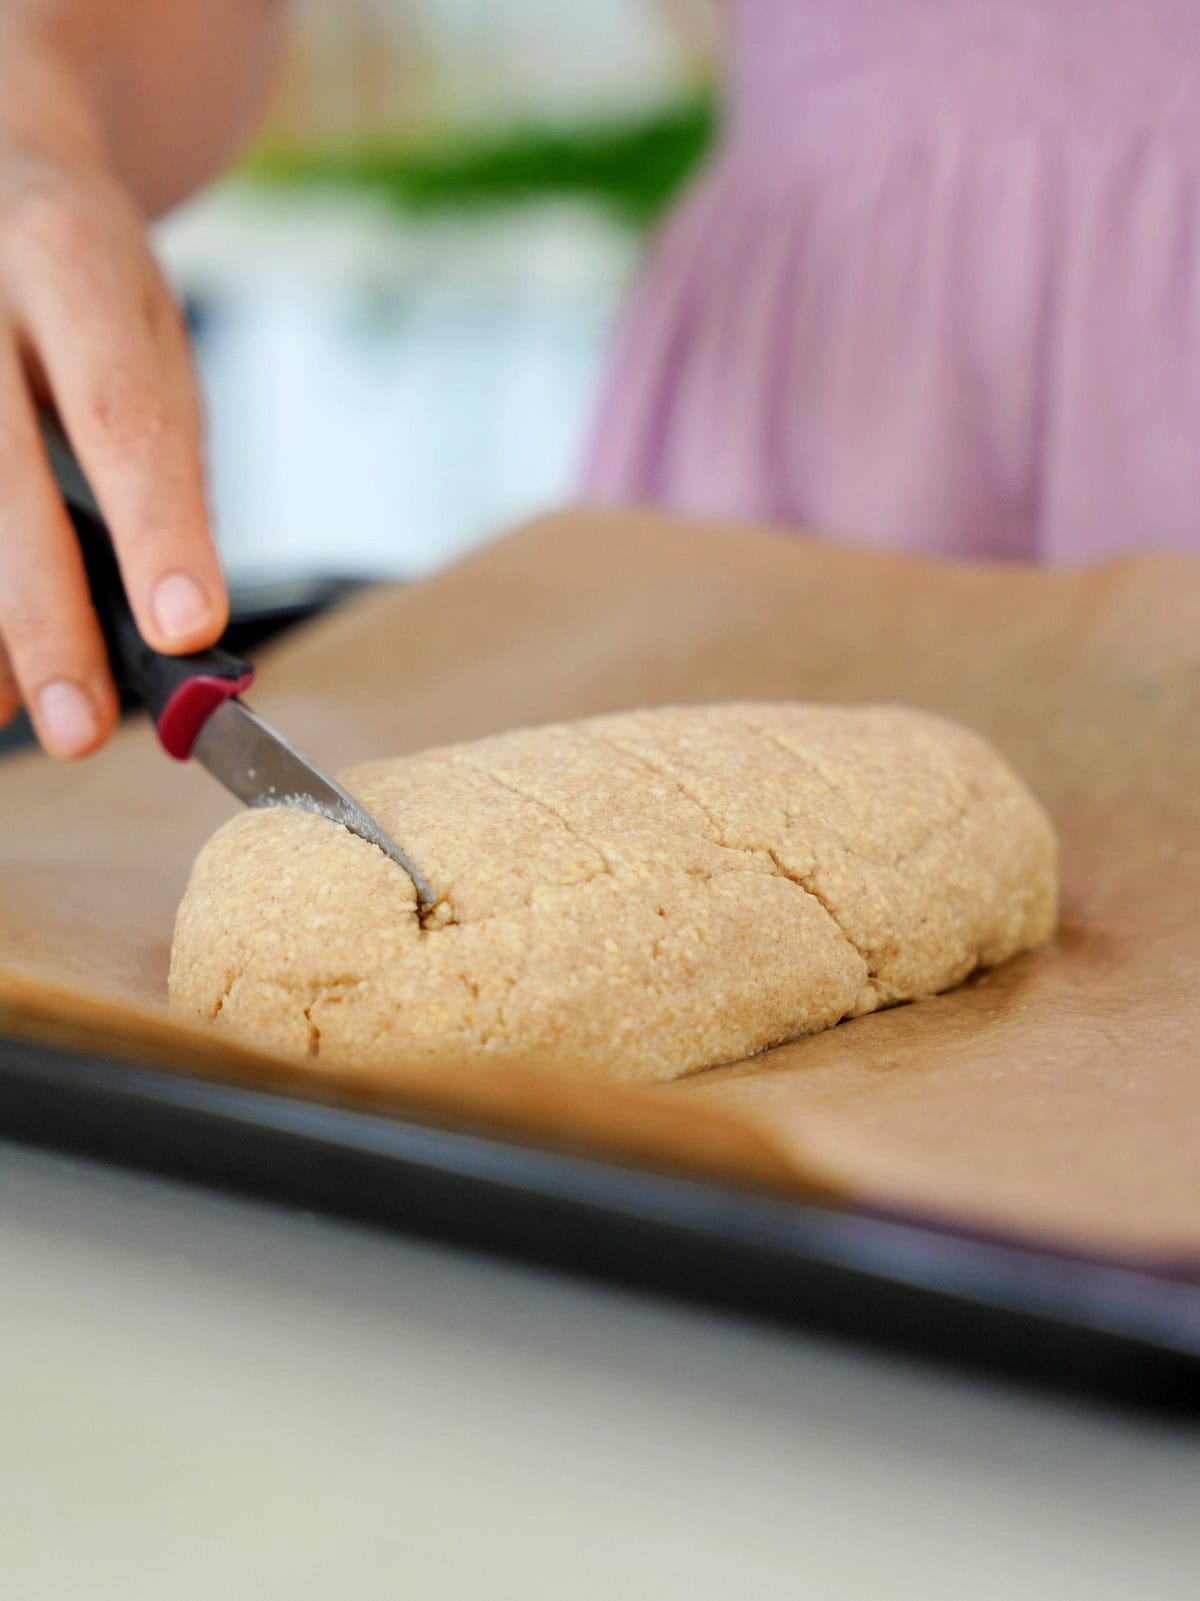
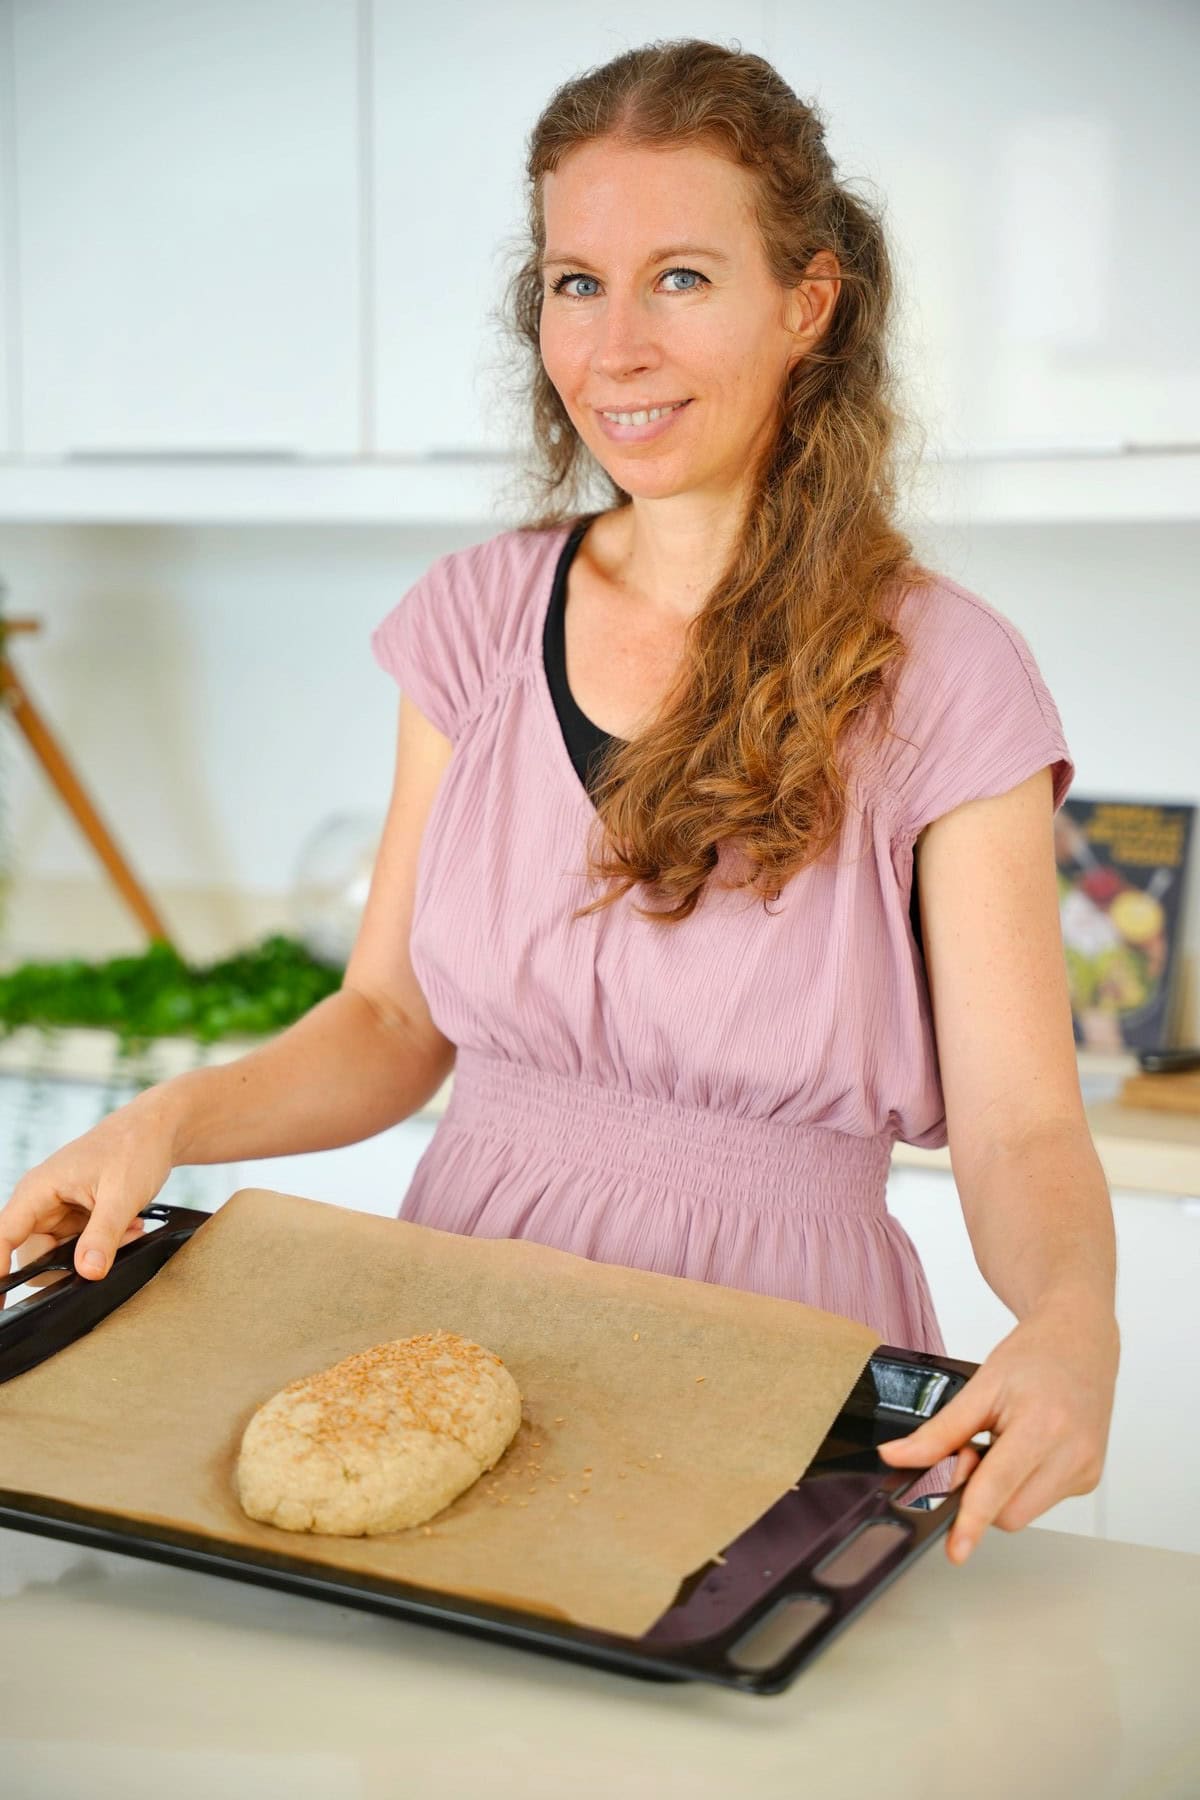
- Transfer the dough onto the prepared pan and shape it by hand into a round loaf, lightly wetting your hands to smooth the top and sides.
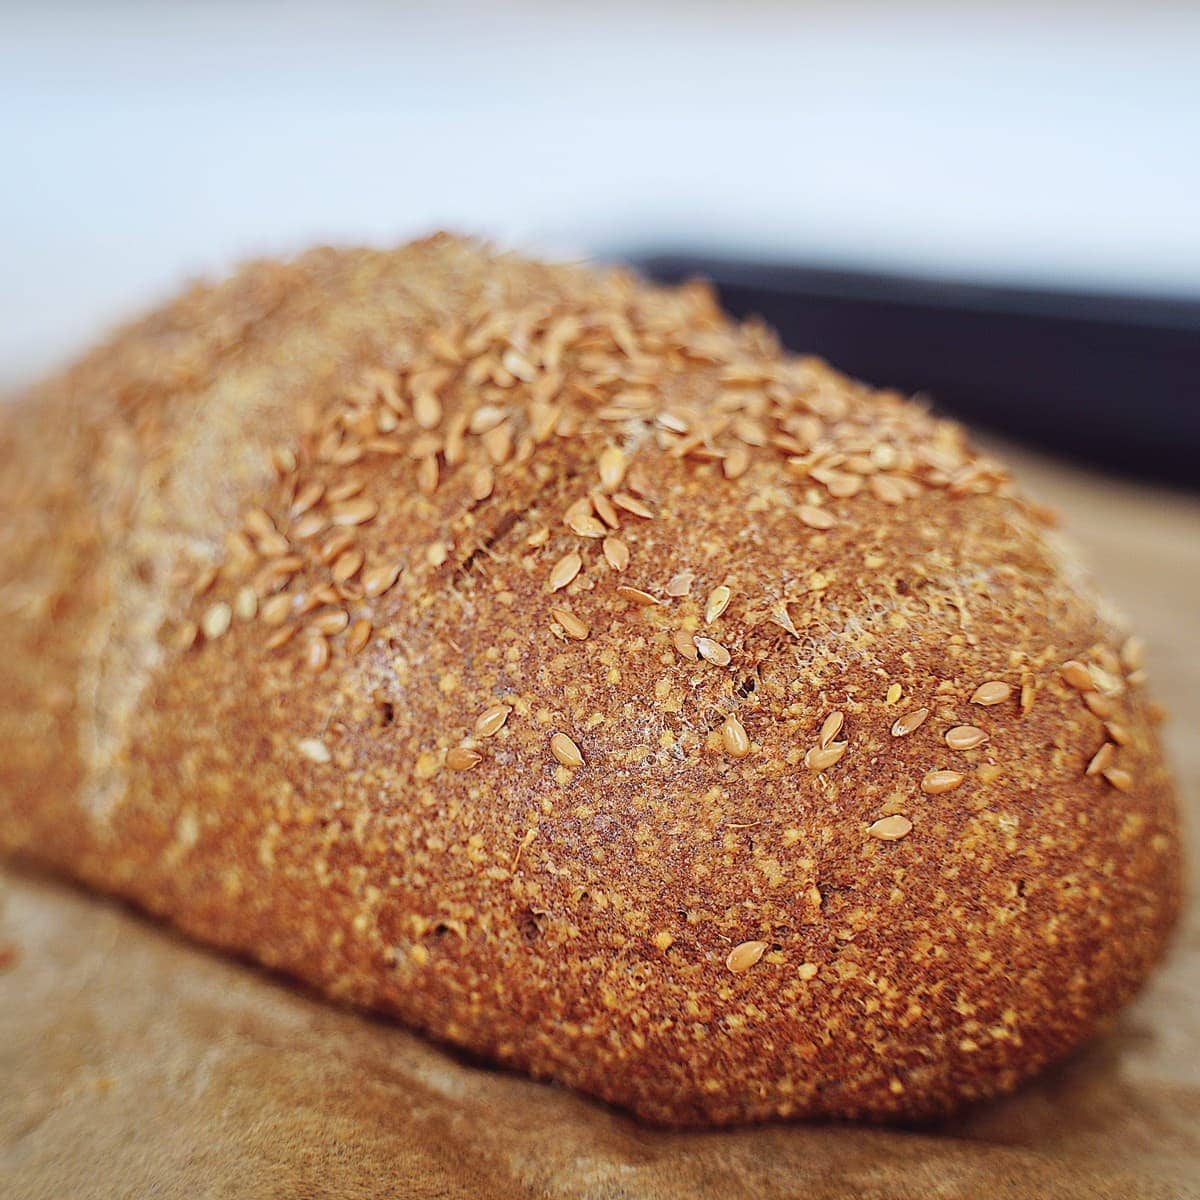
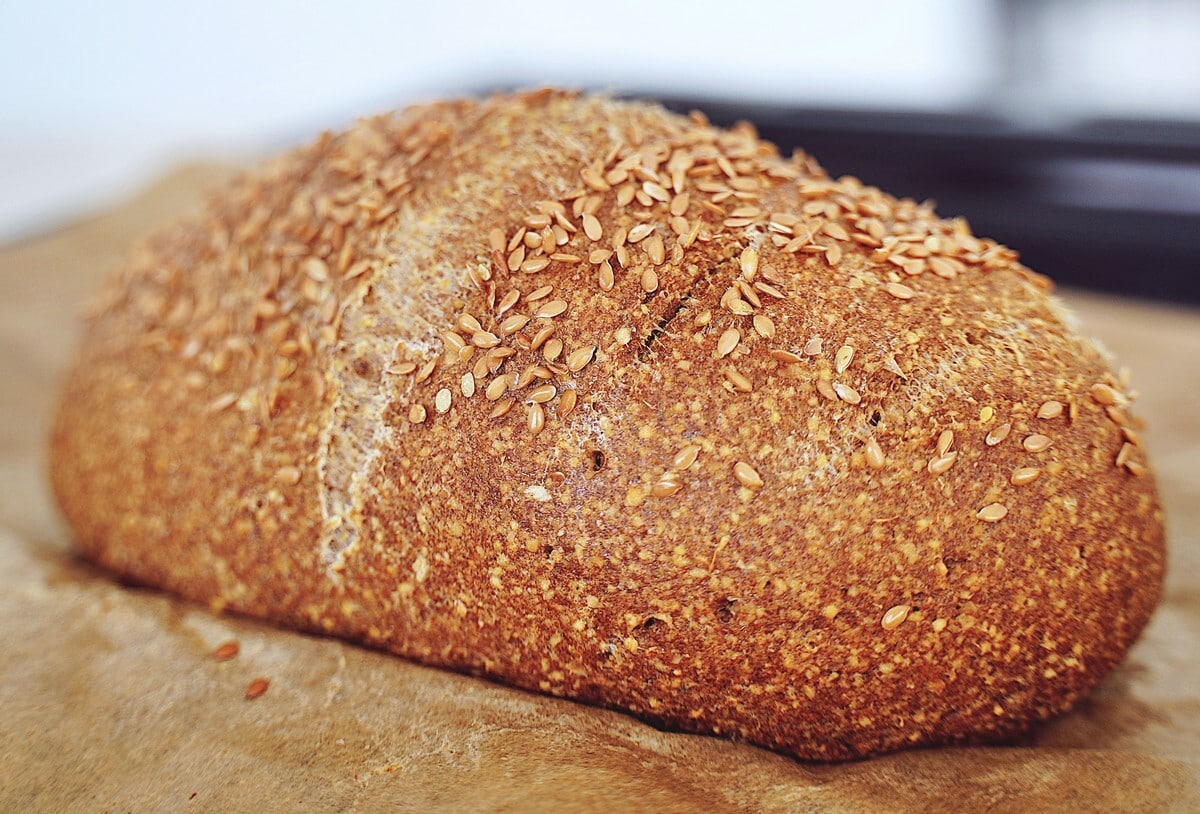
- Score the top with a knife. Lightly wet the surface again, optionally sprinkle with flaxseeds, and bake for 50 to 60 minutes.
When ready, a skewer inserted into the middle should come out clean.
- Let the chickpea bread cool completely, then slice and enjoy!
What To Serve With Chickpea Bread?
Enjoy this hearty vegan chickpea bread for topping, toasting, and sandwiches, including:
- Buttered (with vegan soups, stews, and vegan cheese fondue)
- Breakfast toppings (like scrambled tofu and/or sauteed mushrooms)
- Cheese (vegan cream cheese or vegan ricotta cheese with fresh veggies)
- Avocado (Use it for many delicious avocado toast variations)
- Mezze (like hummus, lentil hummus, garlic white bean dip, etc., with cucumber, tomato, olives, roasted red peppers, pickles, etc.)
- Bruschetta style (with tomato, salt, and olive oil)
Storage Instructions
Store: In an airtight container at room temperature for 2-3 days or in the fridge for up to 5 days.
Freezer: Whole or sliced, with parchment between the slices, in a Ziplock for 3 months. Thaw on the counter for several hours or use the defrost setting in a microwave/toaster.
FAQs
Can I make canned chickpea bread?
No. Soaked raw chickpeas behave very differently from cooked canned chickpeas. They still contain their natural starch, which provides structure and binding when baked. Canned chickpeas are much softer and can’t create the same bread-like texture.
Can I omit the psyllium husk powder?
No, this is an important binder and affects the texture of the bread.
Can I change the shape or size of the loaf?
Absolutely! Feel free to make different-shaped and sized loaves/ a baguette. Adjust baking time accordingly.

Recipe Notes
- For the best results: Use metric measurements for the best accuracy.
- When soaking chickpeas: Make sure the chickpeas are covered with plenty of water, as they swell a lot and absorb a lot of liquid. Then drain thoroughly and rinse to remove any ‘raw’ flavor.
- Shape the loaf: It isn’t like yeast dough, so shape it to your desired shape. It rises wonderfully, but won’t spread.
- Don’t slice too early: Cooling helps ‘set’ the loaf.
More Gluten-free Bread Recipes
- The BEST gluten-free bread
- Keto flaxseed bread
- Red lentil bread rolls
- Gluten-free seeded bread
- Gluten-free French Bread
- Easy Gluten-free Pita Bread
- Gluten-free Naan Bread
If you try this chickpea bread recipe, I’d love a comment and ★★★★★ recipe rating below. Also, please don’t forget to tag me in recreations on Instagram or Facebook with @elavegan #elavegan—I love seeing them.
Chickpea Bread (Gluten Free, No Yeast)
Video
Ingredients
- 1 cup (200 g) dry chickpeas (not canned) (400 g after soaking for 9 hours)
- ¾ cup (180 ml) water
- 4 Tbsp (40 g) psyllium husk powder (not whole psyllium husk)
- ¼ cup (25 g) ground flaxseeds
- 1/2-3/4 tsp salt
- 1 ¼ tsp baking powder
- ¾ tsp baking soda
- 1 ½ Tbsp (16 g) vinegar or lemon juice/ lime juice
Instructions
- You can watch the video for visual instructions.First, soak the dried chickpeas overnight (9-12 hours) in plenty of water until they have noticeably expanded and roughly doubled in weight. Then, drain and rinse thoroughly.
- Next, preheat the oven to 360℉/180℃ and line a baking sheet with parchment paper.
- Blend the chickpeas and water in a food processor until smooth, pausing to scrape down the sides as needed.
- Add the ground flaxseeds, psyllium husk powder, salt, baking powder, and baking soda. Then, pour the vinegar directly over the baking powder and baking soda.
- Blend again, scraping down the sides if needed. The batter will thicken quickly.
- Transfer the dough onto the prepared pan and shape it by hand into a round loaf, lightly wetting your hands to smooth the top and sides.
- Score the top with a knife. Lightly wet the surface again, optionally sprinkle with flaxseeds, and bake for 50 to 60 minutes.
- Let the chickpea bread cool completely, then slice and enjoy!
Notes
Nutrition information is an estimate and has been calculated automatically
 „Simple and Delicious Vegan“ Cookbook by ElaVeganCLICK HERE to order!
If you are using Pinterest, feel free to pin the following photo:
Do you think that I could use Xantham Gum instead of Psyllium Husk?
I wouldn’t recommend it. Xanthan gum behaves very differently from psyllium husk.
Psyllium binds a lot of water and creates structure, almost like gluten, which is exactly what this bread needs. Xanthan gum is much stronger in tiny amounts and tends to make breads gummy, dense, or rubbery when used as the main binder, especially in yeast free or bean based breads like this.
I SOAKED THE CHICKPEAS OVERNIGHT ON SATURDAY BUT DIDN’T HAVE TIME TO BAKE YESTERDAY.. IS IT OKAY TO DO TODAY?
Yes, that’s totally fine 🙂
Just drain them well and give them a quick rinse. Make sure they still smell fresh (neutral, not sour). If they do, you’re good to go and can bake today without any issues.
This looks amazing and I can’t wait to try it out. Can I use dried cannellini beans for this (soaked as per the recipe)?
Thank you
Hey Kirsten, I haven’t tried dried cannellini beans yet, I think they should work fine too, but not 100% sure. 🙂
Love this bread! My food processor takes a long time to mix the batter to smooth. Is it possible to mix the whole loaf in the Vitamix blender? Thank you!
Hey Christine, so glad you love it! I recommend blending the soaked and well drained chickpeas with the water in the Vitamix until smooth. After that, pour it into a bowl and stir in the rest by hand. This way you avoid overblending and the batter keeps the right texture, which really helps with the rise 😊
This is very good and so easy! I especially appreciate how you provided weights of the ingredients. I love the convenience of being able to weigh and blend everything in my Thermomix! This is definitely a keeper!
Thank you so much, Julie! 🤍 I’m really happy you enjoyed it.
And yes, weighing everything makes life so much easier, especially with recipes like this. Love that you made it in the Thermomix, that’s actually perfect for it. So glad it’s a keeper for you 😊
I made the bread as described and it rose like crazy! But kind of deformed despite my making slits all along the top. I let it cool and when I cut it the top was hollow! How do I get it to rise but not have the giant air gap? I’m super excited to get this to work. It will be a very helpful addition to my healthy eating plan. Thank you.
That usually means it rose too fast on the outside while the inside couldn’t set quickly enough. Totally fixable though 🙂
A few things that help prevent that big hollow gap
• Slightly reduce the leavening next time, especially the baking soda
• Make sure the chickpea mixture is blended really smooth and evenly, this helps the crumb set instead of trapping one big air pocket
• Shape the loaf a bit flatter rather than very tall, tall loaves are more prone to hollow tops
• Bake at a slightly lower temperature for a little longer so it cooks more evenly from the inside out
• Let it cool completely before slicing, cutting too early can exaggerate the hollow effect
You’re very close already. The fact that it rose like crazy is a good sign. Once the balance is right, the crumb evens out and you get that fluffy but stable texture. So happy you’re excited about it 🤍
Hello! This recipe looks delicious. Do you happen to know the measurements in cup teaspoons/tablespoons/ml? I’d really like to make this but I have no kitchen scale to measure the weight.
Thanks.
Hi Ash, I have updated the recipe card, you can now see both, imperial and metric measurements.
The recipe looks fabulous…
Any tips for baking it at 8200 feet???
Thank you so much 😊
Yes, at 8,200 feet a few small tweaks can really help.
High altitude usually means things rise faster and dry out more easily. I’d suggest slightly reducing the baking soda and baking powder, about 10 to 15 percent less. You may also need a bit more liquid, one or two tablespoons of water can be enough.
Bake at the same temperature, but check it a little earlier, ovens at altitude can bake faster. If the outside sets too quickly, you can loosely cover it with foil for the last part of baking.
And make sure the batter is smooth and well blended, that helps with structure at altitude too.
HI! I just made 2 loaves. One was as you suggested with more water and a little less leavening and at 360 degrees. Unfortunately it seemed not to rise/expand as much as yours did. My second loaf I raised the oven temp to 385 degrees as suggested on the high altitude baking site. WOW!!! Both are delicious but the extra heat definitely made it puff up with no collapsing. I’m thrilled to have this recipe. I look forward to your others. Many blessings Michaela!!!
That’s amazing feedback, thank you so much for sharing this.
I love that you experimented and figured out what works best at your altitude. The higher heat tip is gold and super helpful for anyone else baking at high altitude too. And I’m really happy to hear that both loaves were delicious, even better that the second one puffed up nicely with no collapse.
Thank you for taking the time to come back and report your results. It truly means a lot. Wishing you many more successful loaves and happy baking 🤍
PS… For high altitude bread baking 195-200 internal temperature was recommended and that worked perfectly here.
That’s such a helpful tip, thank you for adding it 🤍 I’m sure this will help a lot of others who are baking at elevation too. Really appreciate you sharing your experience.
I look forward to making this for my daughter. I am confused about how much water to add to the blender. sorry if I missed it!
Hi, it’s ¾ cup (180 ml) water.
Okay, I tried it again today with exact measurements and procedures. Way better! The dough was easy to work with by the end. However, the texture came out way finer/tighter than yours did. I’ve learned to check the interior temp carefully for gluten-free breads, and it was between 200-210 degrees F, so nicely cooked.
In the process…my processor (old!) broke a part underneath, so I had to finish it in the one I used before, which was not super strong. So I recommend a strong processor! I see that in a later comment you addressed the finer texture with needing more processing!
I’ll try again after I get my processor part replaced. I really like to make a high protein loaf like this and will try your other recipes. I also really like the British way of weighing ingredients!
(Also, I have my own recipe for waffles using soaked seeds/grains which is similar to your recipes, which I would be happy to share with you for your use here–email me!)
Thanks again.
I’m really glad to hear it worked so much better this time. That totally makes sense about the texture, the strength of the processor really does matter here, especially for getting it a bit more open and fluffy. You’re absolutely right about checking the internal temperature too, great tip for gluten free breads.
I love that you’re into high protein loaves and weighing ingredients, it really does make such a difference. And your waffle recipe sounds amazing, that’s so kind of you to offer. Thanks so much for the thoughtful update and for giving it another go. 😊
When I’ll be on my last slice, I’ll be making a new loaf. Yes, it’s that good!!! Thank you SO MUCH for this easy AND yummy bread recipe!! Cheers!!
Aww, that makes me so happy to hear, Monique. That’s the best kind of compliment. Enjoy every slice and happy baking. Cheers. 😊
this bread was a o easy as nd fast from start to finish.. my daughter really liked it
looking good!
I enjoyed the last loaf of this recipe so much, I made it again!
Fairly simple to make, rises well, lots of fiber!!!
That’s so great to hear, Linda. I’m really happy you enjoyed it enough to make it again. Simple, good rise, and all that fiber is definitely a win. Thanks so much for sharing. 😊
I messed up your recipe, so it’s not fair to rate it yet! I don’t know if I didn’t soak the garbanzos long enough, or if my food processor was not adequate to the job! They didn’t seem to be getting smooth, so I thought maybe they were too dry and added more water, several tablespoons! Oh, also in other recipes I’ve used you are told to soak the psyllium first, so I did that, which may have changed the whole thing! Anyhow, the loaf was nice when I put it in the oven, but then it rose up very high…and fell! There were large holes as it baked but other portions were thick and uncooked. SO, I owe you another try the way you said to do it! I’ll soak them longer and use my better food processor. I was so looking forward to a lovely bread from such unusual ingredients. Just my style of recipe–if I’d follow directions properly!
Thanks so much for being so honest about it. I really appreciate that 😊
And yes, you already spotted the main things yourself.
A few key points for next time: the soaked chickpeas should still be firm, not soft like canned ones, but they do need to blend into a smooth batter. Adding extra water can throw the whole structure off, so it’s important to stick to the amount in the recipe. Psyllium also shouldn’t be soaked separately here, it needs to hydrate directly in the batter so it can bind everything evenly.
If the loaf rose a lot and then collapsed, that’s usually a sign that the batter was too wet or unevenly blended. A smoother blend and no extra liquid should fix that.
I love that this recipe is exactly your style, I’m pretty sure you’ll get a great loaf next time when you follow it as written. Fingers crossed for round two 🤍
I love your recipes! thank you so much. I tried this one and it created a large bubble. and the bottom a dense log. I did use canned chickpeas. why is that so different? Can I ever make it with canned- and I will try to ensure the flax seeds are well ground. I will try to flax seed loaf next
Hey Lindsay, as mentioned in the post (in the FAQs section) you cannot use canned chickpeas. I will copy and paste it for you:
Hi..I don’t want to use flaxseed. What could I use instead?
Hi! You could try ground chia seeds.
Hi from Australia. Ive made the bread twice with canned chickpeas and it hasn’t worked properly. I will buy dried ones and try again. Thank you.
Hey, I never said that canned chickpeas are okay to use. The recipe clearly states “dry chickpeas”, soaked in water. I also mention in the FAQs that canned chickpeas don’t work for this recipe.
Fingers crossed it works perfectly next time and thanks for giving it another try!
Baked yesterday and enjoying for breakfast this morning…delicious and nutritious loaf of bread. Thank you so much for the excellent recipe !
So happy to hear that. Thanks so much for trying it and for the lovely feedback. Enjoy your breakfast. 😊
I tried your red lentil bread. It turned out great. Can’t wait to try this next
That’s wonderful to hear, thank you so much! 😊
I’m really glad the red lentil bread worked out for you. I hope you’ll enjoy this recipe just as much. Let me know how it turns out!
Hi. Can one replace the chickpeas with chickpea flour? I am dying to try the recipe but have only chickpea flour.
Hi Laura, I tested it recently and it didn’t turn out well. The loaf was very heavy, compact, and dense, and not fluffy at all. However, I’m already working on a slightly different version using chickpea flour.
Thanks. I found the bread absolutely delicious, but should probably have given it another ten minutes in the oven (I had to leave the house!) as it was very dense and hadn’t risen as much as I was expecting. I was wondering about making it with chickpea flour, as I do have plenty of that, and it would make for a very quick recipe. I look forward to your new recipe! I plan to try it anyway, and also to add some seeds to it, as I love seeded bread.
By the way, many of my husband’s family are gluten-free, and I plan to send them this recipe, as it is like the nicest kind of soda bread!
That makes total sense, ten extra minutes can really make a difference with this loaf, especially if it felt dense inside. I’m really glad you loved the taste though, that’s already half the win 🙂
Adding seeds is a great idea and works well. Just don’t overdo it the first time, as too many seeds can weigh the loaf down. Sunflower, pumpkin or sesame are especially nice.
I love that you’re sharing it with your gluten free family. “Soda bread vibes” is actually such a good description. That makes me really happy to hear. And thank you so much for the kind words. More recipes are definitely coming 🤍
Ela,
Just found your site. Have made this bread twice now, but it’s still coming out pretty dense. The first time I didn’t grind the psyllium husks so made sure to do that the second time, ground the whole flax seeds into 1/4 c meal. Measured the chickpeas, ground flaxseeds and ground psyllium husks in grams. Used room temp water. Using a convection oven at 360F for 60 mins the second time. Was a bit higher, but not like your pictures. Any thoughts?
Thank you so much for trying the recipe and for all the details. Just one more important question: did you use raw, soaked dried chickpeas, or did you use canned chickpeas?
That makes a huge difference for the rise and texture.
Also, did your batter look thick and moldable like in my video, or was it a bit on the wetter side?
Thanks for your reply. I did use the organic dried chickpeas and soaked them overnight both times. I also (in the second version) made sure to pour the vinegar over the baking powder/soda. I watched your video before the first batch. and felt like it was similar to your video in terms of maleability. I also added water to my hands to smooth it out. I was going to try increasing the baking powder and/or soda to get more rise, but didn’t know how that would affect the taste. In your picture above, if yours rose not quite 3 inches, mine was closer to 2 inches. So the second time I got a few of the air pockets, but not as much as you.
Thanks for the detailed feedback, that really helps.
First off, I wouldn’t increase the baking powder or baking soda. That usually doesn’t solve the rise issue and can easily lead to a bitter or soapy taste. The height difference you’re describing, around 2 inches vs. close to 3, is actually quite small and already within a normal range for this kind of bread.
A few things that can make a noticeable difference:
The blend really matters. Even if the dough feels similar, very tiny chickpea pieces can limit the rise. The smoother and more uniform the batter, the better the structure can form and trap air. If your food processor struggles, doing the chickpeas and water first in a high speed blender can help.
Oven behavior plays a big role too. Some ovens run cooler or vent steam more aggressively. If the bread sets too slowly, it won’t hold as much height. Make sure the oven is fully preheated and try not to open the door during baking.