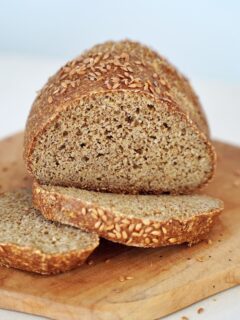
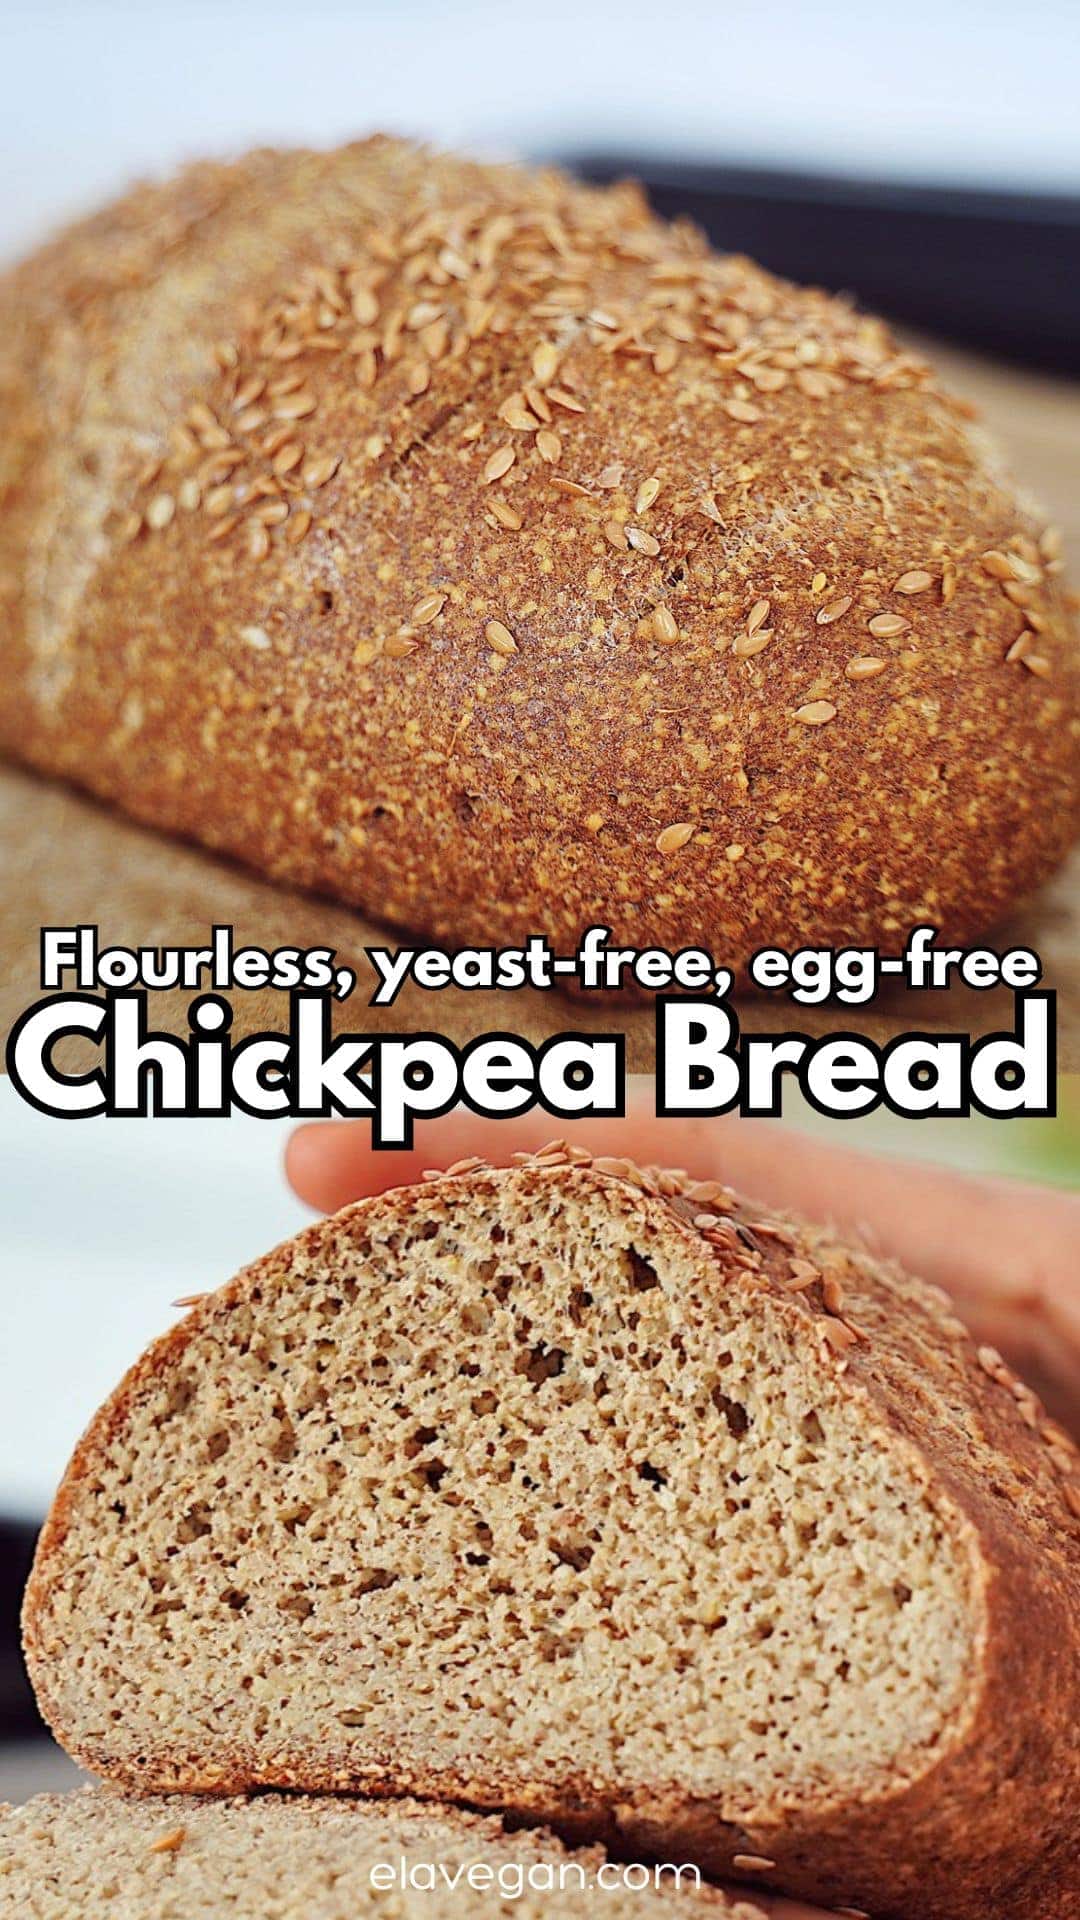
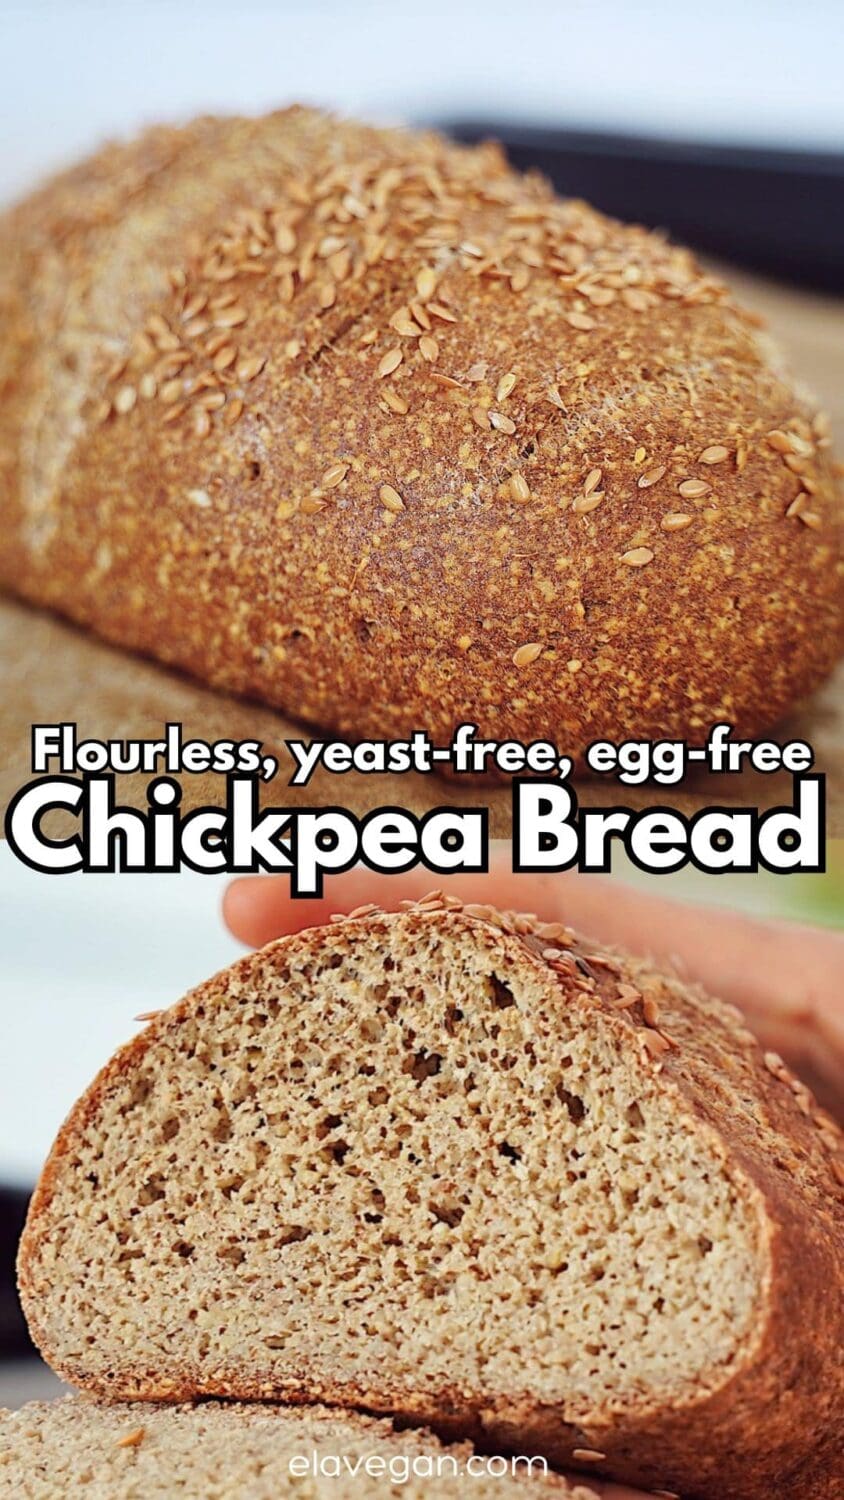
This simple chickpea bread transforms soaked chickpeas into a surprisingly fluffy yet hearty loaf that’s gluten-free, grain-free and toasts, dips, and slices well!
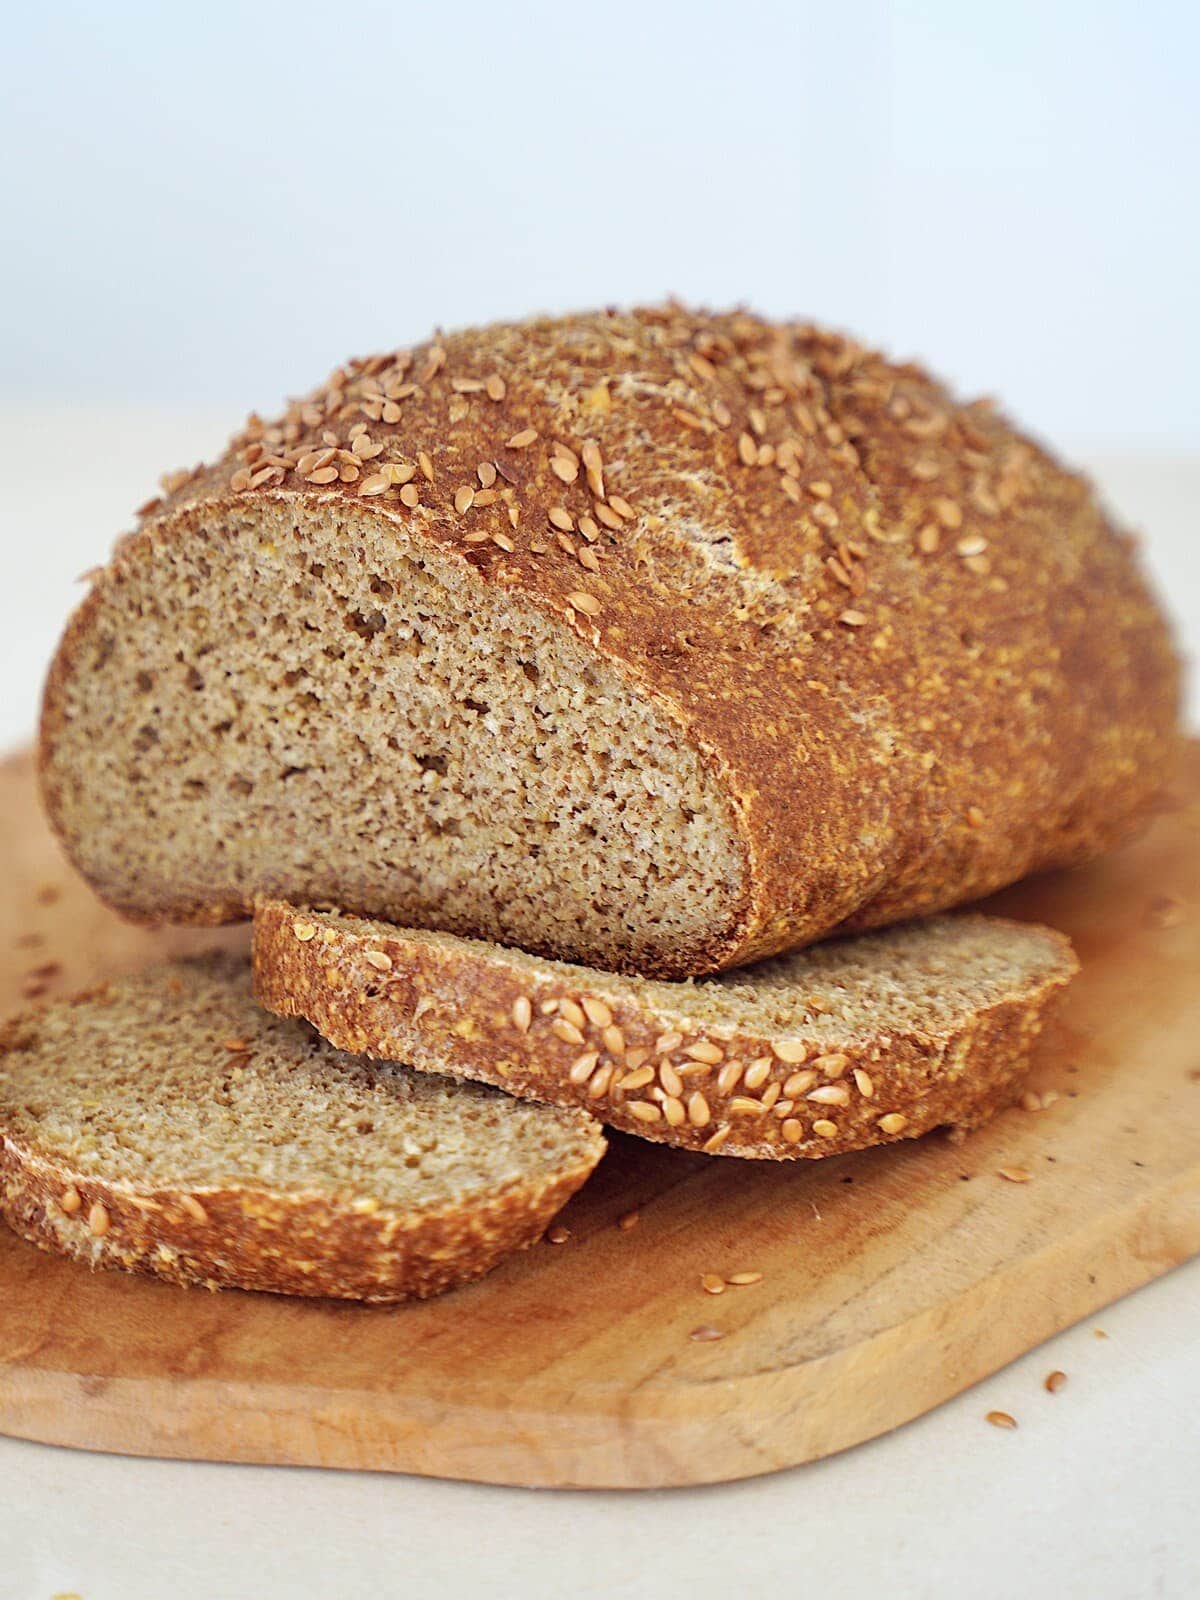
Guess who’s back with another fun gluten-free bread? After quinoa bread, lentil protein bread, and oatmeal seed bread, my recent chickpea crackers recipe led straight to this fluffy, savory flourless chickpea bread. Unlike most chickpea bread recipes, mine uses whole dried chickpeas, not chickpea flour. The result is surprisingly bread-like (soft and fluffy!) with a savory nuttiness and just enough texture to feel hearty and satisfying.
Even better, this loaf is yeast-free, requires no kneading or rising, and is incredibly easy to make. It’s also grain-free, gluten-free, sugar-free, oil-free, AND high in fiber and some protein. Plus, its savory, nutty, almost buttery flavor is perfect for slicing, toasting, and dunking.
If you love creative chickpea recipes, don’t miss my chickpea tofu, chickpea cookie dough, or chickpea blondies.
The Ingredients
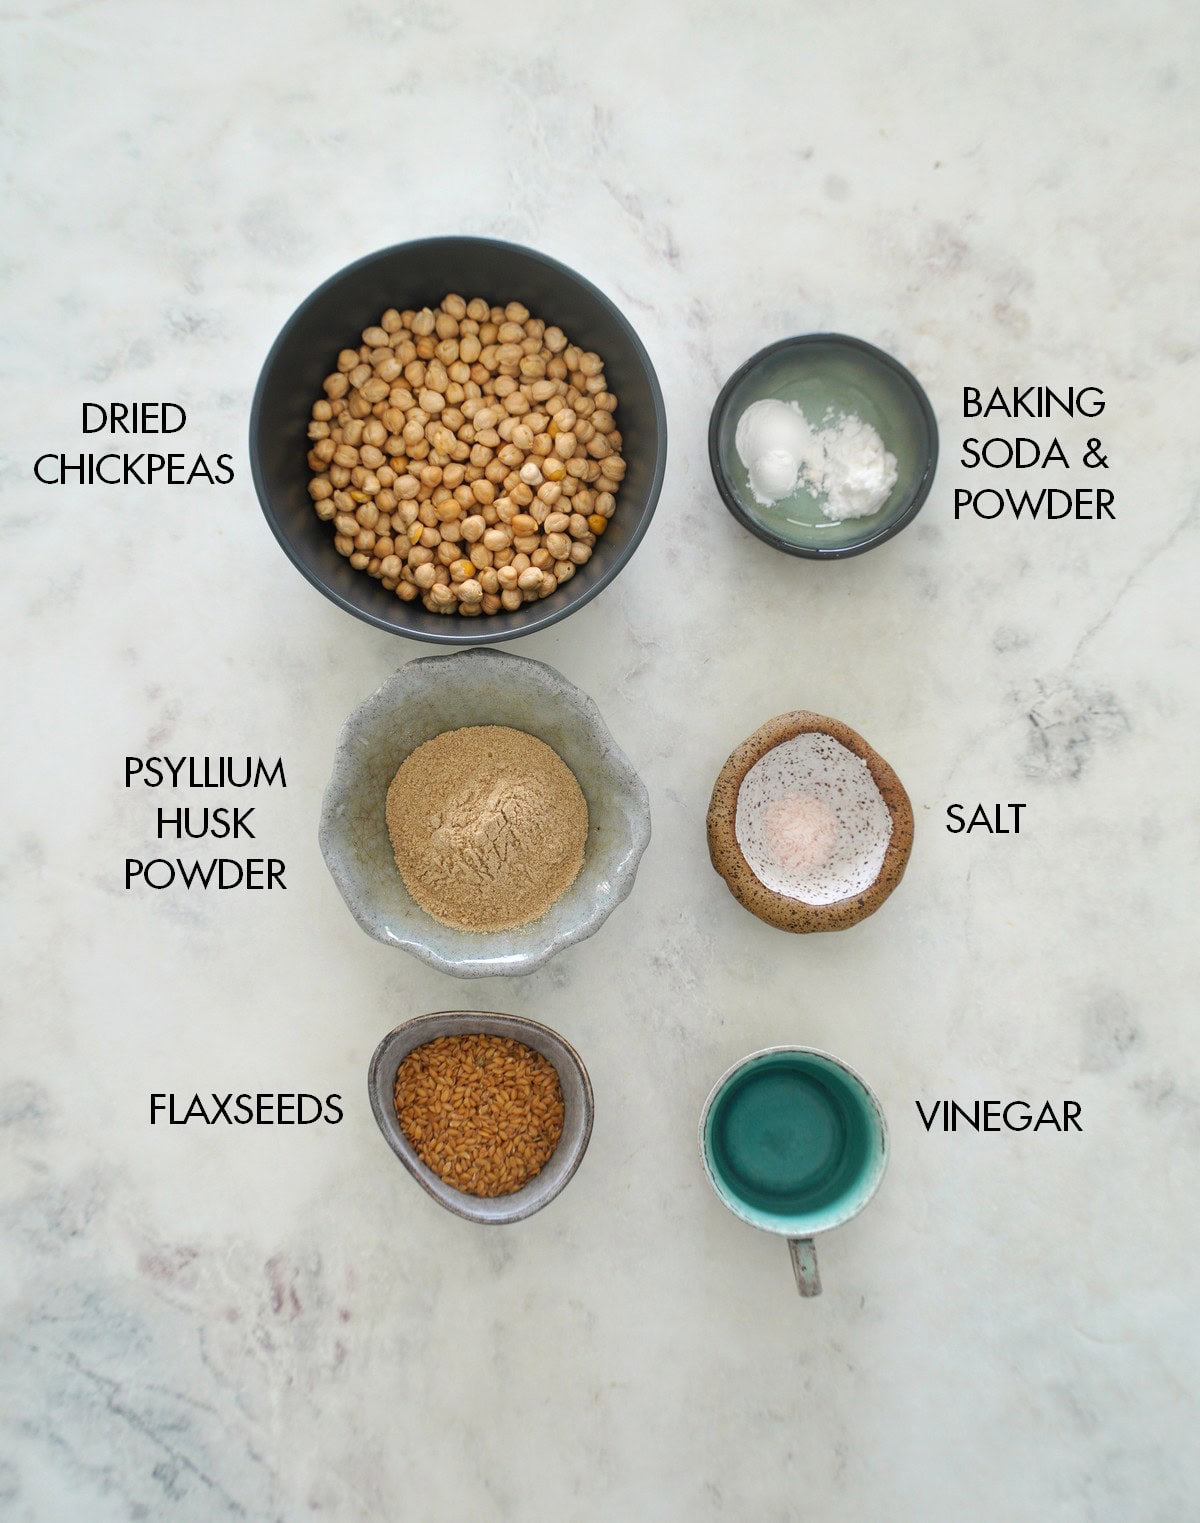
- Chickpeas: Dried chickpeas, soaked overnight, provide the best texture (like in falafels!) for this whole chickpea bread.
- Psyllium husk powder: Use POWDER, not whole psyllium husk. Otherwise, blend them into a fine powder first. This helps mimic wheat dough’s elasticity and softness.
- Ground flaxseed: To bind the loaf while adding nutrients.
- Leavening agents: This yeast-free chickpea bread uses both baking powder and baking soda for rise and fluffiness without yeast.
- Vinegar: Like apple cider vinegar (or lemon/lime juice).
- Salt
- Water
For the full ingredients list, measurements, complete recipe method, and nutritional information, read the recipe card below.
To Flavor The Bread
This savory, soaked chickpea bread makes a versatile canvas.
- Herbs: For falafel-inspired flavor, add plenty of fresh parsley and cilantro with optional dill/mint. Rosemary, thyme, or Italian seasoning also works.
- Seasonings: Garlic powder is a simple way to add savory depth. However, onion powder, smoked paprika, cumin, black pepper, and/or cayenne/red pepper flakes also work. Blends like curry powder also work. Coarse sea salt over the top is also delicious.
- Nutritional yeast: For a cheesy, umami flavor.
- Chunky add-ins: Like a few finely chopped sun-dried tomatoes, roasted garlic, caramelized onions, preserves lemon peel, and/or olives. Pat them dry.

How to Make Chickpea Bread
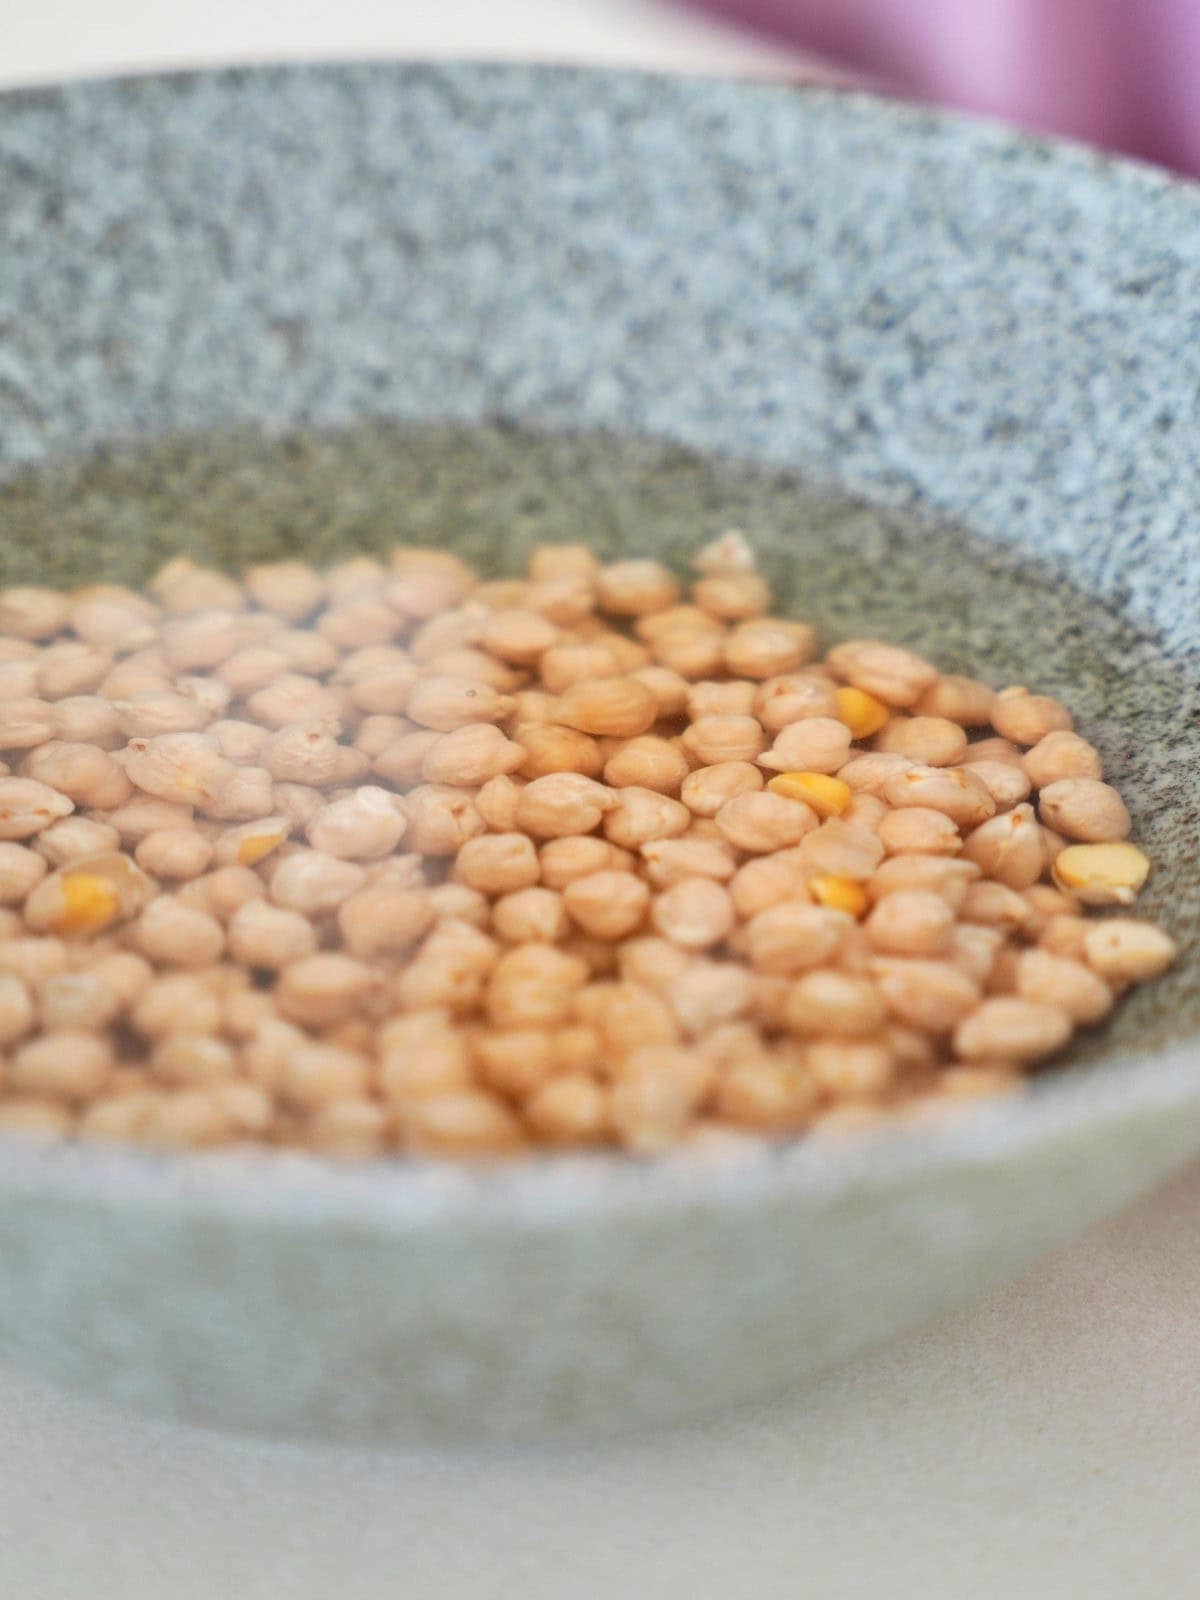
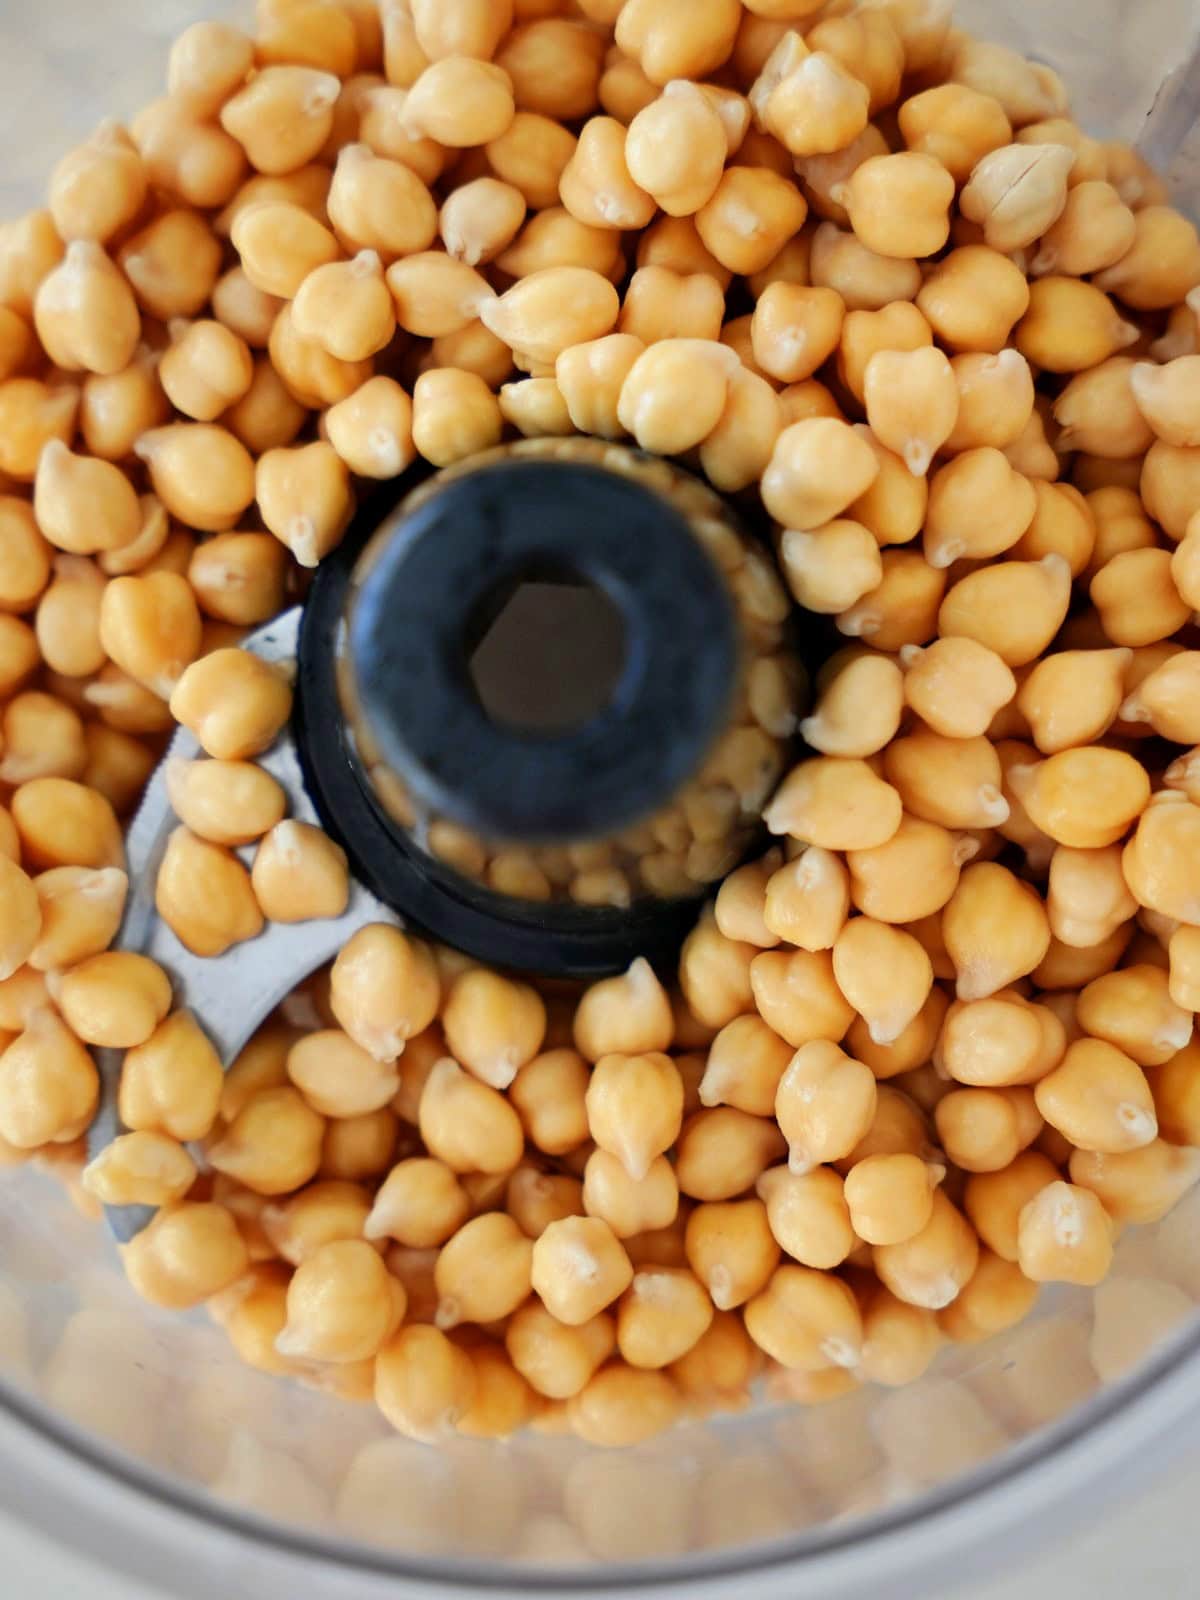
- First, soak the dried chickpeas overnight (9-12 hours) in plenty of water until they have noticeably expanded and roughly doubled in weight. Then, drain and rinse thoroughly.
- Next, preheat the oven to 360F/180C and line a baking sheet with parchment paper.
- Blend the chickpeas and water in a food processor until smooth, pausing to scrape down the sides as needed.

- Add the ground flaxseeds, psyllium husk powder, salt, baking powder, and baking soda. Then, pour the vinegar directly over the baking powder and baking soda.
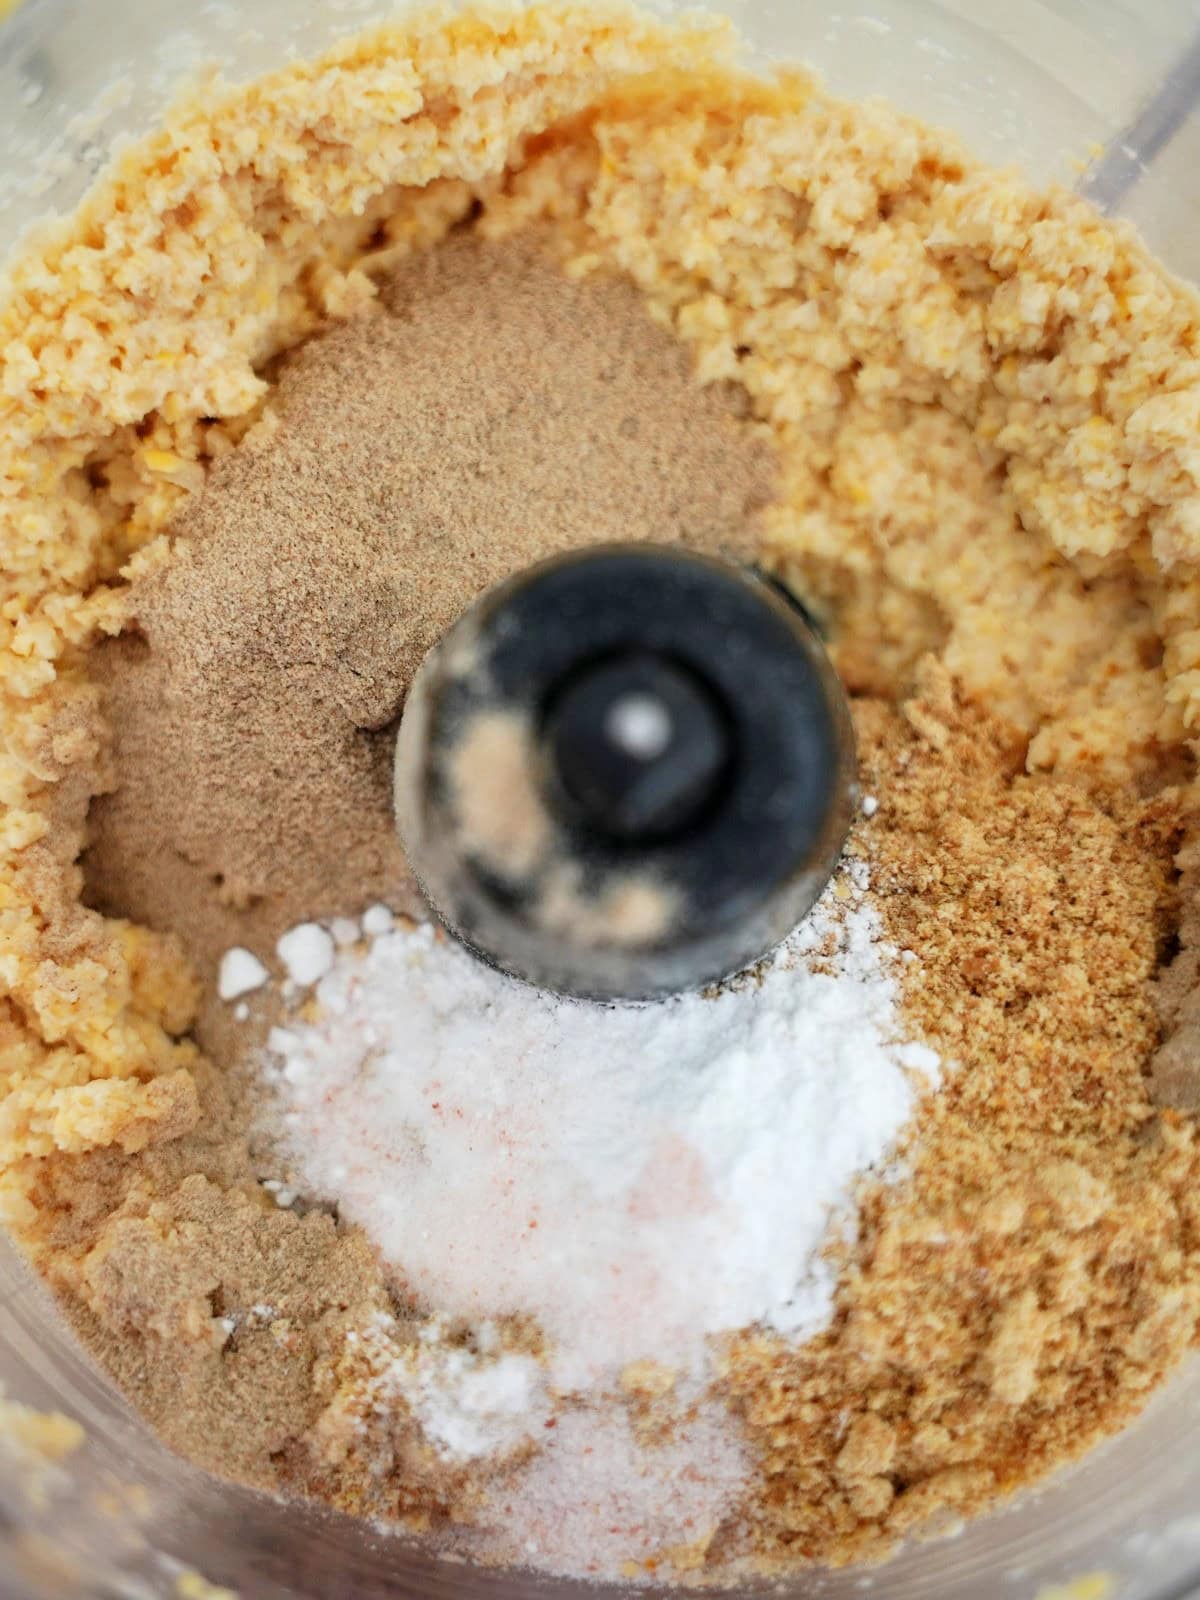
- Blend again, scraping down the sides if needed. The batter will thicken quickly.
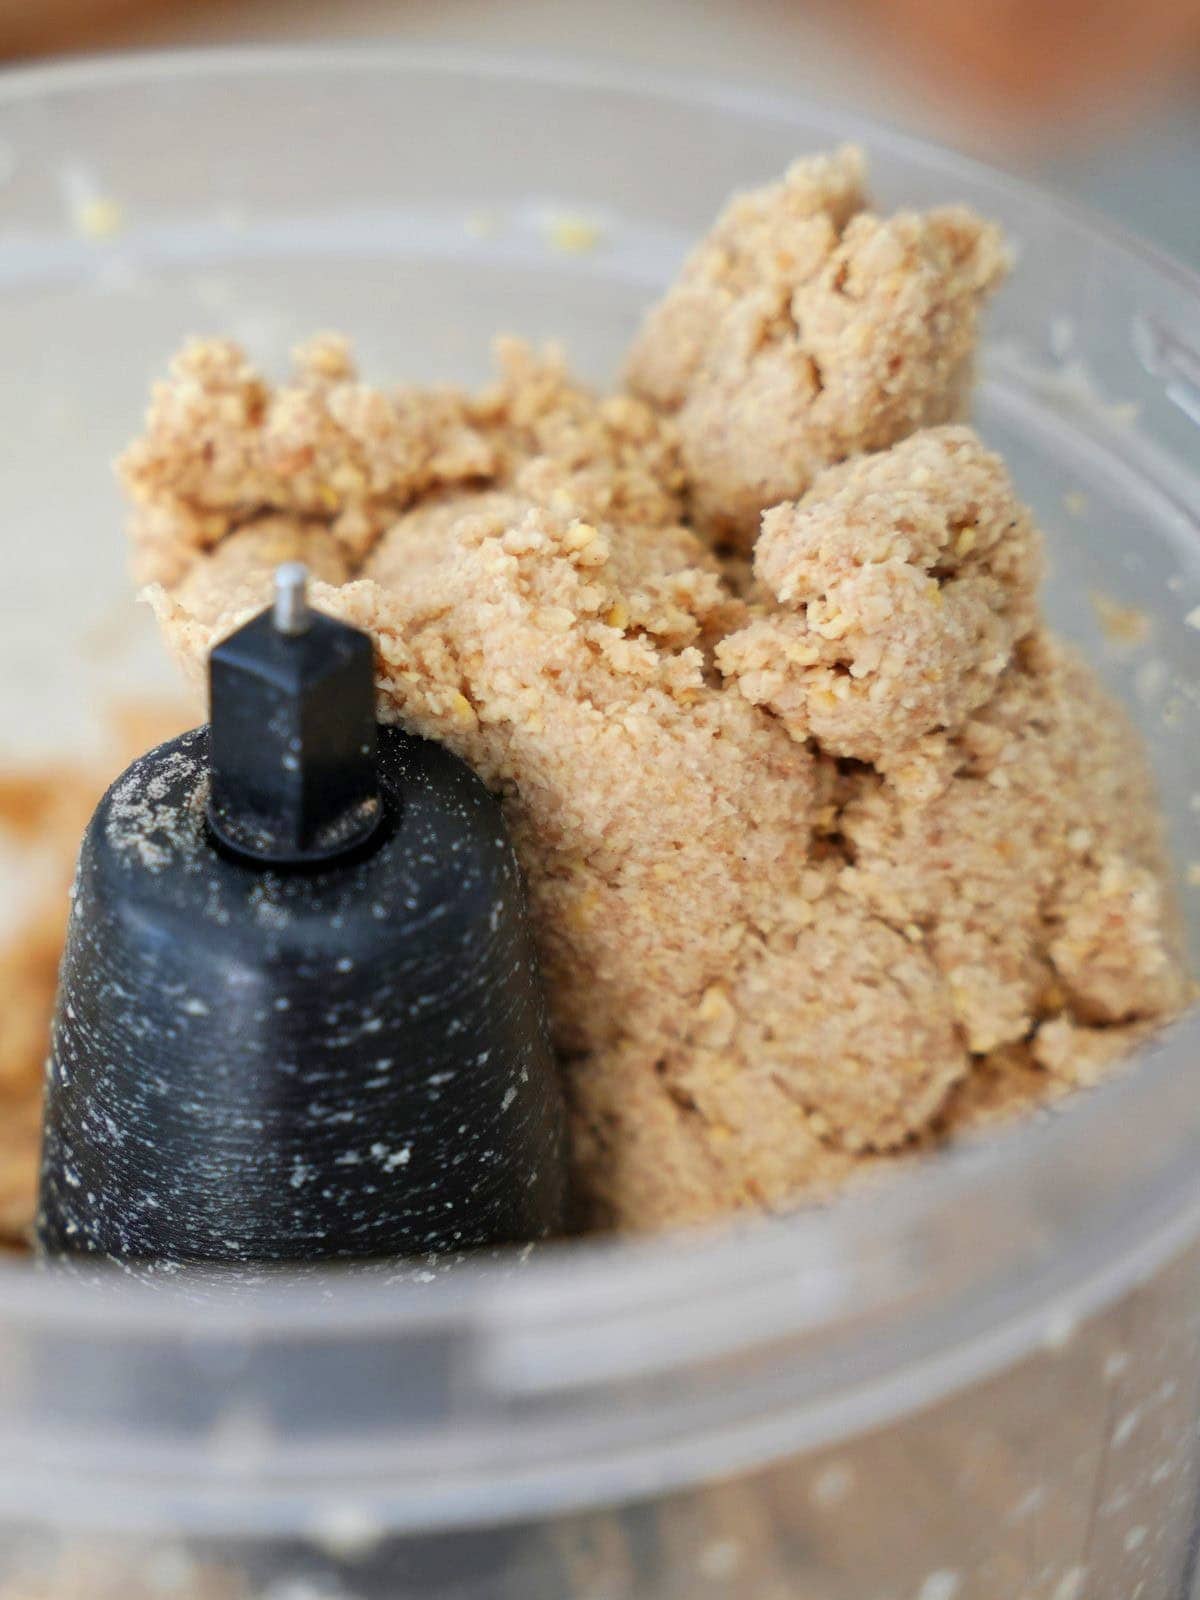
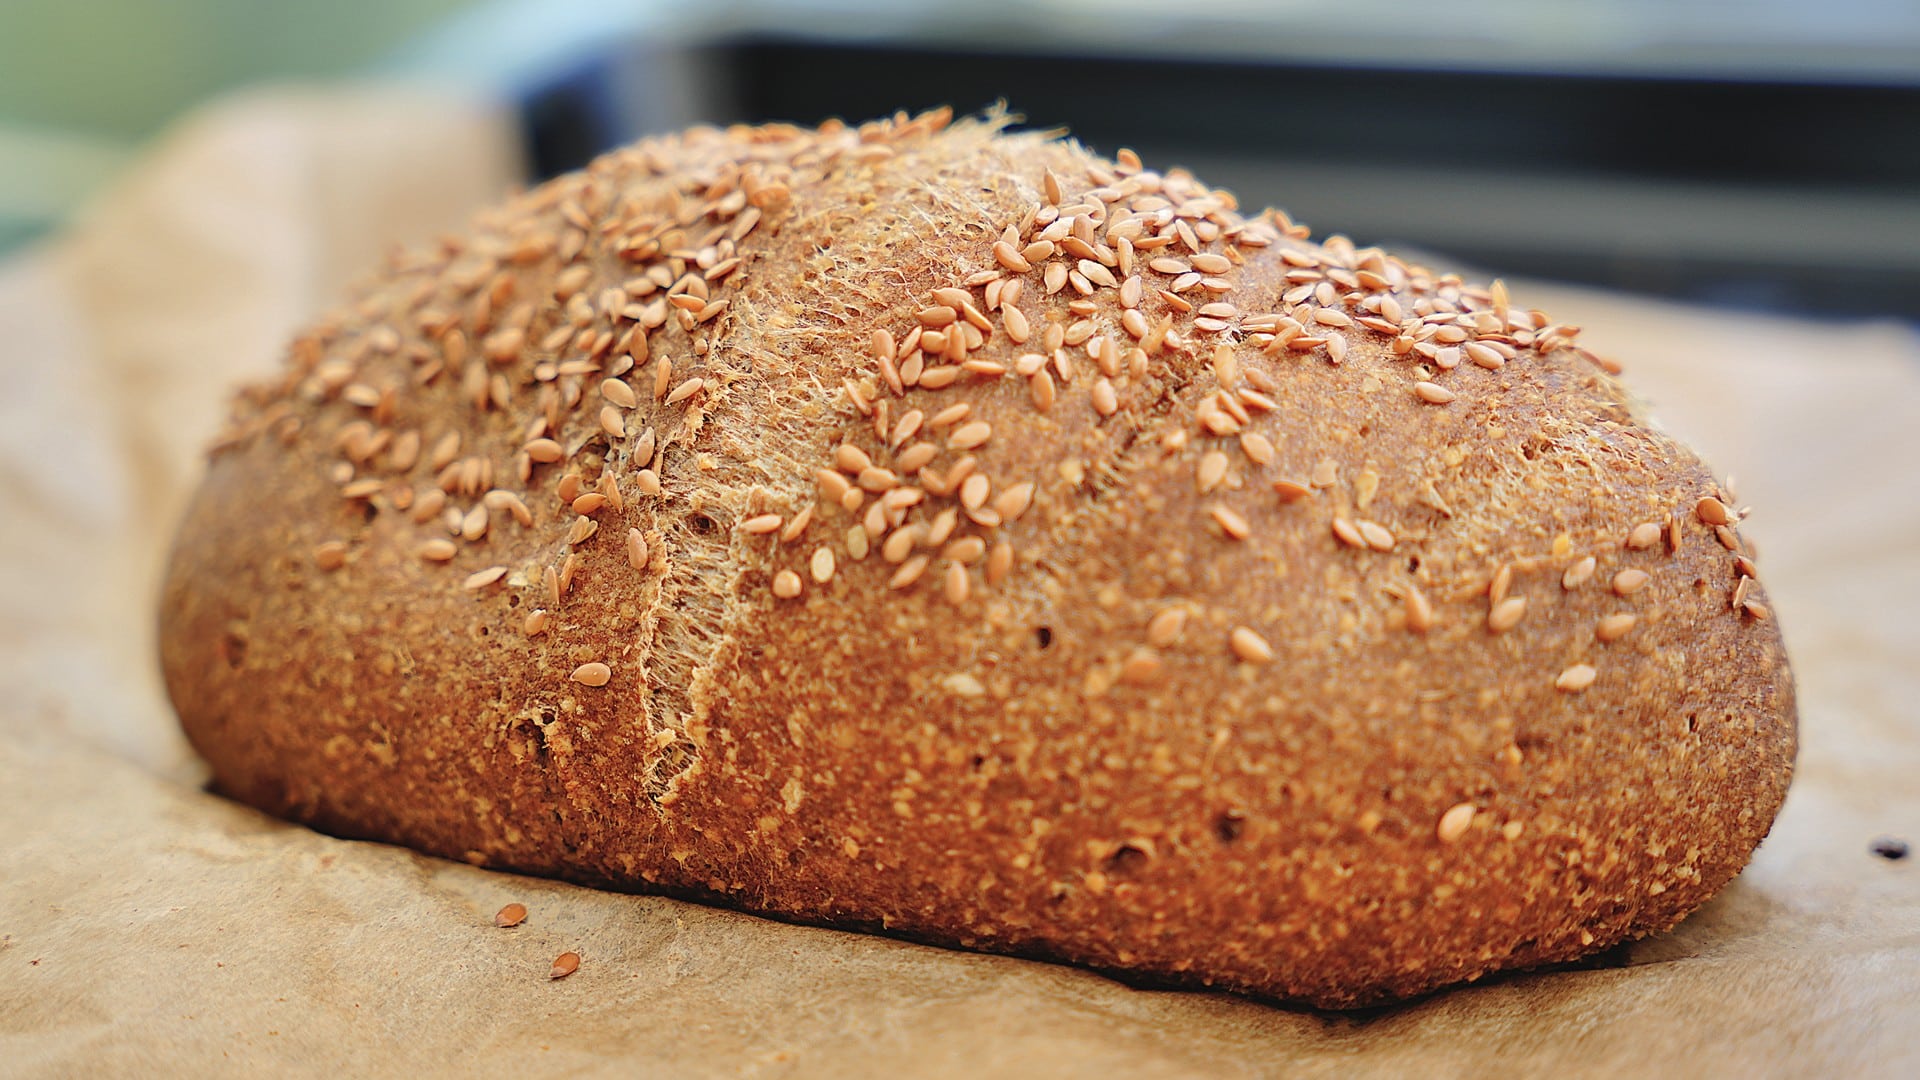
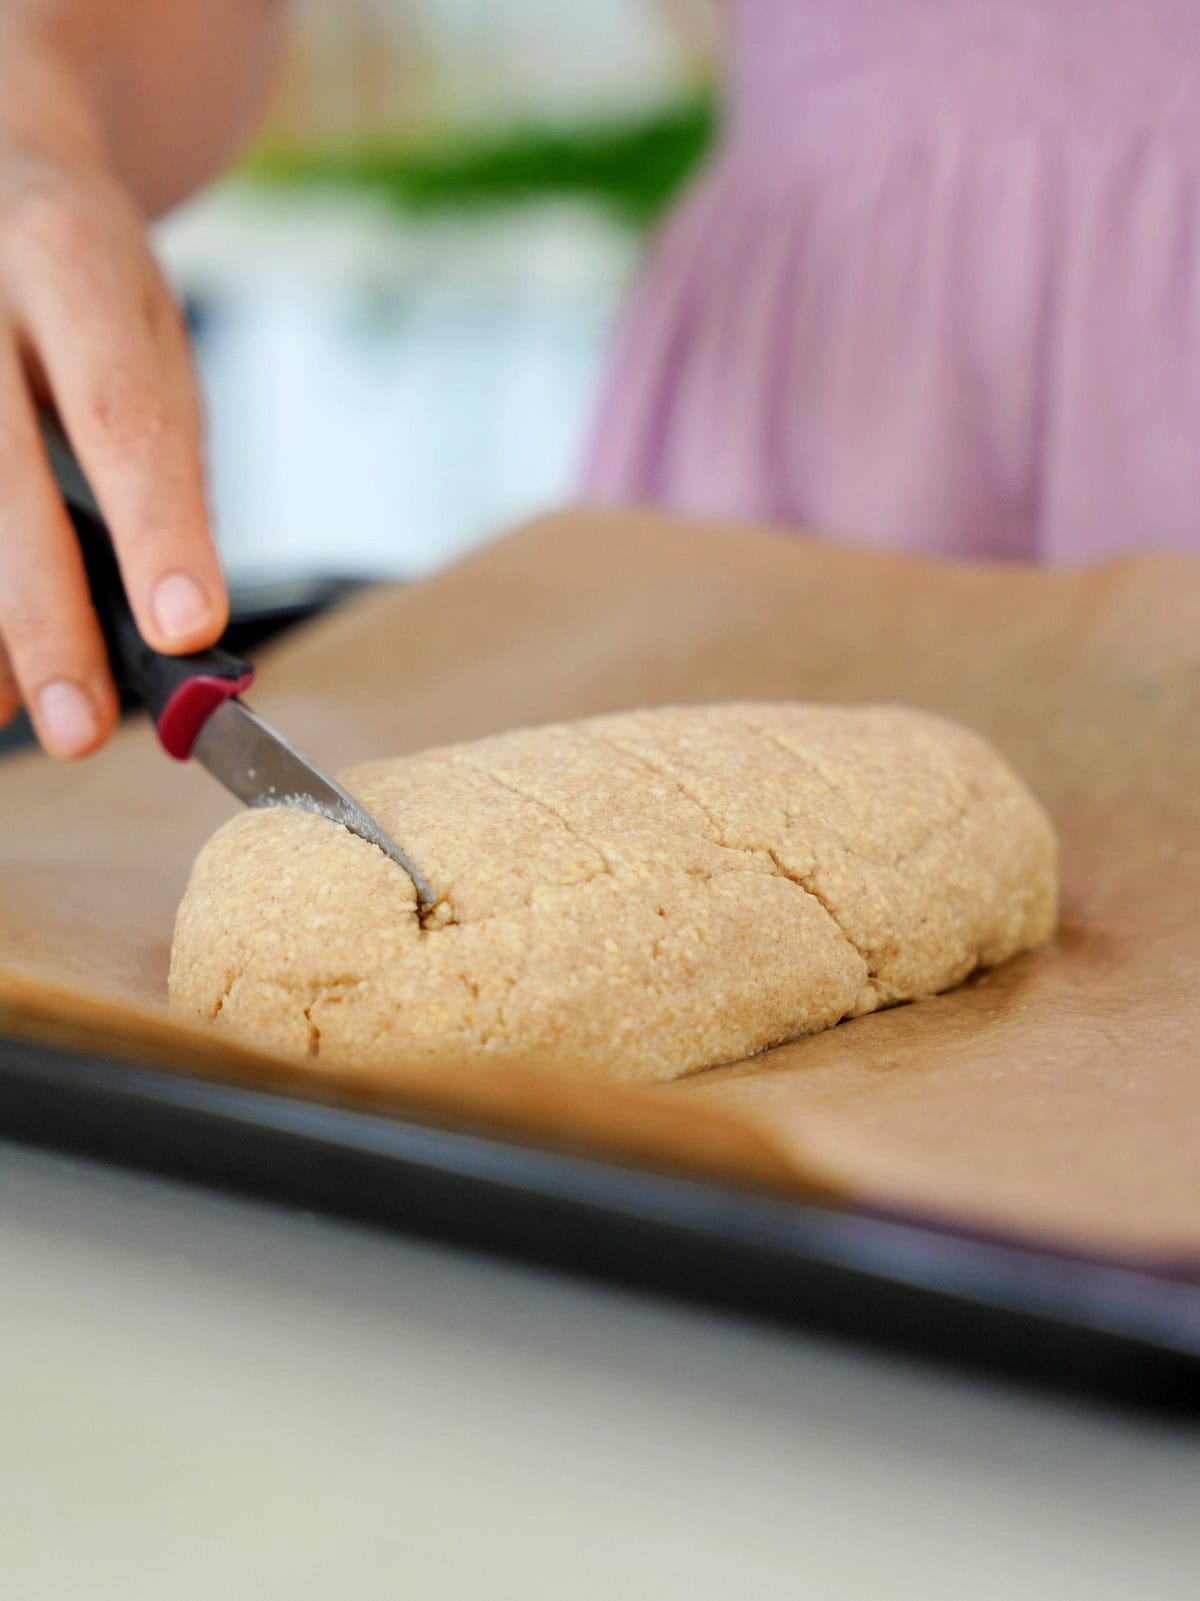
- Transfer the dough onto the prepared pan and shape it by hand into a round loaf, lightly wetting your hands to smooth the top and sides.
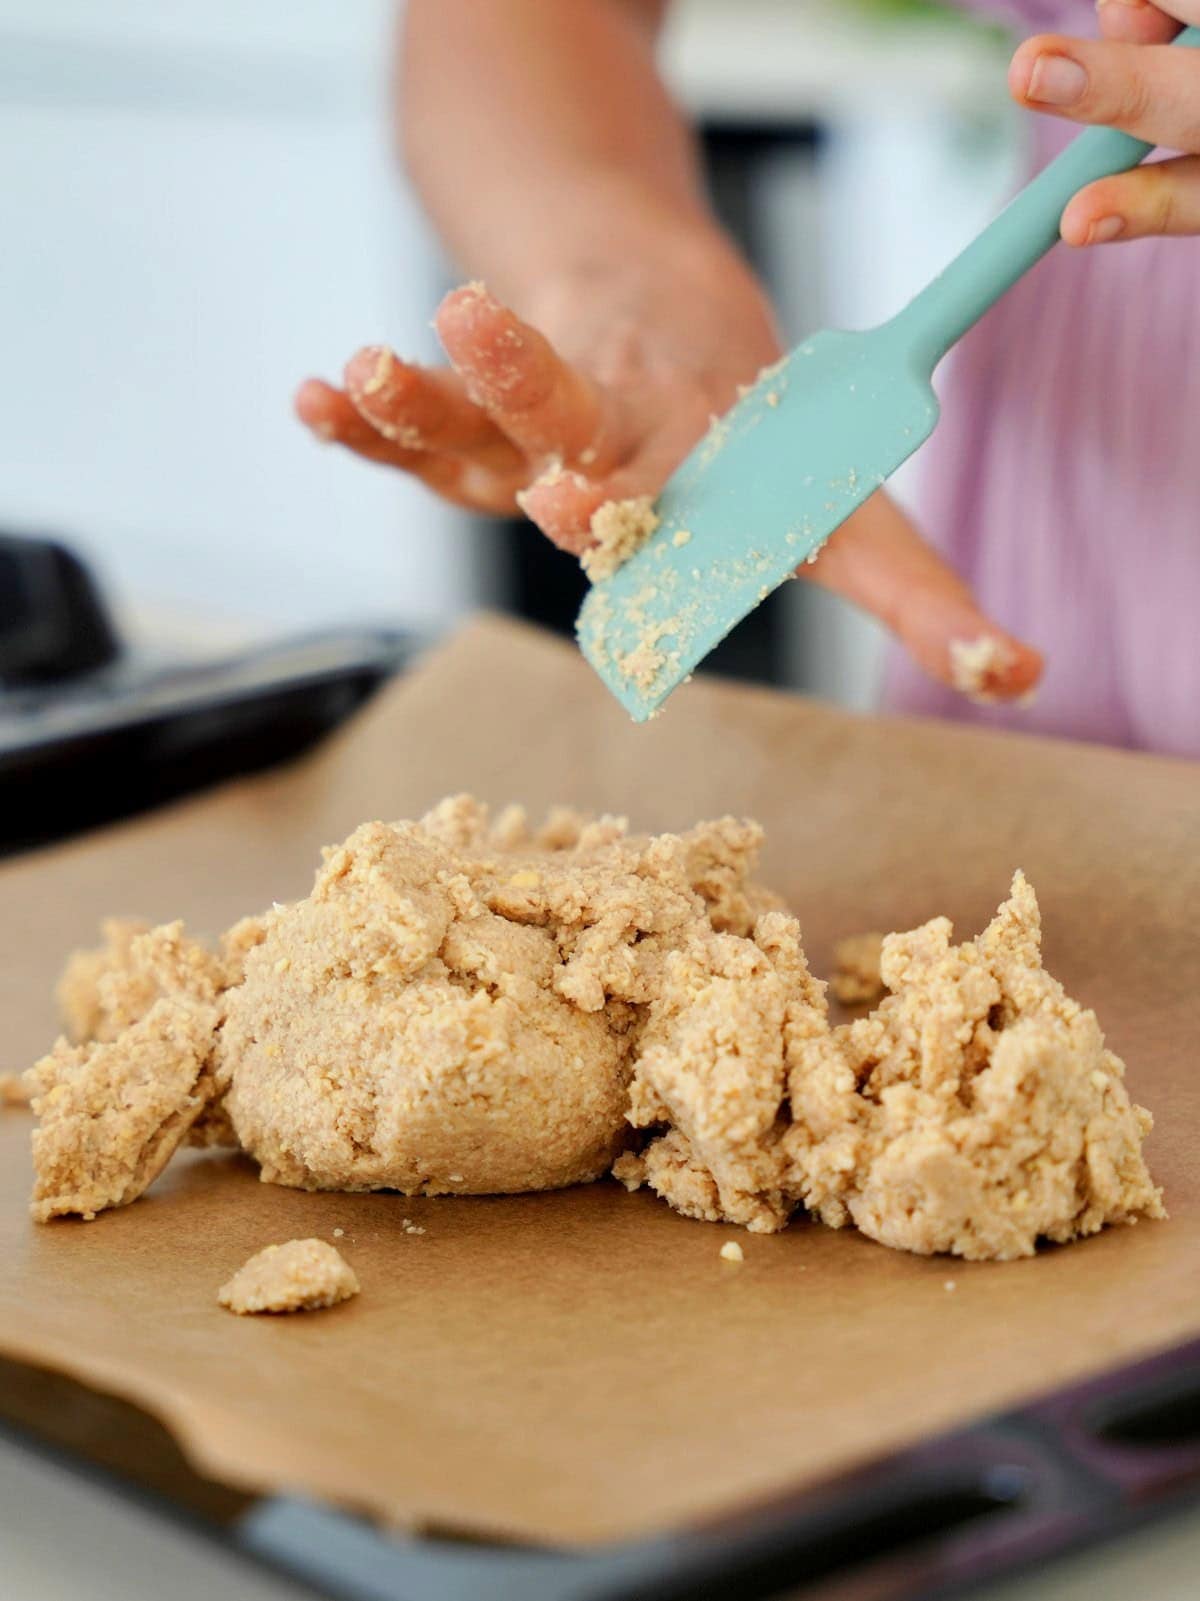
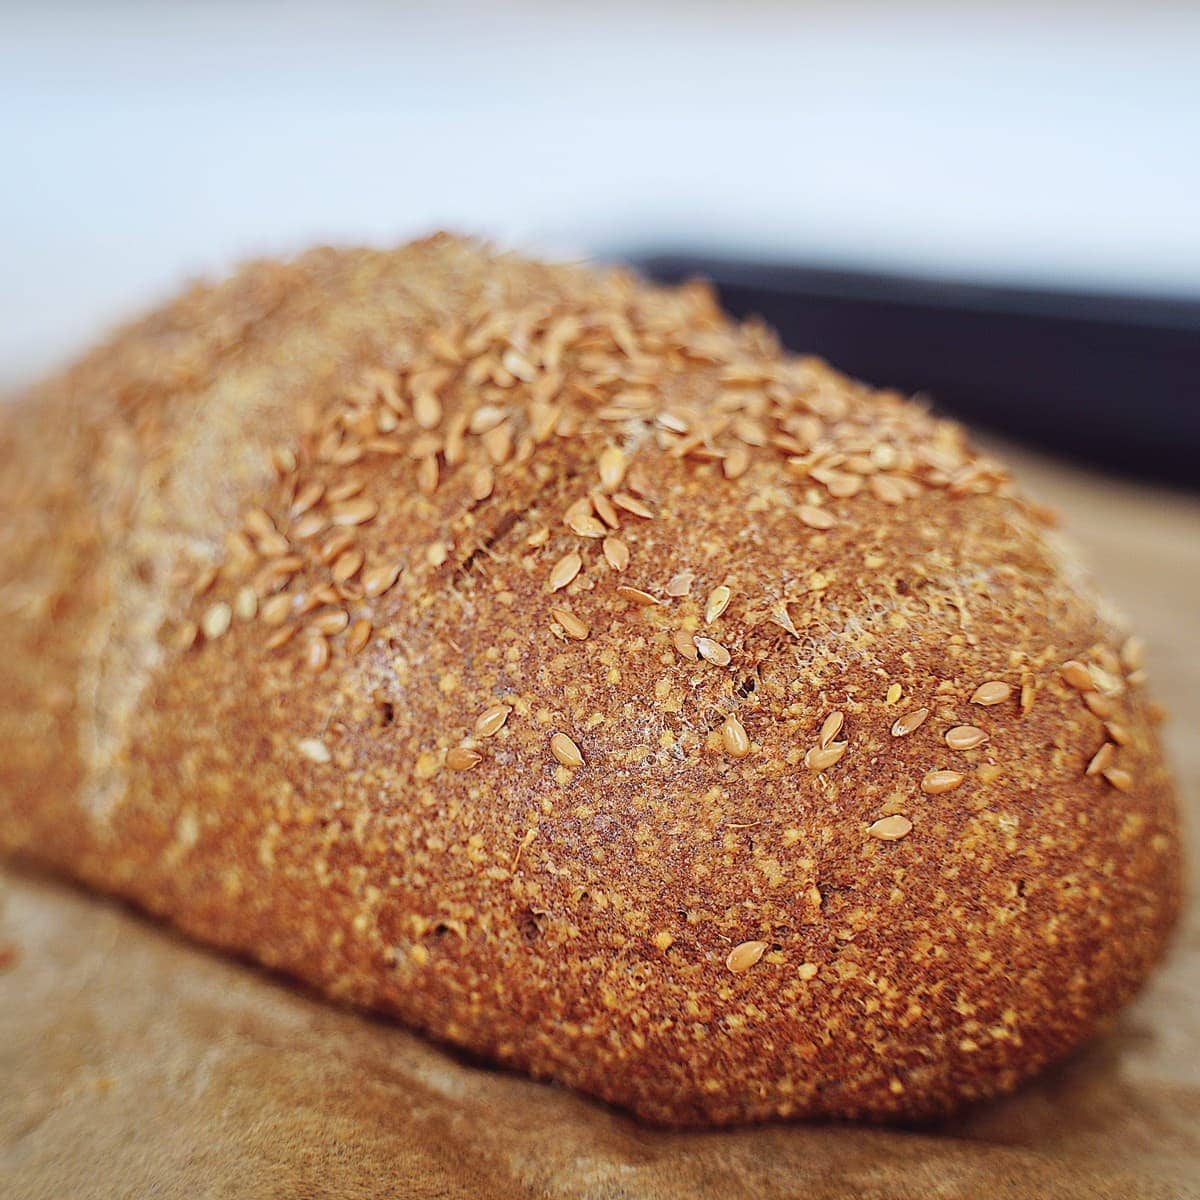
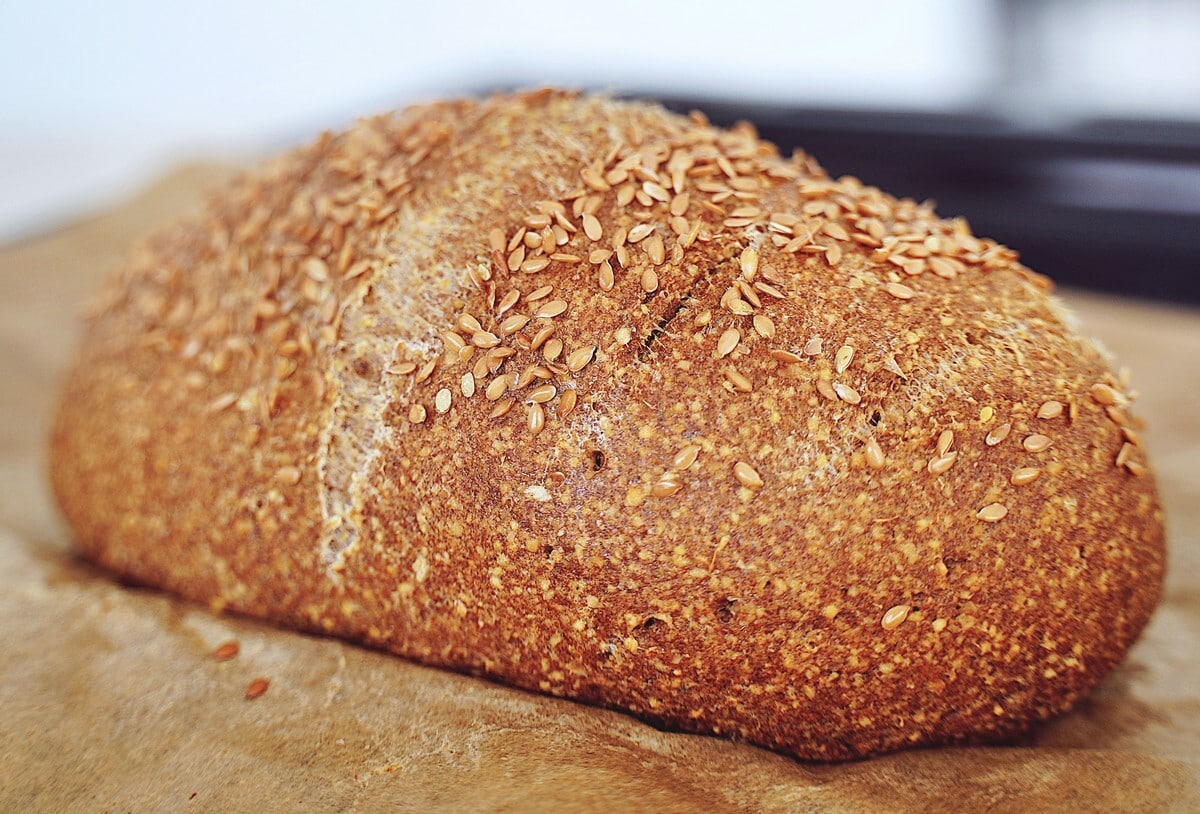
- Score the top with a knife. Lightly wet the surface again, optionally sprinkle with flaxseeds, and bake for 50 to 60 minutes.
When ready, a skewer inserted into the middle should come out clean.

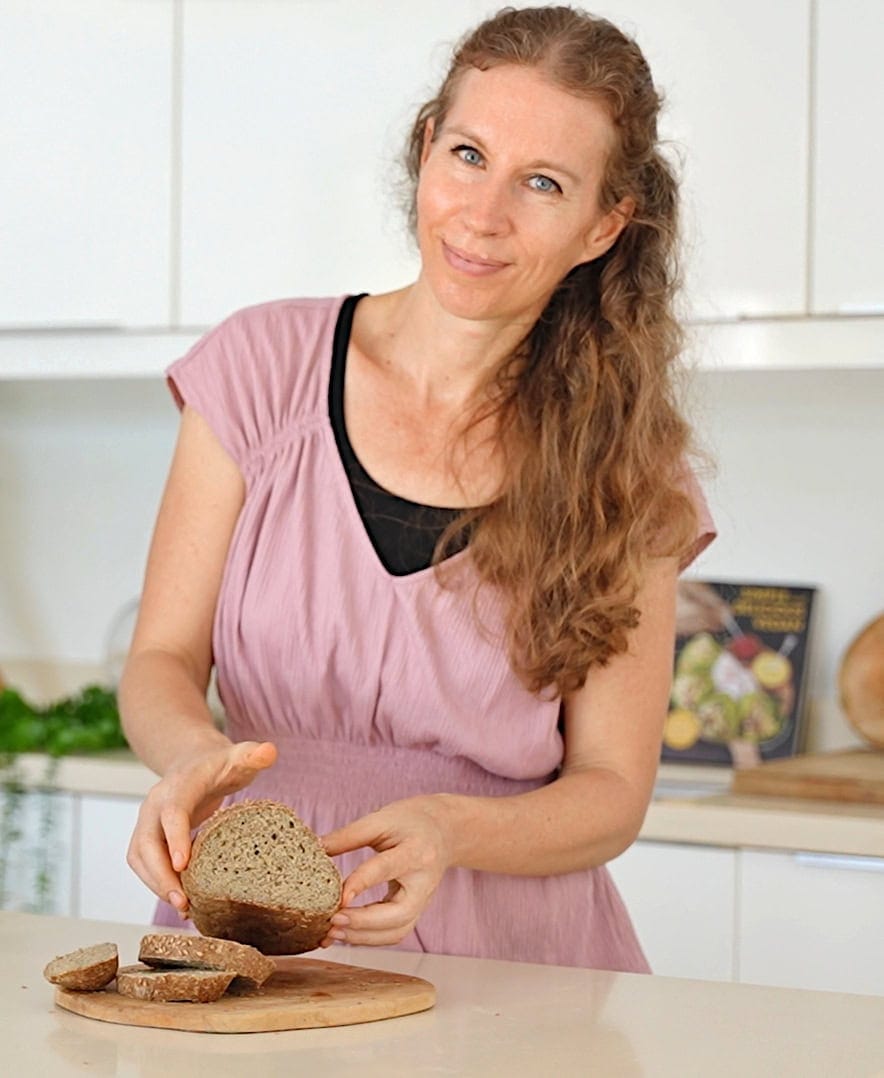
- Let the chickpea bread cool completely, then slice and enjoy!
What To Serve With Chickpea Bread?
Enjoy this hearty vegan chickpea bread for topping, toasting, and sandwiches, including:
- Buttered (with vegan soups, stews, and vegan cheese fondue)
- Breakfast toppings (like scrambled tofu and/or sauteed mushrooms)
- Cheese (vegan cream cheese or vegan ricotta cheese with fresh veggies)
- Avocado (Use it for many delicious avocado toast variations)
- Mezze (like hummus, lentil hummus, garlic white bean dip, etc., with cucumber, tomato, olives, roasted red peppers, pickles, etc.)
- Bruschetta style (with tomato, salt, and olive oil)
Storage Instructions
Store: In an airtight container at room temperature for 2-3 days or in the fridge for up to 5 days.
Freezer: Whole or sliced, with parchment between the slices, in a Ziplock for 3 months. Thaw on the counter for several hours or use the defrost setting in a microwave/toaster.
FAQs
Can I make canned chickpea bread?
No. Soaked raw chickpeas behave very differently from cooked canned chickpeas. They still contain their natural starch, which provides structure and binding when baked. Canned chickpeas are much softer and can’t create the same bread-like texture.
Can I omit the psyllium husk powder?
No, this is an important binder and affects the texture of the bread.
Can I change the shape or size of the loaf?
Absolutely! Feel free to make different-shaped and sized loaves/ a baguette. Adjust baking time accordingly.

Recipe Notes
- For the best results: Use metric measurements for the best accuracy.
- When soaking chickpeas: Make sure the chickpeas are covered with plenty of water, as they swell a lot and absorb a lot of liquid. Then drain thoroughly and rinse to remove any ‘raw’ flavor.
- Shape the loaf: It isn’t like yeast dough, so shape it to your desired shape. It rises wonderfully, but won’t spread.
- Don’t slice too early: Cooling helps ‘set’ the loaf.
More Gluten-free Bread Recipes
- The BEST gluten-free bread
- Keto flaxseed bread
- Red lentil bread rolls
- Gluten-free seeded bread
- Gluten-free French Bread
- Easy Gluten-free Pita Bread
- Gluten-free Naan Bread
If you try this chickpea bread recipe, I’d love a comment and ★★★★★ recipe rating below. Also, please don’t forget to tag me in recreations on Instagram or Facebook with @elavegan #elavegan—I love seeing them.
Chickpea Bread (Gluten Free, No Yeast)
Video
Ingredients
- 1 cup (200 g) dry chickpeas (not canned) (400 g after soaking for 9 hours)
- ¾ cup (180 ml) water
- 4 Tbsp (40 g) psyllium husk powder (not whole psyllium husk)
- ¼ cup (25 g) ground flaxseeds
- 1/2-3/4 tsp salt
- 1 ¼ tsp baking powder
- ¾ tsp baking soda
- 1 ½ Tbsp (16 g) vinegar or lemon juice/ lime juice
Instructions
- You can watch the video for visual instructions.First, soak the dried chickpeas overnight (9-12 hours) in plenty of water until they have noticeably expanded and roughly doubled in weight. Then, drain and rinse thoroughly.
- Next, preheat the oven to 360℉/180℃ and line a baking sheet with parchment paper.
- Blend the chickpeas and water in a food processor until smooth, pausing to scrape down the sides as needed.
- Add the ground flaxseeds, psyllium husk powder, salt, baking powder, and baking soda. Then, pour the vinegar directly over the baking powder and baking soda.
- Blend again, scraping down the sides if needed. The batter will thicken quickly.
- Transfer the dough onto the prepared pan and shape it by hand into a round loaf, lightly wetting your hands to smooth the top and sides.
- Score the top with a knife. Lightly wet the surface again, optionally sprinkle with flaxseeds, and bake for 50 to 60 minutes.
- Let the chickpea bread cool completely, then slice and enjoy!
Notes
Nutrition information is an estimate and has been calculated automatically
 „Simple and Delicious Vegan“ Cookbook by ElaVeganCLICK HERE to order!
If you are using Pinterest, feel free to pin the following photo:
success !
I’ve made this bread several times, it’s flavour is different but still delicious. I’m experimenting with adding nuts & seeds in the final blend, walnuts work a treat !!
many thanks !!
That’s wonderful to hear! 😊 I’m so happy you’ve been enjoying the bread. Walnuts sound like a delicious addition, and I’m glad your experiments have been successful. Thanks so much for sharing your variation. I’m sure it’ll inspire other readers too! 💚
This looks amazing! If I have Psyllium but not psyllium powder, can I make it in my high speed blender?
Yes! 😊 You can grind whole psyllium husks into a fine powder in a high-speed blender or a coffee/spice grinder. Just make sure to measure it after grinding, not before, since the volume changes quite a bit. Even better, measure it by weight (grams) for the most accurate results. 💚
Thanks! I always use my scale when the grams are given! 🙂
Hi Ela,
I was very exciting to try your recipe but it didn’t work for me. The bread raised but was dense and looked like I used too much water. There were no air bubbles. I measured everything. Wished I could send you some pictures. What am I doing wrong?
Hi! I’m sorry to hear it didn’t work out. 😊 I’d be happy to help figure out what happened.
A few things come to mind:
– Did you use dried chickpeas that you soaked yourself, or canned chickpeas? The recipe only works with dried chickpeas because canned chickpeas contain much more moisture and will make the bread dense.
– Did you use psyllium husk powder or whole psyllium husks? They behave very differently.
– Was your baking powder still fresh?
– Did you blend the chickpeas until they were completely smooth?
can you cook this in an air fryer?
Hi Anne, I believe some people tried it and commented on YouTube that it works. I haven’t tried it yet, but I think it should work! 🙂
Hi Ella, thank you for this fabulous recipe.,which I followed to the dot. Today I baked second loaf very successfully.. as I have visitor with celiac issues and your bread was popular for the flavour/taste. Absolutely no problem with making the bread, both loaves turned out just perfect; from this moment this is the only bread for me..
Thank you very much.
Thank you so much for your wonderful feedback! 🥹💛 I’m absolutely delighted that both loaves turned out perfectly and that your guest with celiac disease enjoyed the bread too. Thank you for trusting my recipe, and happy baking! 😊
Dear Ela,
Thank you so much for the recipe! I have to admit that I was quite skeptical at first, but the bread turned out really well.
Due to some unexpected circumstances, I ended up soaking the chickpeas for much longer than intended, about 48 hours. My food processor managed to blend the chickpeas without any issues, but once I added the flax seeds and psyllium husk, it started to struggle. Both ingredients absorbed the liquid very quickly, and the mixture seemed too thick to process properly. In the end, I switched to an immersion blender and finished mixing and kneading the dough by hand.
Despite these little challenges, the result was surprisingly good. The bread has a slightly different flavor from traditional bread, but it pairs perfectly with flavorful spreads and fresh vegetables. Before baking, I sprinkled the loaf with caraway seeds, which worked wonderfully, though next time I’ll definitely add much more. 😊
Thanks again for sharing this recipe. I’ll definitely be making it again!
Hello Jitka, thank you so much for your wonderful feedback! 🥰💛 I’m so happy the bread turned out well despite the unexpected longer soaking time and the extra effort with blending. Caraway seeds sound like a delicious addition!
For next time, I’d recommend adding the psyllium husk powder and ground flaxseed only after the chickpeas have been blended completely smooth, then mixing just until everything is combined. Since they absorb liquid very quickly, that usually makes the process much easier. 😊 Thanks so much for sharing your experience!
Your recipes are GREAT
Aww, thank you so much! 🥹💛 That truly means a lot to me. 😊
hello Ela! is it possible to make this bread in a breadmaker machine?
Hi Sofy, I don’t think it’ll work. This is not a yeast dough but a very fast-setting batter with psyllium, flax and baking powder. It thickens within minutes and needs to be shaped and baked right away, which bread machines don’t handle well.
If you really want to try it, only use the machine as a “baking oven”: prepare the batter as written, transfer it directly into the greased bread pan and start a bake-only program without any kneading or resting time.
But honestly, the regular oven gives much better results for this recipe.
Can I bake the bread in Air Ftyer instead of oven ?
Yes, I think some readers already tried it with success. 🙂
Wow thank you very much for this recipe
You are very welcome! 🙂
I just made this and it was really good! Based on previous comments, I decided to make it in a small loaf pan. I baked for 40 min, as directed in a convection oven and then added 5 more minutes and was happy with the results. I also substituted 3 tablespoons of additional flax meal plus 1 tablespoon of wheat germ for the 4 tablespoons of psyllium. I topped mine with sesame seeds. I also am notorious for not waiting for baked goods to cool, so I waited almost 10 minutes, that’s long for me…but maybe not suggested! I truly enjoyed it and will definitely make it again.
Also a note to those who may not have soaked beans ready when you decide on a whim to make a new recipe. I soak twice as many as I will be using and freeze the soaked beans after draining. That way, I always have soaked beans ready for a recipe or to cook for another recipe. So far it works with any kind of bean!
Thank you so much for sharing your experience! 😊 I’m so happy you enjoyed the bread! Thanks for sharing your substitutions and baking time, too. And your tip about soaking and freezing extra beans is such a great idea. I’m sure many people will find that really helpful. 💚
Would garbanzo flour work in this recipe in place of ground garbanzos?
Hi Sharon, you can make my chickpea flour bread recipe instead. 🙂
💛Ela, Ela, Ela…
I’m rating this again. Your wonderful recipe is a taste delight; vegan, flour free, oil free, and high protein. ☺️
I pulled this out at my husband’s request. I read through a lot of comments to see what others did. I wanted to use a bread pan and tried something another tester did – baking it at 350 F for 65 minutes I made it and produced a “brick.” This was not to deter us. The flavor is amazing (I added garlic powder and caraway seeds.) My husband later proceeded to cut my thin slices into 1/8 inch and toast them in the toaster oven. Then he added ‘no salt seasoning’ and coarse celtic sea salt on top for delightful toasty crackers.
I truly felt bad about the guy who produced a brick and “threw everything in the bin.” Didn’t he even taste it? He would have learned what resilient bread this is!
I also followed the instructions to a T and used the kitchen scale measurements. I am writing to tell other testers, “Don’t give up if the results aren’t what you expect. Use it another way.” This bread is simply amazing and I am so blessed to be married to a man who doesn’t care how it turns out. He absolutely loves it every way!! I spent yesterday making two more loaves because it disappears so quickly.😋😮
My only dilemma is waiting 9 hours for the chickpeas to finish soaking.😂 (By the way, thanks for the food processor link. I love my new lightweight Hamilton Beach kitchen tool. It works well and easily with this recipe.😉🤗
Thank you again for sharing yourself with the world!♥️
Aww, thank you so much for taking the time to come back and leave another review! 🥹❤️ Your comment truly made my day. I absolutely love that your husband found a delicious way to enjoy the first loaf instead of letting it go to waste! 😊 And thank you for encouraging others not to give up if things don’t turn out perfectly the first time. That means a lot. Wishing you both many more delicious loaves! 🤗💛
You are very welcome, and thank you again!💛🤗
We never waste good ingredients. This bread is a delicious delight.😋 You, my dear, are a rock star in the vegan/allergy world.🤩
Hi Ela,
Brilliant recipe! This bread recipe works perfectly every time (and I’ve made it for about 6-8 weeks consistently now and churned out about 14 loaves at least, all perfect).. Toasts beautifully, too, but amazingly is great fresh as a sandwich as well – as close to wheat bread as I’ve found after trying so many recipes over the years.
Just one question – do you think I could double the recipe to form a single, larger loaf or do you think it might not bake through to the centre of the loaf properly (or could I just extend the cooking time, perhaps to compensate)? I was just looking for an occasional larger loaf of bread so the slices are a bit longer.
Thanks again for your fantastic recipes!
Clare ❀
Hi Clare! 😊
Thank you so much for your lovely feedback! 💛 I’m thrilled to hear that you’ve made the bread so many times and that it’s been working perfectly for you. Knowing that it’s become a regular part of your routine means a lot! 🥰
As for doubling the recipe, I haven’t tested that myself, so I can’t say for certain how it would affect the baking time and texture. My concern would be exactly what you mentioned, that the center might not bake through properly before the outside becomes too dark. 😊 If you’d like to experiment, you could certainly try extending the baking time, but unfortunately I can’t guarantee the results.
If you do give it a try, I’d love to hear how it turns out! 💛
Hi Ela,
Thanks for your reply, appreciate it. Yes, I figured it would only be an educated-guess on your part as I doubted you would have tried a bigger loaf either – the normal-sized loaf this recipe makes is perfectly fine for me, but my manfriend wants his sandwiches bigger and more ‘man-sized’ slices as he puts it, haha!
I will give the larger loaf a try some time soon and will be sure to come back here and let you know how it goes, what I did differently, if there’s any adjustment in cooking time, etc.!
Also wondering while writing if putting the larger loaf into a standard-sized loaf tin in that instance may help heat the loaf through more consistently given it’s larger size (just a thought, may not do anything except shape it differently)?
Thanks 😊
Clare
——————————————————————-
*** P.S. Here’s my completely unsolicited, unrelated, unaffiliated ‘plug’ for Ela’s cookbook “Simple and Delicious Vegan“ as a big THANK YOU for her generosity in sharing so many brilliant recipes freely here on her website as I love to pay things back. I highly recommend the cookbook to everyone who visits here and wants a stunning collection of delicious vegan, gluten-free, refined-sugar free recipes that actually work AND help you maintain good health along with actually enjoying your food (vegan/plant-based shouldn’t be boring or non-tasty!). I bought it as an eBook at the moment, but will eventually buy it as a hard copy too, as recipes look so much more beautiful in books. End of unsolicited plug, and thank you Ela! 😊 ***
Hi Clare! 🙂 Haha, “man-sized” sandwiches gave me a good laugh! 😄💛
Thank you for being willing to experiment and report back. I’m sure other readers would find your results helpful too! 😊 A loaf tin could definitely be worth trying.
And wow, thank you so much for your incredibly kind words about my cookbook! 🥹💛 Your recommendation means more to me than you know. I’m truly grateful for your support, both here on the blog and through the cookbook. Comments like yours make all the work worthwhile.
how about just slicing through the bread loaf horizontally to make a large sandwich. kind of like you would a bread bun. surely that would make a more man sized sandwich
Hi Ela,
Would it be okay to omit the flax seeds, as I am intolerant to them?
Hi Mal, you could use ground chia seeds instead of flax seeds. 🙂
I have made this bread several times and it is delicious and easy to make. There are times where it does rise and there are times where it comes out flat. Please let me know what I might be doing wrong.
Hi 😊💛
If the bread sometimes rises well and sometimes stays flat, even though you’re using the same recipe, a few things come to mind.
First, are you measuring everything in grams with a kitchen scale? That’s especially important for the psyllium husk powder. Different measuring methods can lead to very different results.
Another possibility is the chickpeas. After soaking, they should weigh about 400 g. If they weigh significantly less or more, the moisture content of the dough can change.
I’d also check the freshness of your baking powder and baking soda. If either one is getting old, the bread may not rise as well.
Finally, different brands of psyllium husk powder can behave quite differently. Some absorb much more liquid than others, which can affect both the texture and the rise.
If you’ve noticed a pattern, such as using a different brand of psyllium, chickpeas, or leavening agents when it turns out flat, let me know and I’ll be happy to help troubleshoot further. 😊💛
Currently in the oven, so excited to try this out! As someone who is gf with also oats, soy and egg white allergies, your recipe looks amazing!
Any advice on what can be used if someone runs out of soaked chickpeas btw? Quick soak of red lentils perhaps? I soaked my chickpeas (24h since I didn’t get to back last night) but they ended up o oh being 225g when weighed, so while tempted to open a can to balance, I didn’t want to risk a flop, so just halved everything else. Looks good with nutritional yeast in it and topped with sesame!
In case you see this soon, what time should I take it out since half sized loaf, 40ish mins?
Hi 😊💛
I only saw your comment several hours later, so I’m sure your bread is already out of the oven by now! 😄
For future reference, yes, a half-sized loaf will usually bake a bit faster, so I would start checking it after about 35-40 minutes.
As for the chickpeas, I wouldn’t recommend replacing them with red lentils in this particular recipe. The recipe was specifically developed with soaked chickpeas, and lentils absorb liquid and bake quite differently. If you only have about half the amount of chickpeas, reducing all the other ingredients proportionally (as you did) is definitely the safest option. 😊
I love the idea of adding nutritional yeast and topping it with sesame seeds. I hope it turned out delicious! 💛😊
this bread is so simple and absolutely delicious!
Thank you so much! 😊💛 I’m so happy you enjoyed it! 😍
I have a question about making this bread. What vinegar do you use; apple cider or malt vinegar?
Thanks.
Hi, I use apple cider vinegar. 🙂
I used white bean the second time making this for a more neutral tasting bread. Came out great. Only difference is to use less water since navy beans aren’t so heavy to blend like garbanzo beans are. Start with a 1/2 cup a slowly and add a teaspoon at a time if necessary to make sure it’s completely smooth.
Thank you for sharing your experience! 😊💛 I’m so glad it worked well with white beans too.
And that’s a great tip. Different beans can vary in moisture and texture, so adjusting the water as needed is always a good idea. Starting with less water and adding more only if necessary is definitely the safest approach 😊
Thanks for taking the time to share your results! 💛
You wouldn’t happen to have the ratio to make a cinnamon raisin bread with the same recipe would you.
I don’t because I never tried it. I think that was mentioned by someone on YouTube or here in the comments. Sorry I don’t remember. 🙂
I’m excited to share my take on cinnamon raisin bread with this recipe! Instead of 3/4 of a cup of water, I used half a cup of maple syrup and 1/4 cup of black tea, I added 2 tablespoons of cinnamon and 2 tablespoons of vanilla and one cup of raisins. I think next time I will use lemon instead of ACV, and I’m going to try adding 1 tablespoon of molasses, and a little bit more cinnamon and vanilla. I can still taste the chickpeas a little bit and I want to try to cover up that flavor.
Good luck if you try it!
Thanks so much for sharing, Maegen! 🙂
Hi Ela, when adding in nutritional yeast, what is the best amount to addd to enhance the flavor, but not effect the rise and texture of the bread.
I would probably start with about 2-3 tablespoons 😊 That should enhance the savory flavor nicely without noticeably affecting the texture or rise 👍