This gluten-free pita bread is tender, fluffy, and pillowy – all without the use of wheat! With just 5 ingredients (not including water, salt, and oil) and a simple process – you can make delicious, cost-effective flatbread at home that will have you ditching store-bought versions for good!
Fluffy, Tender, Gluten-Free Flatbread
Having posted my naan recipe recently, I’m really getting into the spirit of home-baked GF bread, especially simple gluten-free flatbread style recipes like this pita bread (Pitta for those in the UK).
What is pita? Pita bread actually refers to a family of flatbreads that are yeast-leavened and originate in the Middle East and are also popular in the Mediterranean (e.g. Greece). There are several varieties, including the most common pita bread containing a pocket (aka pita pockets or Arabic/Syrian bread) which are perfect for stuffing with fillings. There are also thicker pocketless versions (similar to naan), used to serve alongside kebabs.

Is Pita Bread Gluten-Free?
Pita is traditionally made with wheat flour and is known for being light and pillowy – not exactly qualities synonymous with gluten-free bread. Luckily, inspired by my gluten-free pizza dough recipe and with something to prove, I got myself in recipe testing mode and didn’t stop until I had this fluffy gluten-free, vegan pita bread recipe.
I was actually blown away by how much I was able to get the pita to puff up, but I also love how cost-effective they are. The ‘free from’ aisles in stores aren’t exactly known for being easy on the bank balance (I mean, have you noticed the price difference between wheat pita and gluten-free pita bread?!) and so making these simple items at home is a great way to enjoy foods you love in a lower-budget way.
More than that, though, if you’ve ever taken the time to actually look at the ingredients found in many grocery stores’ GF bread options, you’ll notice lots of very questionable additives and preservatives. In the end, you have to pay more for a product that usually doesn’t taste as good and is filled with ingredients that many would rather avoid. All the more reason to turn to this simple, natural, homemade pita bread recipe!
How To Make Pita Bread?
I’ve included basic step-by-step instructions just below. For the full ingredients list, measurements, complete recipe method, and nutritional information read the recipe card at the bottom of the post.
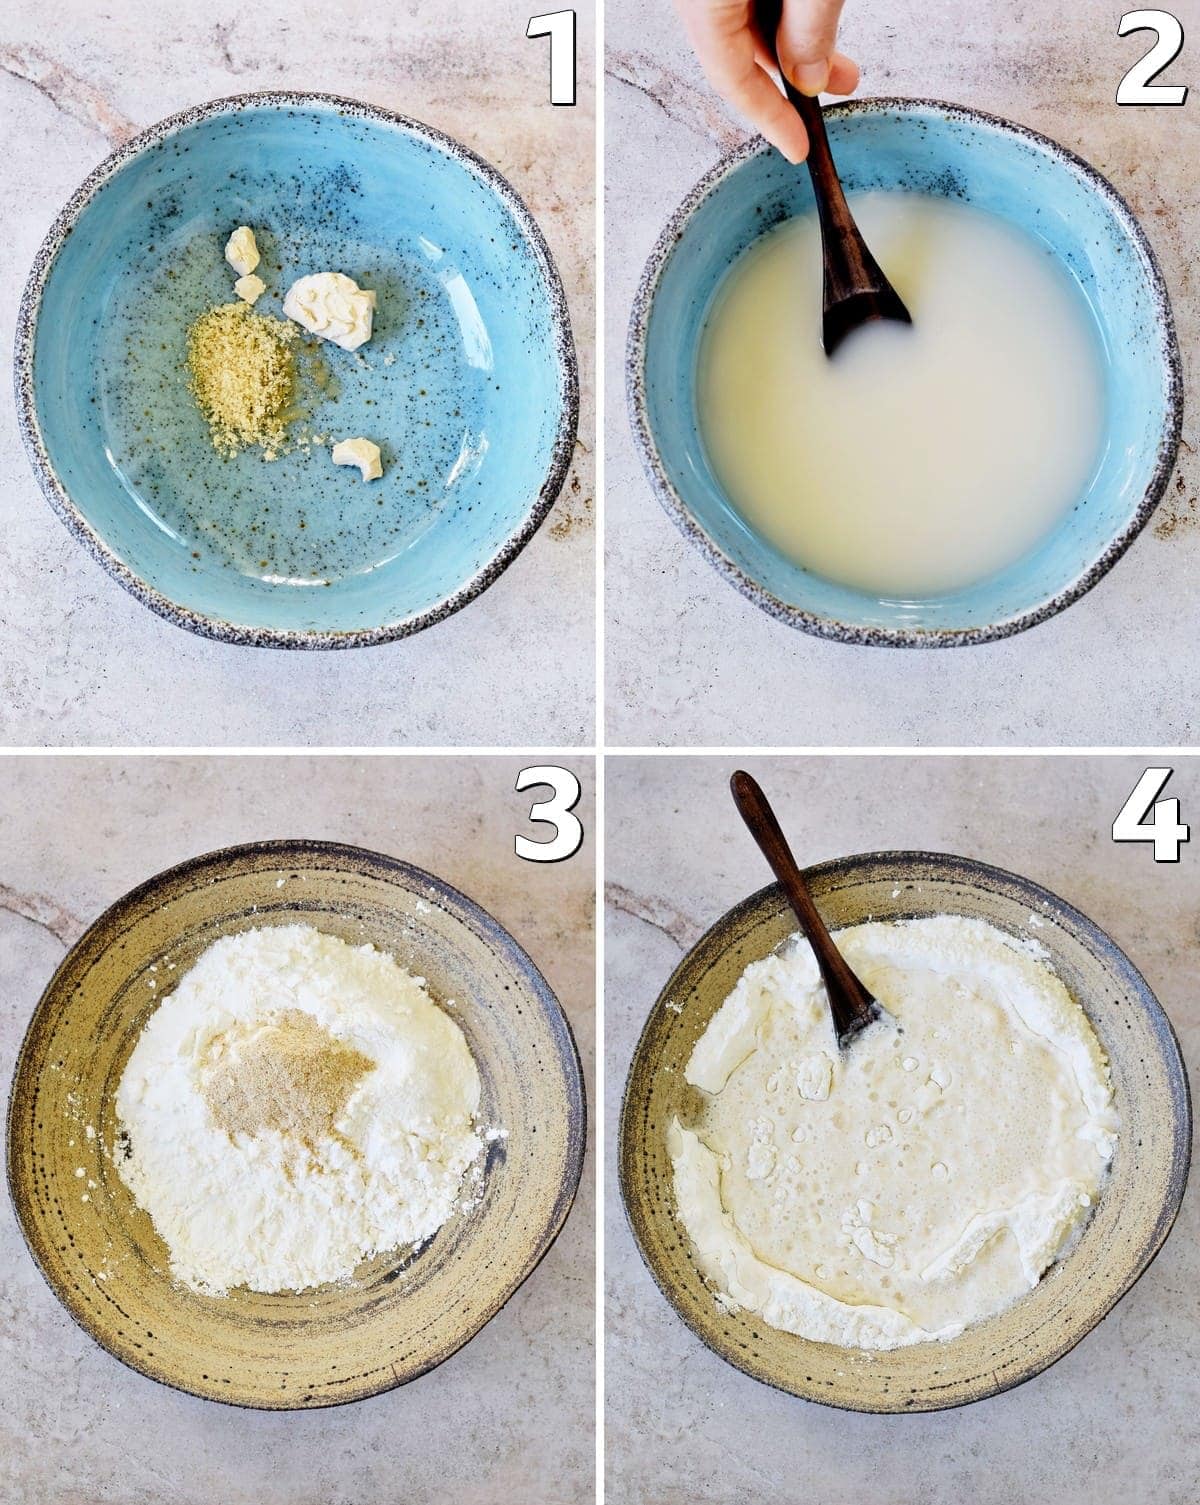
Prepare the yeast mixture
Heat your water to around 40°C (lukewarm), add the yeast, sugar, and stir well with a spoon. Then set aside for five minutes for the yeast to activate – it should begin to froth up and become slightly bubbly.
Make the gluten-free dough
Combine all of the remaining dry ingredients in a large bowl and mix, then add the yeast mixture and oil and stir with a wooden spoon until combined.
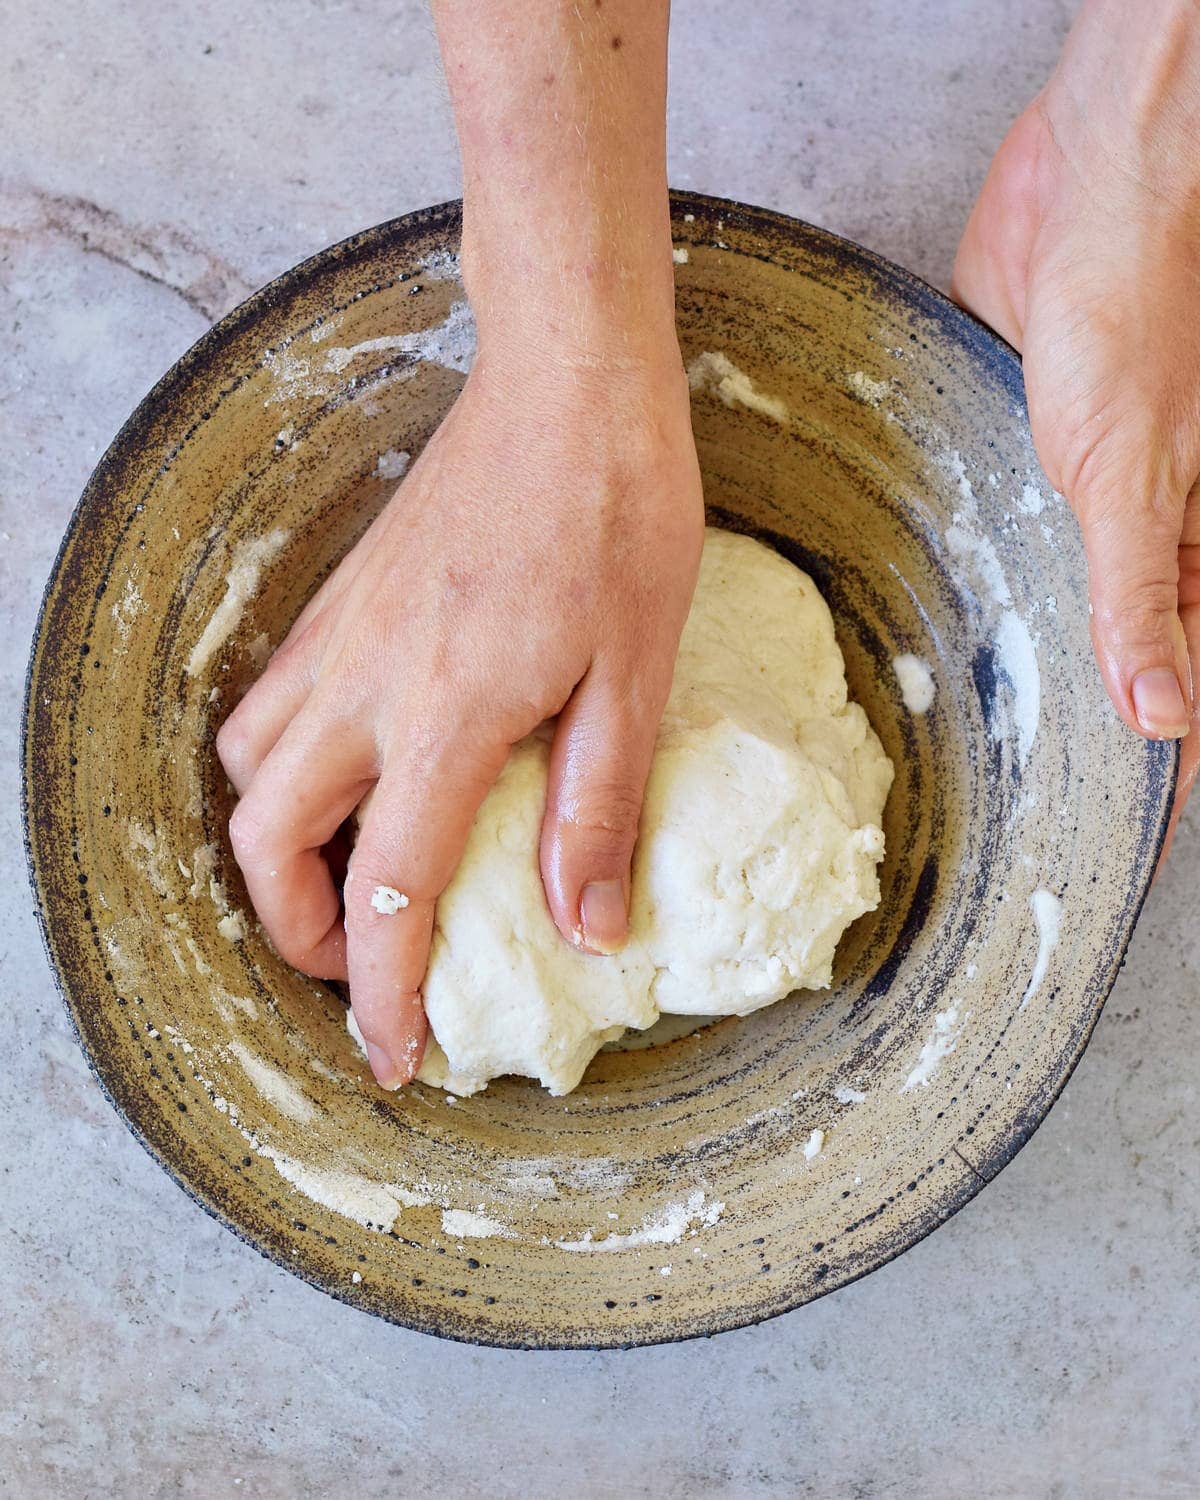
Knead it & allow it to rise
Knead the gluten-free dough for a few minutes, form a ball, and place it back into the bowl. Then, cover the bowl with cling film and allow it to rise in a warm area (preferably between 40-50°C) for 45-60 minutes.
Note: You could heat your oven for just a few minutes, then switch off and leave the dough in the warm oven.
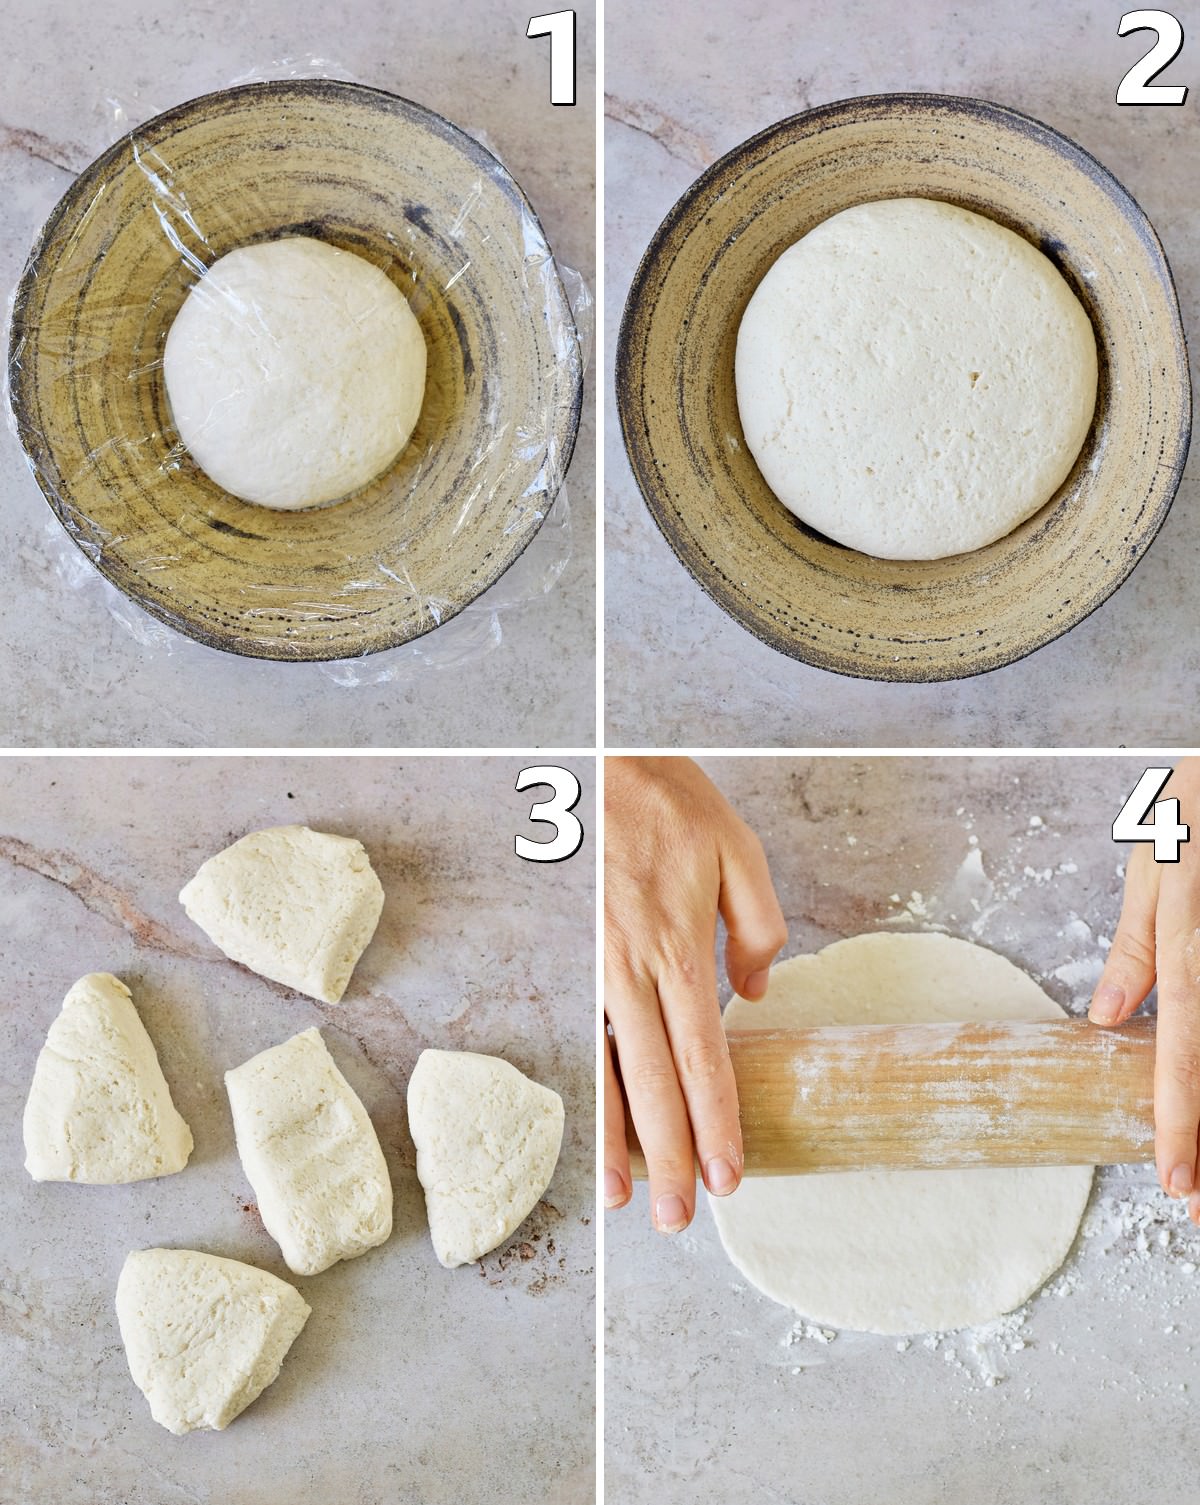
Shape the pitas
Divide the dough into 5 pieces (around 90g), or 10 if you want mini pittas, and shape each piece into a ball.
Leave to rest for a further 10-15 minutes before rolling each dough ball into a circle around ¼-inch thickness using a floured rolling pin.
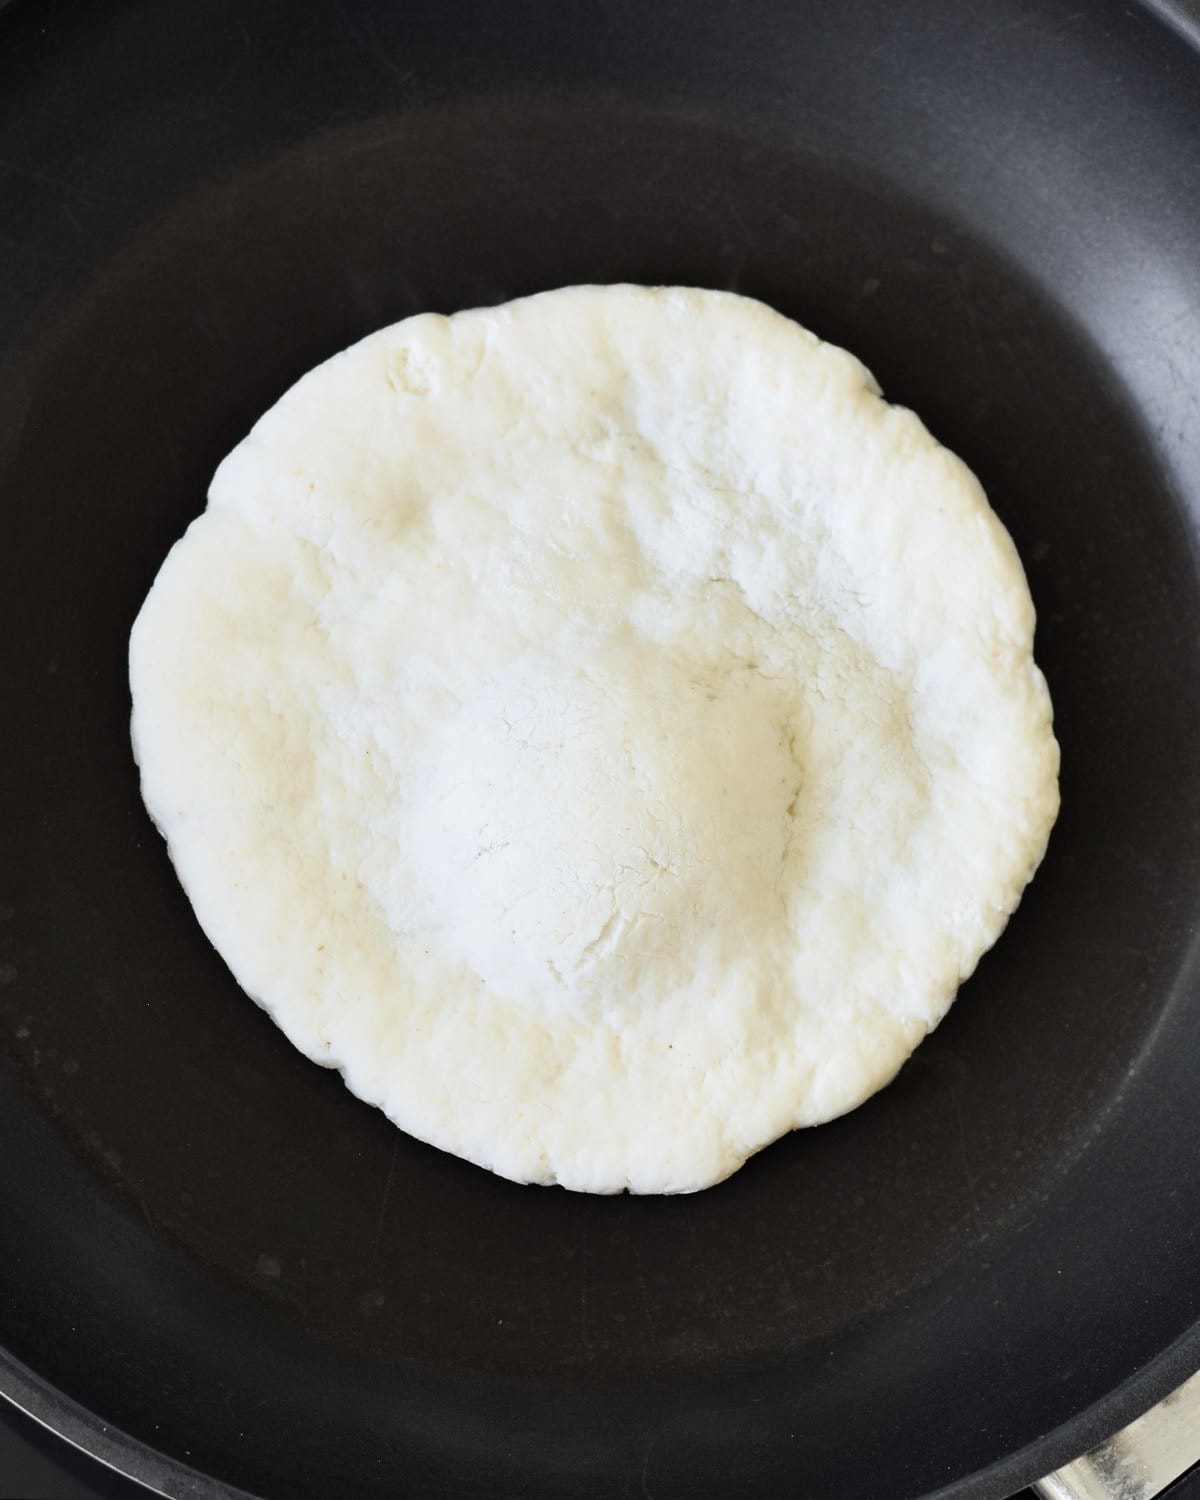
Cook the pita bread
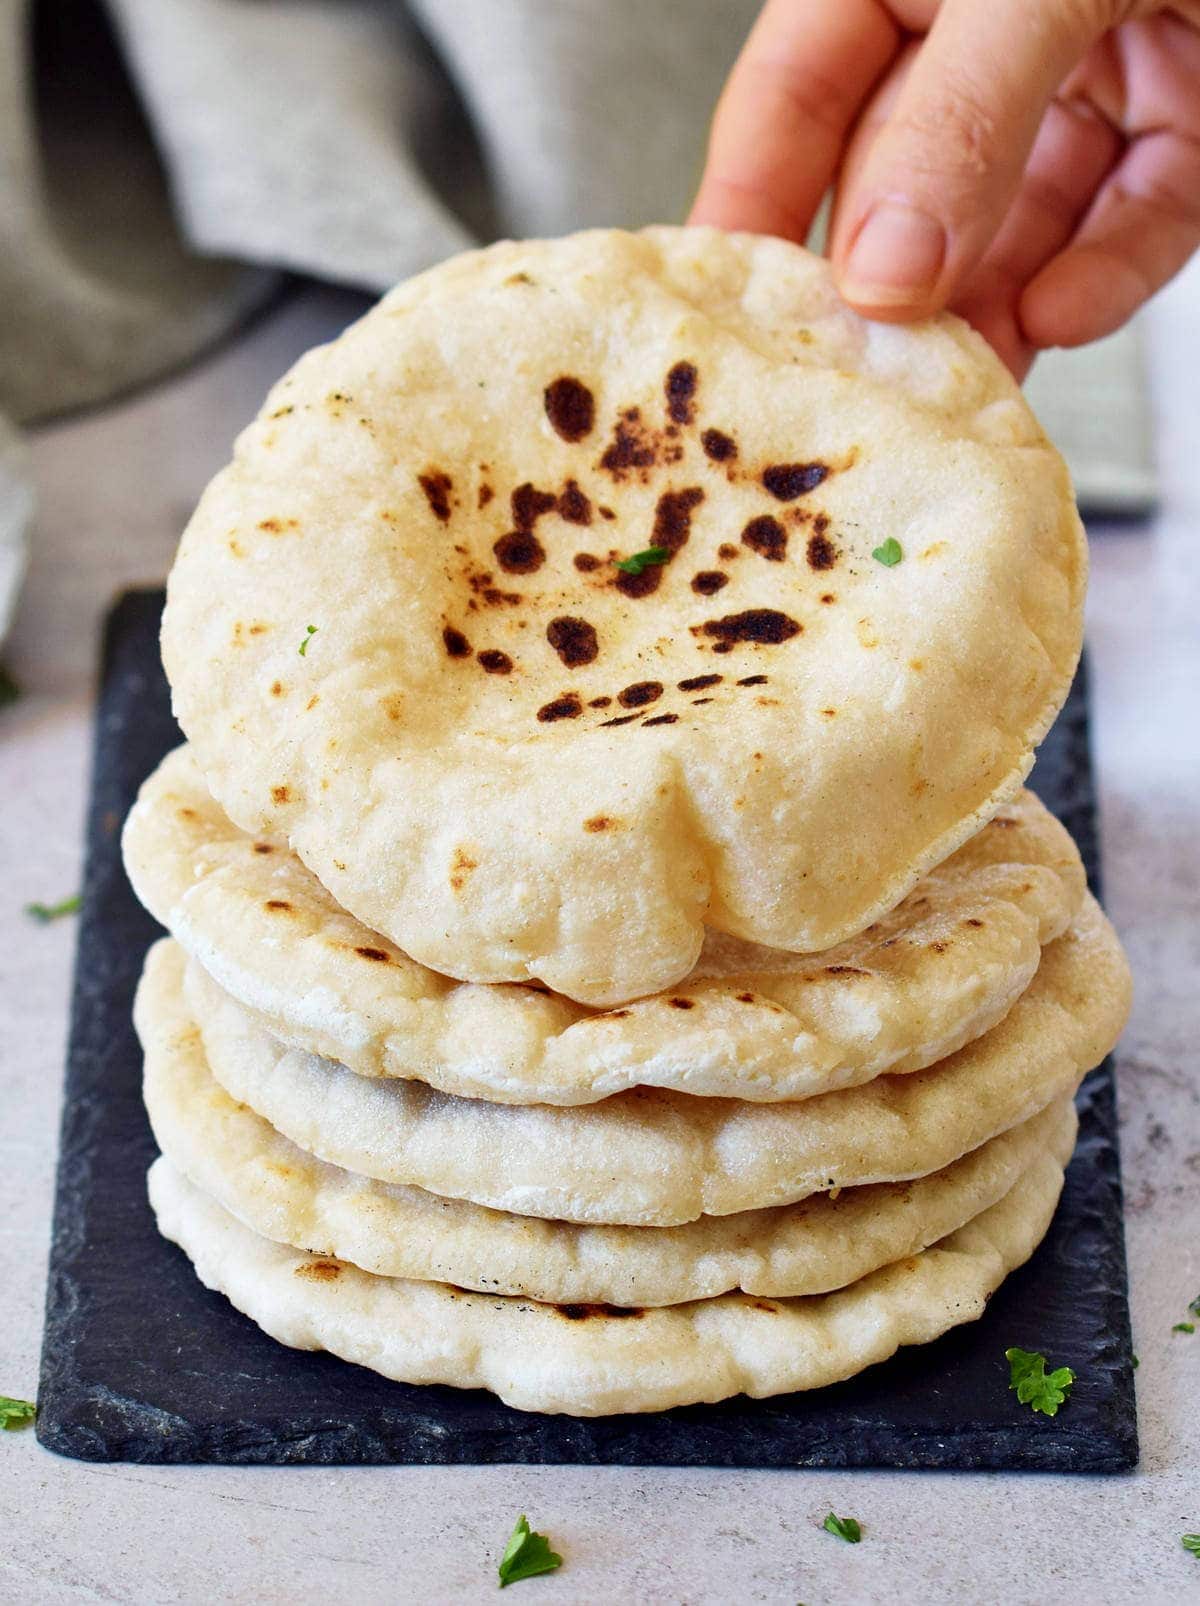
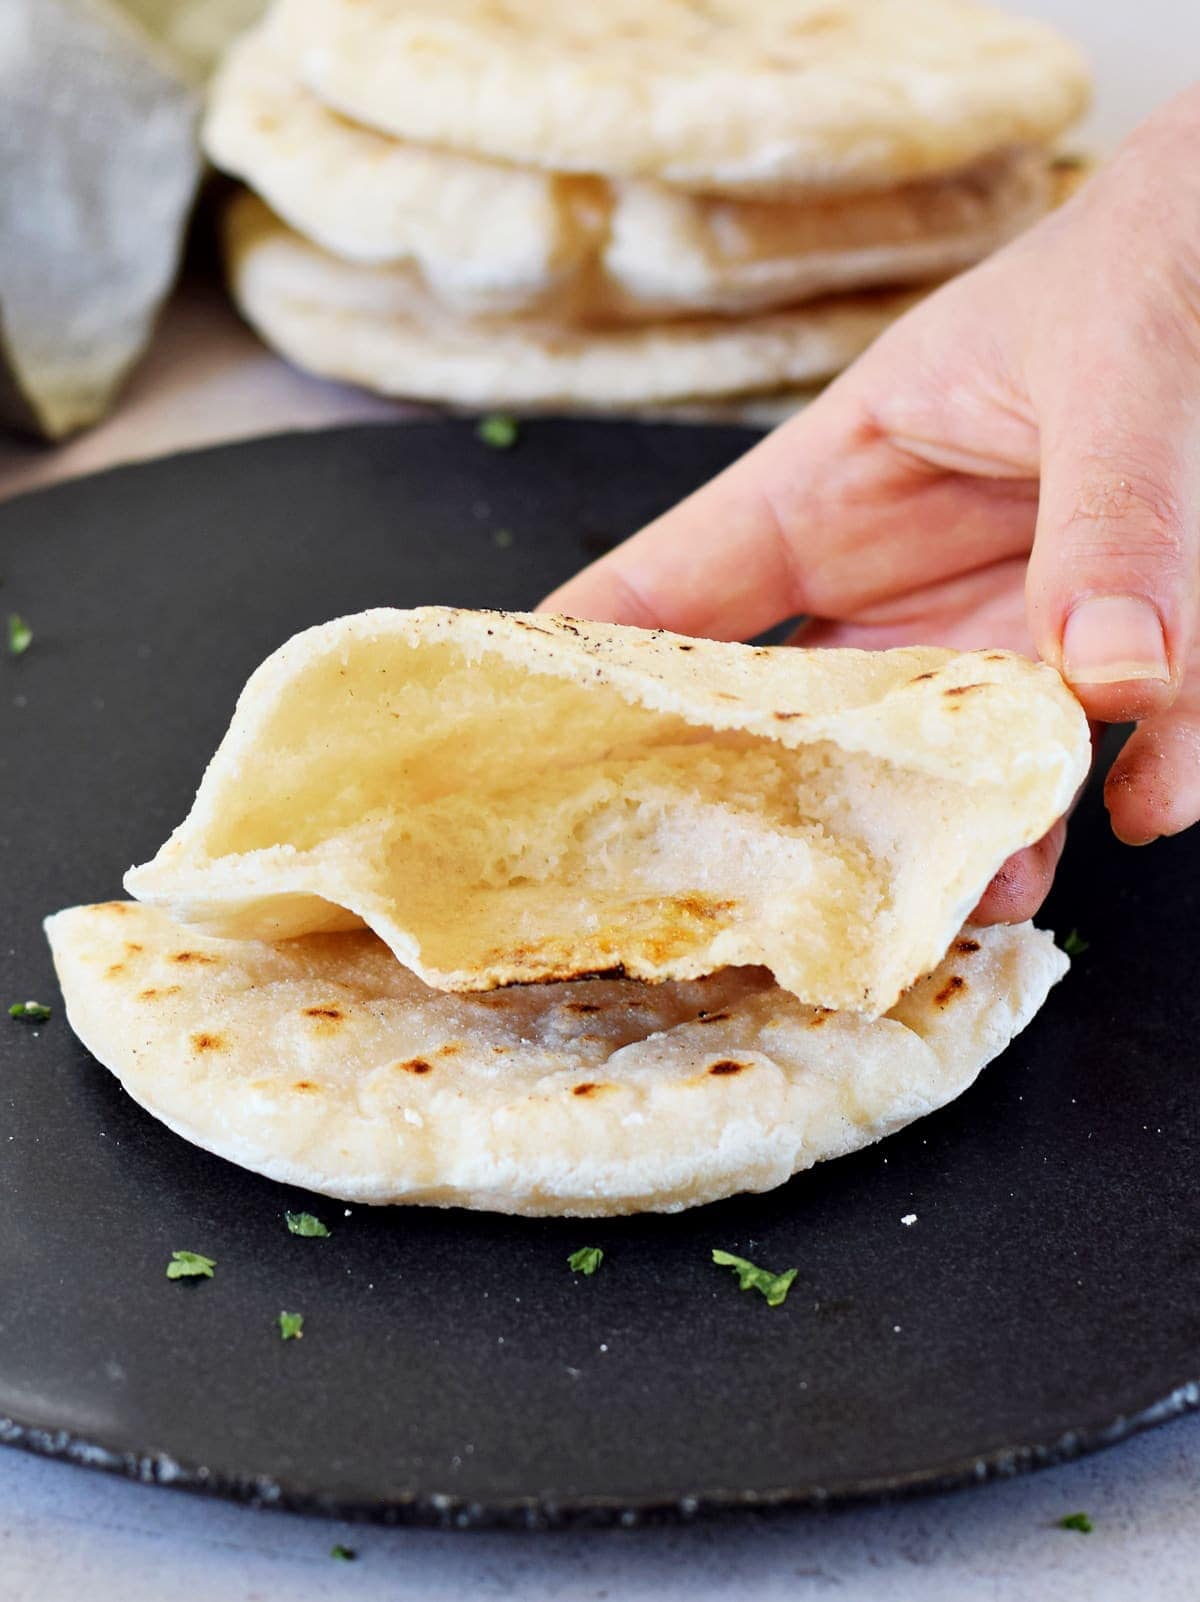
This is the critical step in getting the gluten-free pita to puff up. Make sure not to use heat that is less than 390°F (200°C).
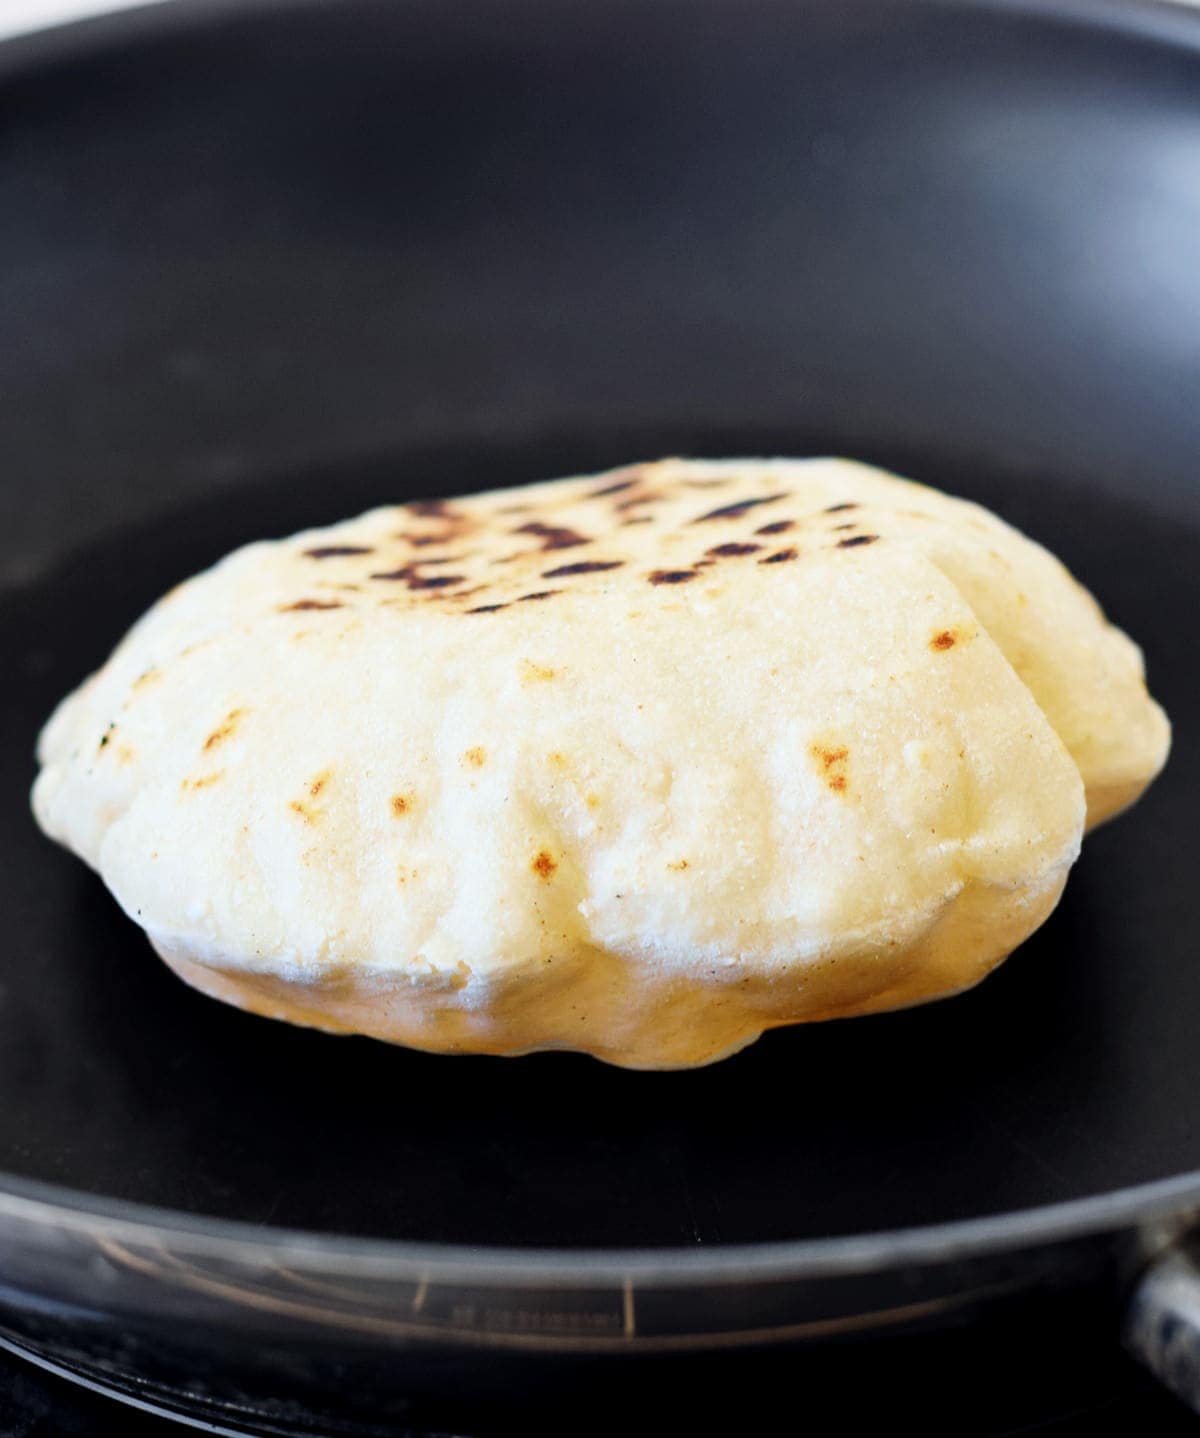
Heat a skillet over medium-high heat (I chose 390°F on my induction cooker). Once hot, cook a pita in the pan for 1 minute – until bubbles begin to form on the surface.
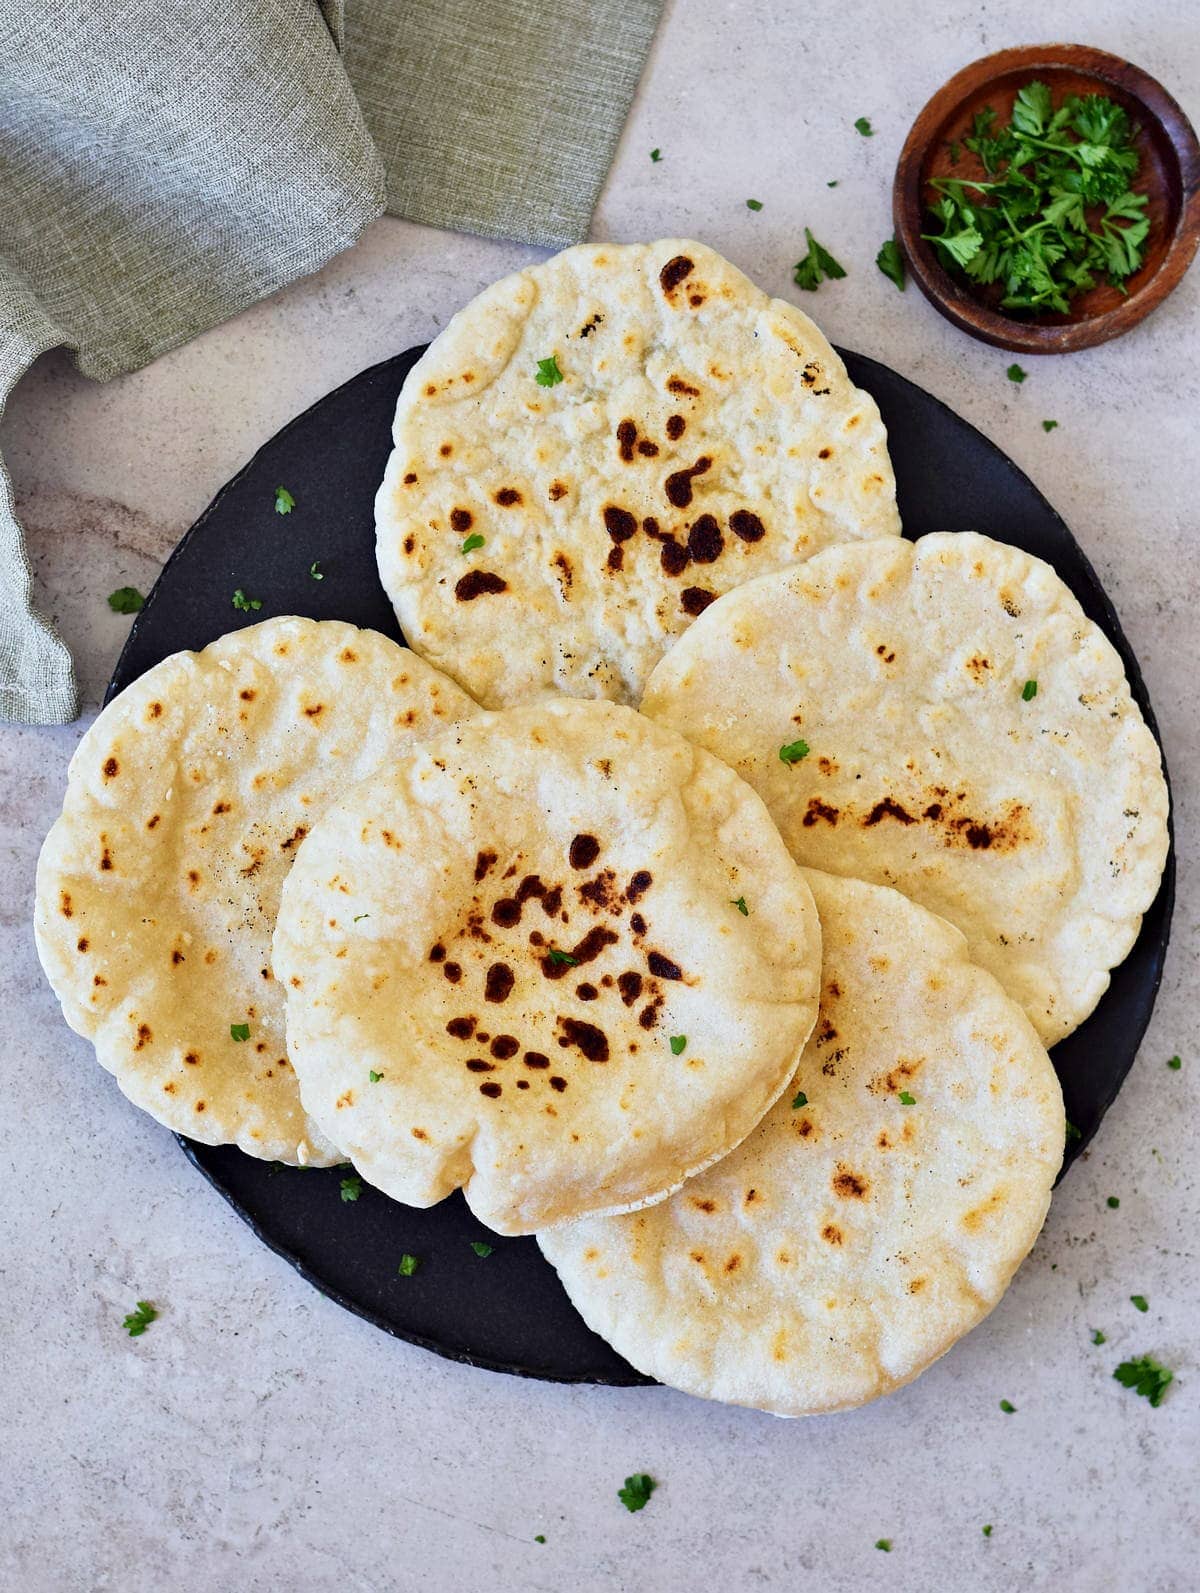
Then, flip the pita over and cook for a further few minutes on the other side. Flip once more, and it should puff up and form a large pocket.
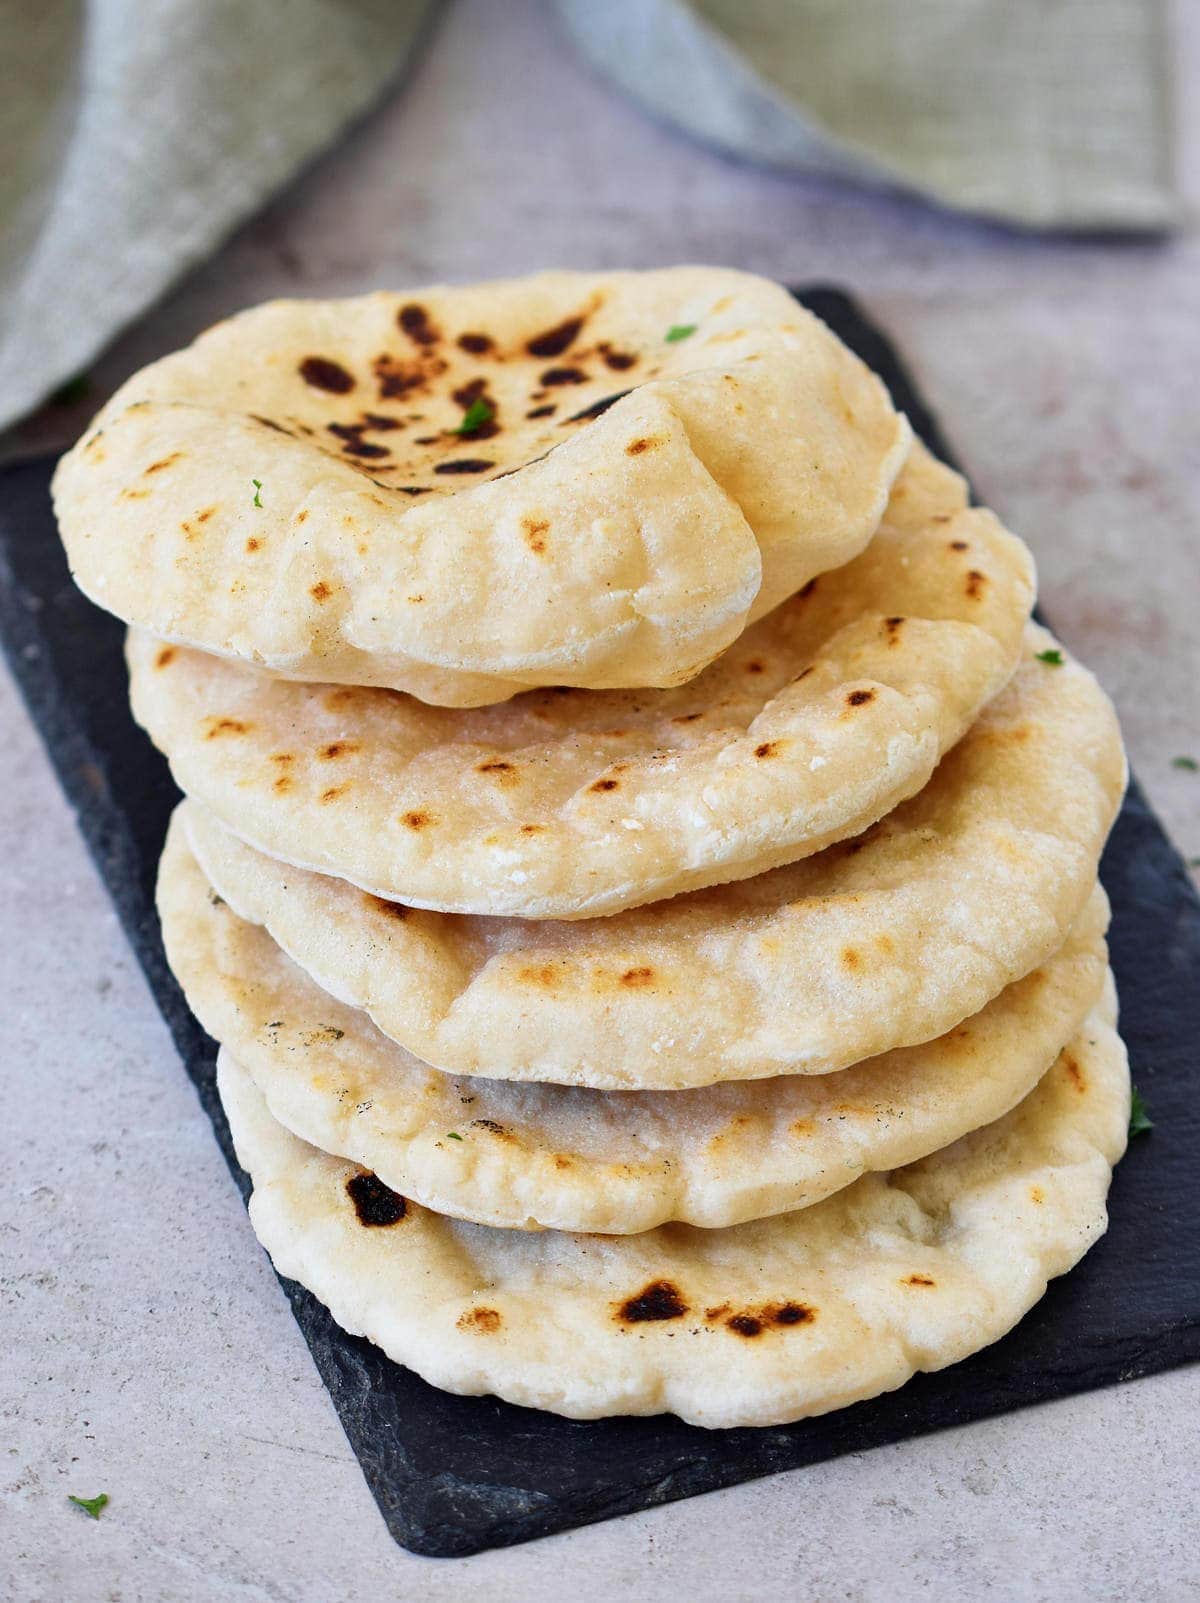
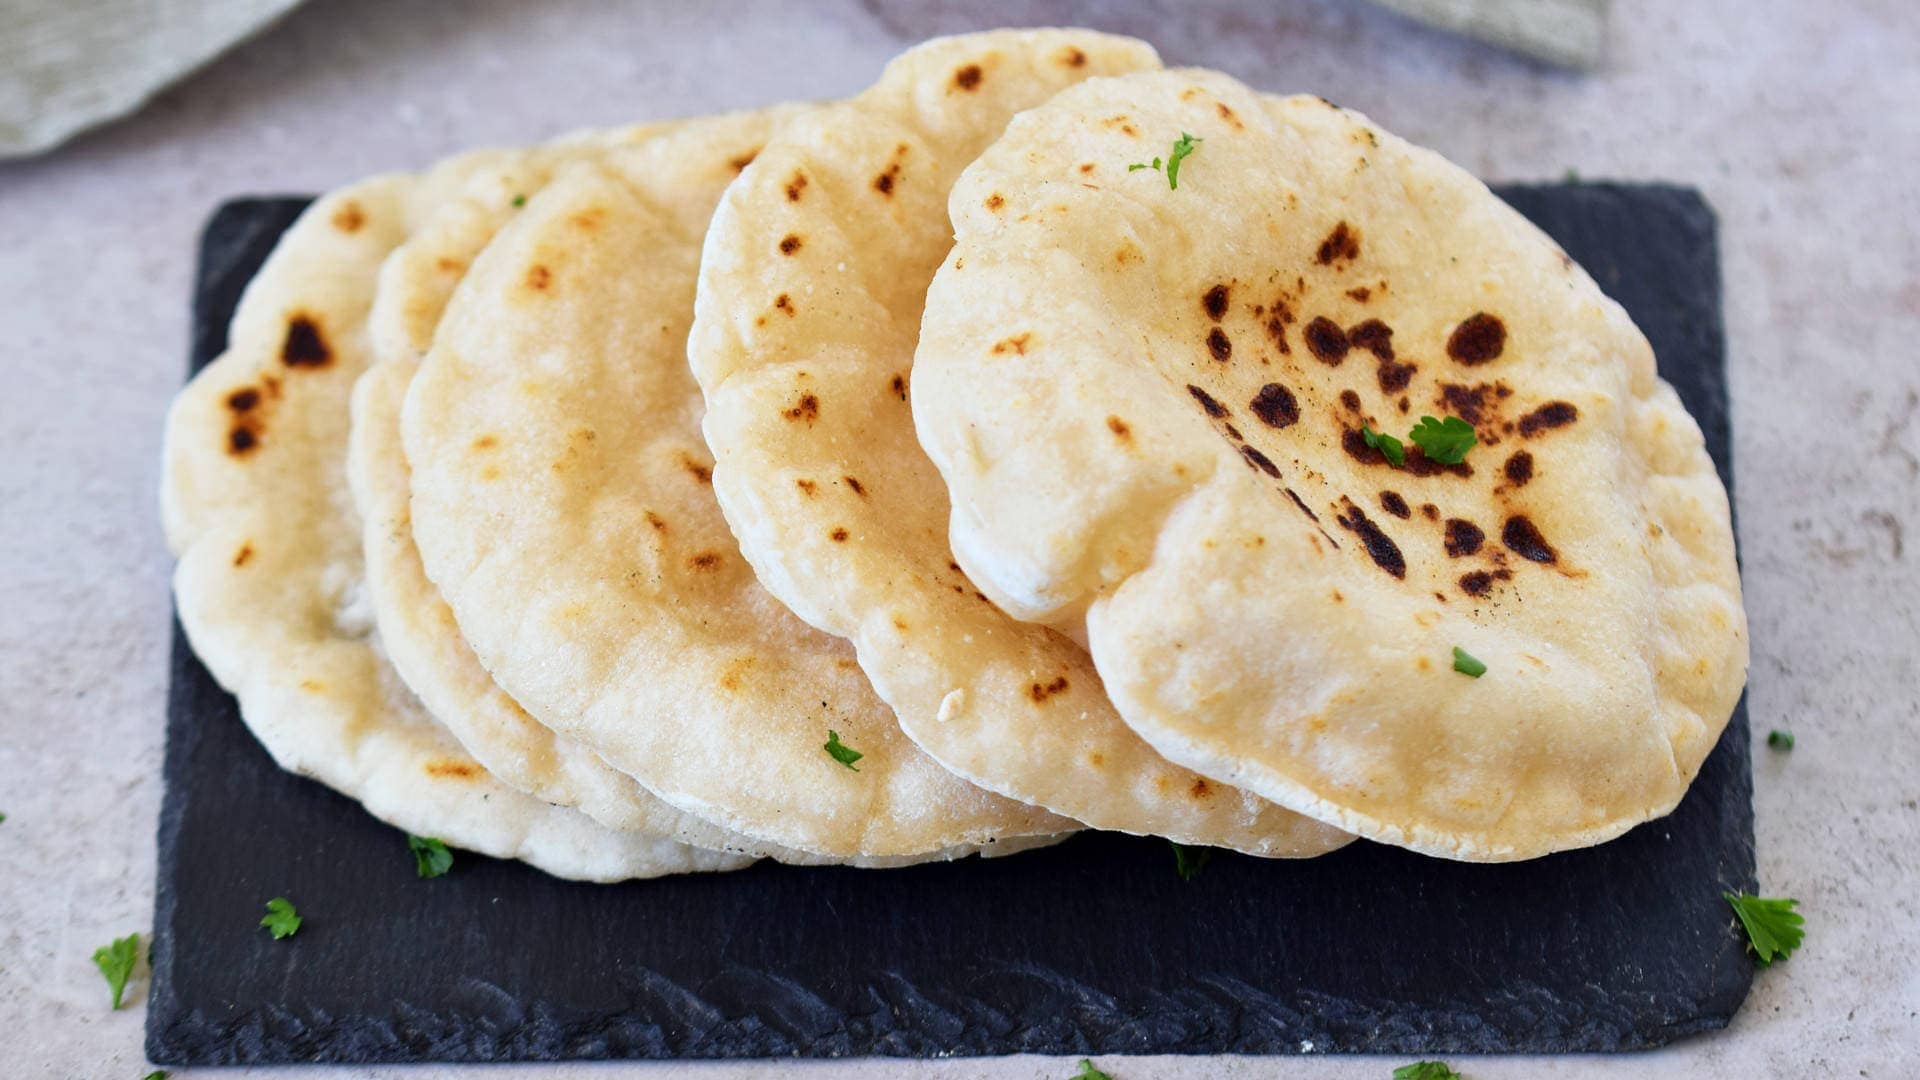
Repeat this with the remaining pita dough. Keep all cooked ones covered with a clean, dry kitchen cloth to stop them from drying out/crisping up.
How much the gluten-free pita bread puffs up (if it does at all) can be solely down to how thick your dough is rolled out. If you test one pita and it doesn’t puff up, roll the next one thinner and try again. This can take a little bit of practice to get the thickness sweet spot, but when you do – hello pocket-y goodness!
How To Make Ahead & Store?
To Make Ahead:
You can prepare the gluten-free dough in advance and only cook a little at a time. The prepared, uncooked dough can be kept in the fridge, covered, for 2-3 days.
To Store:
I prefer to make the gluten-free pita bread fresh, so they don’t dry and crisp up. However, leftovers can be stored in an airtight container (to avoid them from drying out), for a few days. I like to splash them lightly with a little water and microwave for 10-15 seconds. Or bake in the oven for a couple of minutes), to soften them.
This vegan pita bread should also be freezer friendly for up to a month, though it isn’t something I’ve tried. Make sure to wrap the bread well before freezing.
How To Serve?
- As pita pockets – i.e., stuffed with falafels, tahini sauce, and salad or even this Vegan Shawarma Kebab.
- Use leftovers of this gluten-free pita for traditional Lebanese and Middle Eastern dishes like fattoush salad.
- Cut and bake into pita chips for dips – like this Vegan French Onion Dip or Easy Vegan Spinach Artichoke Dip.
- Use as a makeshift gluten-free flatbread ‘pizza’. This is a great way to use any that don’t puff up as much as you’d like). Top with your toppings of choice and stick under the broiler for a few minutes. You could also oven-bake them for 10 mins or so until the toppings are warm/melted.
- Make pita pocket versions of your favorite taco/enchilada fillings. Like these Chickpea Tacos, Oven-Baked Spinach Tacos, or Enchiladas With Lentils.
- Use with burgers, as an alternative to burger buns.
Useful Recipe Notes
- Tapioca flour: You can most likely also use arrowroot flour instead, though I haven’t tried it.
- Psyllium husk powder: This ingredient is important and shouldn’t be substituted.
- Rice Flour: Unfortunately, with gluten-free baking, it isn’t simple to swap out the flours to whatever you’d prefer. Each flour reacts to ingredients in different ways. For that reason, I can’t easily suggest alternatives or guarantee results if you choose to use a different gluten-free flour.
- To make a version with wheat flour: Use 160 ml warm water, 10 g fresh yeast, 1 1/2 tsp organic cane sugar, 270 g all-purpose flour, 1/2 tsp salt, and 2 tsp oil.
- I tried making the pita bread in the oven, but they didn’t puff up. It may work with a pre-heated pizza stone in the oven, using the hottest setting. Pitas usually need temperatures of at-least 230C/450F to turn the water in the dough to steam and cause the pita to puff up into a pita pocket.
- You can optionally add some nigella seeds or poppy seeds to the dough for more flavor.
- For a Mediterranean style gluten-free flatbread, you can roll the dough out thicker. That way, it won’t puff up and have a pocket but should still have a fluffy, slightly chewy texture.
- When making this homemade gluten-free pita bread, you can control the size and shape of your individual flatbreads. If you want snack-sized mini pitta, go for it- pizza boat-shaped flatbread, sure!
Other Related Bread Recipes
- Moist Vegan Cornbread
- Gluten-Free Vegan Bread
- Gluten-Free Buns (Bread Rolls)
- Easy Spinach Tortillas Recipe
- Gluten-Free Tortillas
If you try this gluten-free pita bread recipe, I’d love a comment and recipe ★★★★★ rating below. Also, don’t forget to tag me in re-creations on Instagram or Facebook with @elavegan/ #elavegan – I love seeing your recreations.

Gluten-Free Pita Bread
Video
Ingredients
- ¾ cup + 2 tbsp (200 ml) warm water
- 10 g fresh yeast (see notes)
- 1 ½ tsp organic cane sugar
- 1 cup (160 g) white rice flour (see notes for a version with regular flour)
- ⅔ cup (80 g) tapioca flour
- 2 tsp psyllium husk powder
- ½ tsp salt
- 2 tsp oil
Instructions
Make the yeast mixture
- I recommend using a kitchen scale for this recipe and measuring the ingredients in grams instead of cups. Also, watch the video in the post for easy visual instructions.Heat the water in a saucepan over medium heat for a few seconds until it's lukewarm (not hot!) about 40°C (104°F). Add yeast + sugar and stir with a spoon. Set aside for about 5 minutes to proof the yeast. If it starts to get a little frothy, then the yeast is still active and usable.
Make the dough
- Combine rice flour, tapioca flour, psyllium husk powder, and salt in a large mixing bowl and stir with a whisk. Add the yeast mixture and oil, then stir with a wooden spoon until combined.
Knead it and let it rise
- Knead the dough with your hands for a few minutes, form a dough ball, and place it back into the bowl. Cover the bowl with cling film and set aside preferably in a warm place (40-50°C / 120°F would be perfect*) for about 45-60 minutes. The dough should rise nicely after that time.*Note: You can heat your oven for some minutes until it's warm, then turn it off and put the bowl with the dough inside the oven.
Shape the pitas
- Divide the dough into 5 equal pieces (about 90 grams each) and shape them into balls. Cover them again and leave them to rest for about 10-15 minutes.
- Roll out one piece into a circle about 1/4 inch (0.6 cm) thick by using a floured rolling pin. Repeat this step with the other dough balls.
Cook the pitas
- Heat a skillet over medium-high heat for a few minutes. I chose 390°F / 200°C on my induction cooker. Place a pita in the skillet and cook for about a minute. After a while, you will see that bubbles start to form on the surface. Flip the pita over and cook it for a few more minutes on the other side. After flipping it one more time it should puff up and form a large pocket.Note: How much the pita bread puffs up (if it does at all) can depend on how thick your dough is rolled out. If you test one pita and it doesn’t puff up, roll the next one thinner and try again. This can take a little bit of practice.
- Repeat this step with the other pitas and keep the cooked ones covered with a kitchen towel. Serve with falafel and a tahini dressing.
Notes
Video Of The Recipe
- Yeast: I recommend fresh yeast, but you could also use 1 tsp dry yeast.
- Tapioca flour: You can most likely also use arrowroot flour instead.
- Psyllium husk powder: This ingredient is important and shouldn't be substituted.
- For a yeast-free flatbread, check out my Gluten-Free Naan Recipe.
- I tried making the pita bread in the oven but the pitas didn't puff up. It might work if you have a pizza stone in the oven and use the hottest setting.
- Check the step-by-step photos in the blog post.
- The total time doesn't include resting time.
- 2/3 cup (160 ml) warm water
- 10 g fresh yeast
- 1 1/2 tsp organic cane sugar
- 2 1/4 cups (270 g) all-purpose flour
- 1/2 tsp salt
- 2 tsp oil
Nutrition information is an estimate and has been calculated automatically
 „Simple and Delicious Vegan“ Cookbook by ElaVeganCLICK HERE to order!
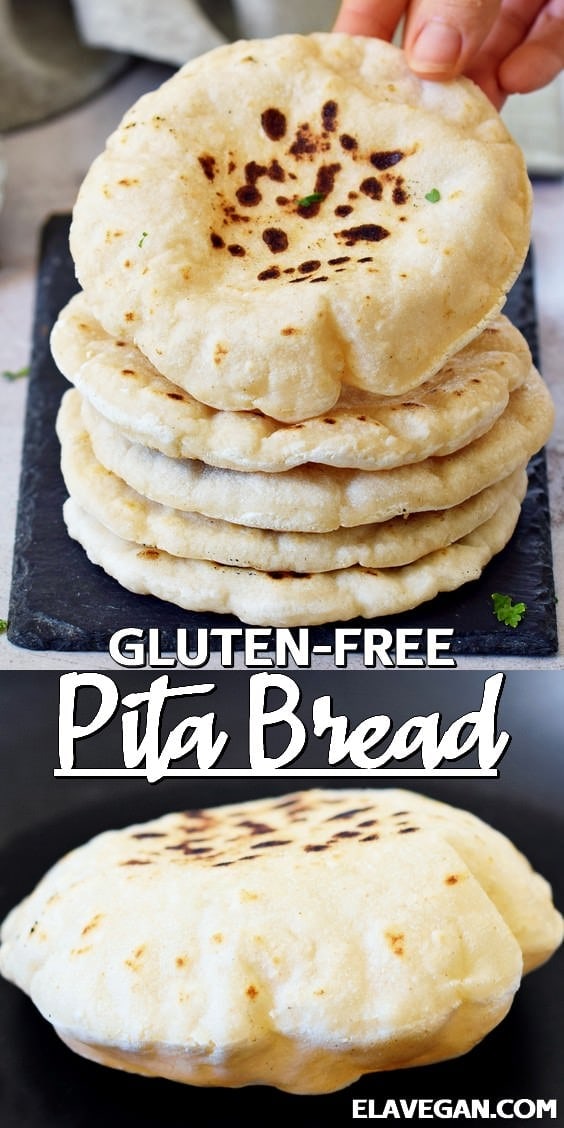
I have been baking my own gf breads, pizza crusts, crackers, etc for ten years now. Understanding the science behind the ingredients necessary makes all the difference. However, although I thought I was making pitas… I make the most delicious naan I have ever had! Couldn’t get it to puff. Even with the high temp and flipping often I still got a lot of charring. All that being said, I can tell with practice this recipe will get easier and we all know gf products have finicky outcomes. I am delighted to try your recipes and look forward to more yummy results in the kitchen. I apologize for anyone who has sent you nasty grams because they did not see success. GF baking is very challenging and no one has the right to say “waste of money and time” just because they’re angry. I hope you know how much the hard work on your recipe is appreciated by others.
Hats off to you!
Thanks so much for your very kind comment, Angel. I appreciate it a lot! I am glad you like my recipes. 🙂
Ignore my last comment, just found the “to store” section.????. Apologies.
Can these be made ahead and stored? Do they freeze well? Just curious.
Hi
I am considered a really good cook amongst my friends and the first time I made these they were absolutely great, but I made them twice more since and for some reason The dough simply hasn’t risen and I can’t figure out why as I’ve made them the same way, same yeast, same everything, so wondering if you have any suggestions
I very rarely have failures with anything, but it happens
????????????
Hi Annie, that can sometimes happen. Maybe the water was a little too hot, or the yeast isn’t working anymore. 🙂
It’s definitely not the yeast because I use that mostly for making traditional bread, buns etc, and add it to some of my sourdough recipes as well. and I never have a problem, I’m also very careful about the heat of the water, only tepid, but I will definitely try again with less heat because my gluten free friends loved the first batch
Thank you so much for getting back to me and have a great day
Hi how long can we store them and how?
Thanks!
Hello dear, please read the section “how to store” in the post. 🙂
Absolutely LOVED. These pita pockets. They puffed up wonderfully and I cooked them at 6,200 ft in elevation I was worried they wouldn’t turn out but they couldn’t have been more perfect.
Thanks a whole bunch 🙂
Yay, that sounds terrific! I am so glad they turned out wonderfully. Thanks for sharing. 🙂
The last two puffed… I think I over worked the first three – though they did try to puff in some areas… the flavor and texture are really nice… I love that you used white flours so the bread was light…
I think the next attempt will be completely successful!
Thanks for sharing!
That’s awesome, Lisa! I am so glad they turned out great. 🙂
Hi! Thanks for the recipe. Made tonight with regular gluten pita for my family. Found that this gluten free pita worked great on a pizza stone at 475. Thanks again! 🙂
Forgot to rate 🙂
Sounds great, Tiffany! Thanks for your feedback. 🙂
In case anybody was wondering! I made the following changes to the recipe and the results were amazing
Cane sugar subbed for maple syrup
Tapioca flour subbed for arrowroot starch
Live yeast subbed for fast acting dry yeast
The bread turned out fantastic but there were differences:
1. The dough was not at all malleable. Had to use a rubber spatula the whole time because it was far too sticky
2. The dough did rise, however not as much as in the original
3. No pocket formed, no matter how thin I made the dough
4. It was easier to mold using a plastic cling wrap folded in half with oil rubbed on either side
5. It was also easier to mold into thicker pieces, about half an inch each – I oiled my hands anytime I touched it, and it still stuck a little bit
Those were the differences, but it was still delicious. I may attempt again with slightly more rice flour and then again with potato starch instead of tapioca or arrowroot.
Thanks to the creator for sharing!!!!!!!
You are welcome! Thanks for sharing your substitutions. 🙂
Can I use brown rice flour instead of white rice flour?
They might be not as fluffy with brown rice flour, but you can try. 🙂
Rock and Roll! This recipe is awesome. I’ve tried a lot of pita/flat bread recipes to find one that works and this one is the one I’ll be using from now on.
Thank you!
You are very welcome, Steve! I am so glad you like it. 🙂
I’ve ordered all the ingredients and am about to try this recipe. As someone who has made many tortillas, I’m wondering if the “puff” is not happening for some bc the pan is not hot enough? That’s generally the issue with tortillas.
Hi, yes, that might be the case. But working with gluten-free dough is always a bit tricky. 🙂
not sure what I did wrong, I measured the ingredients, the yeast was alive and I made sure to rest twice. My pitas would not puff up when I place them on the pan, anyone can help me trouble shoot what I did wrong?
Hi Sage, try to make the dough thinner next time and make sure to use medium high heat. 🙂
Also, here is a great tip from another reader (Alem):
I had work and a few other things going, so the dough was left out for about 4 hours. This was probably set up to fail, but it turned out great, I made 3 and have six dough balls in the fridge for the coming days. In regards to puffing when baking, I used a Tefal skillet, and had one piece puffed very nicely, almost separating completely from inside, it was rolled last, baked first. The other two puffed up though not as much, I think it works better if baked quickly as the dough tends to dry out faster than wheat flour which keeps fermenting and softer much longer than rice and tapioca.
This is the best gluten-free pita recipe I tried so far. Thanks for sharing!. ????
Hi Sara, I am so glad you loved it! 🙂
I weighed the ingredients & followed the directions exactly. I was very hopeful, the dough seemed great to work with, but no puff, no rise. Rolled the last one to the size of a burrito tortilla (9 inches across) and nada. Floppy texture, dry, barely any color. A waste of time & ingredients.
Hi Kimberly, sorry to read the recipe didn’t work for you. So many people have had lots of success with it, I included. 🙂
Goodmorning from beautiful Greece. I am writing with a translation to forgive me for this. Thanks for the very nice recipes. Could I put quinoa flour instead of rice flour?
Hello Dimitris, I am not sure if quinoa flour will work, as I never tried it. 🙂
Michela! God bless you dear!!! This was a lifesaver and turned out exceptionally well, even though I didn’t follow it 100%. It came out perfect, my sister was surprised as well.
I used Sansbury plain gluten-free flour(rice, potato, maise mix) mixed with tapioca, jaggery for sugar, Himalayan salt, instant yeast(a little more than half of what’s asked for), flax meal for psyllium (I didn’t have any psyllium when kneading the dough, though I got some and mixed in half a tbs before rolling and backing).
I had work and a few other things going, so the dough was left out for about 4 hours. This was probably set up to fail, but it turned out great, I made 3 and have six dough balls in the fridge for the coming days.
In regards to puffing when baking, I used a Tefal skillet, and had one piece puffed very nicely, almost separating completely from inside, it was rolled last, baked first. The other two puffed up though not as much, I think it works better if baked quickly as the dough tends to dry out faster than wheat flour which keeps fermenting and softer much longer than rice and tapioca.
Thanks again, I will be making more while trying to follow the recipe a bit more for better results.
Hello Alem, thanks so much for your amazing and helpful feedback! I am glad the pitas turned out great, even with your subs. 🙂
Hi Steph! Did you end up trying this with the brown rice flour? If so, how did it turn out?
I used my kitchen scale, got all exact ingredients, and watched the video. This is some super sticky dough. I struggled with it and i’ve made plenty of tortillas and flat bread before. I made 6 little balls and rolled 5 super thin. None of them puffed, but they do taste good. The last one I rolled, not so thin and SURPRISE!!! Tons of puff. Will try this again. Thanks
Hi Jenjin, thanks for your feedback. My dough wasn’t sticky, as you can see in the video. Maybe your flour mix wasn’t as fine, so it didn’t absorb enough water. I am glad the last one turned out great! 🙂
Would you explain, please, exactly WHY the psyllium husk powder is so important? It is expensive to mail order in something like that, and I’d rather not if it is just because someone thinks that we need the extra fiber (which is all I can find in Google search, that psyllium husk is good for) I am not asking to be flippant or rude, but I want to make a decent pita pocket bread, without going bankrupt, that my celiac wife can eat. If this will make a pocket bread with a decent texture WITHOUT adding this, I want to know.
Hi Mark, psyllium husk works amazingly well in gluten-free baking, similarly to xanthan gum. I explained how it works in a previous comment which I will paste for you below:
Ah; thank you for explaining that. I use a premade 1 to 1 gluten free flour blend, which already has the xanthan gum in it, so I’d have to sub the rice and tapioca flours with than anyway. Now I know to ensure that I cover the psyllium, too.
I think the gluten free blend I buy is mostly rice and tapioca anyway, so it shouldn’t be too far off what you have here. 🙂
You are very welcome. 🙂
Not sure how well it would go, but you could try using flax meal.
Also, psyllium husk is a bit expensive online for me as well, I had to search a lot before I finally found it in a local herb and spice shop. I don’t know if you have similar shops around, but would be worth looking for shops that sell herbs/spices for cooking and/or medicinal uses.
Psyllium husk is a significantly stronger binder than flax meal. Flax does some binding, but it’s pretty weak. Ground chia is a little stronger. Psyllium is the strongest of this bunch. Psyllium comes both ground and whole. I typically will end up using the ground as a gluten replacement in my flour mixes (stirred in WELL before adding any liquids, or it will clump) and the whole as an egg replacer (whisked into the liquids ahead of time and allowed to sit and “gel” before adding to mix). The two main reasons I use psyllium instead of xanthan gum is that I react to the xanthan gum, and also the psyllium doesn’t give the baked goods the “gumminess” that xanthan gum tends to contribute. If you’re into close-to-nature baking, there’s also the advantage that psyllium is much less processed (simply extracting the seeds and possibly grinding them) than the process of extracting the gums.
You’ll can find Pysllium husk can be found in any Indian store know as Isabgol which is cheaper then rest of store. Good luck!
Thanks for the tip! I also use a lot of besam flour, which is easy to find cheaply at Indian stores, so next time I go to buy that, I’ll look! Is Isabgol usually the ground version or the whole version (or does it come both ways)?