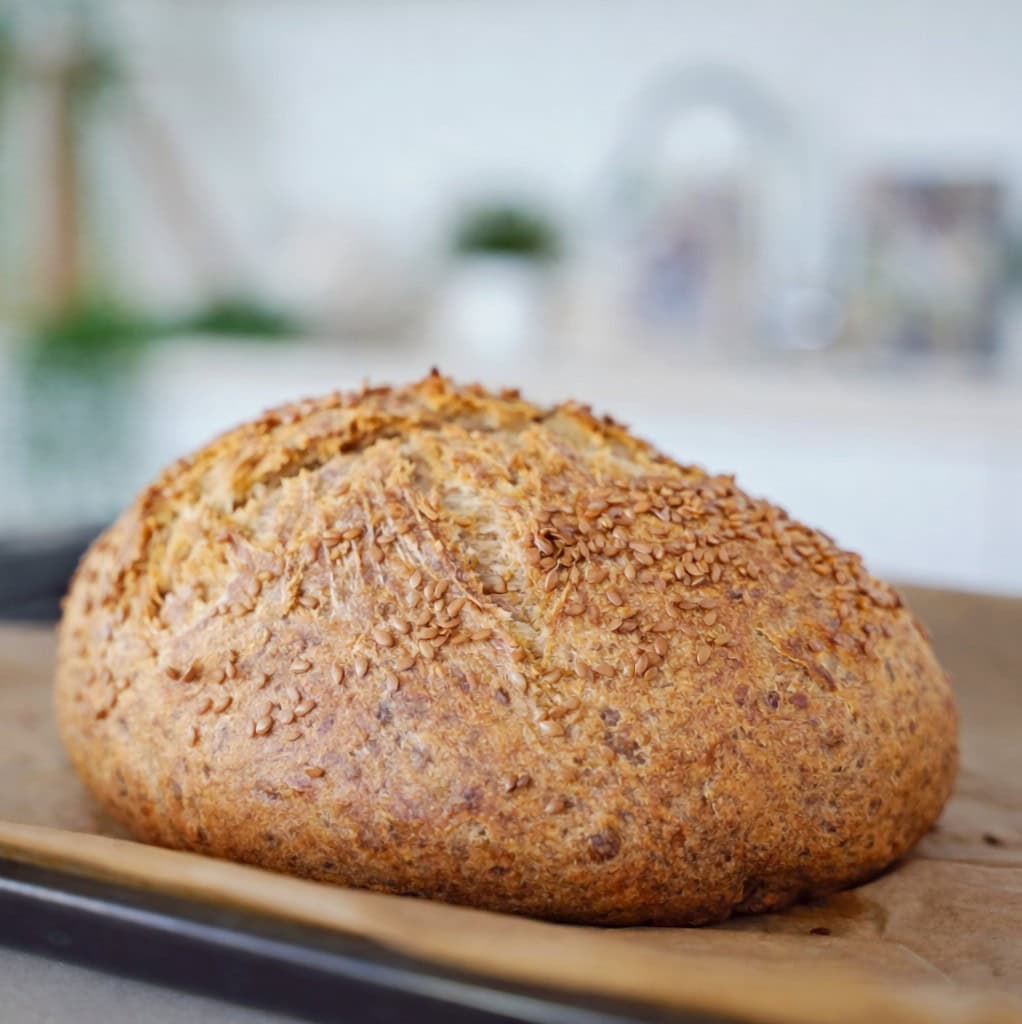
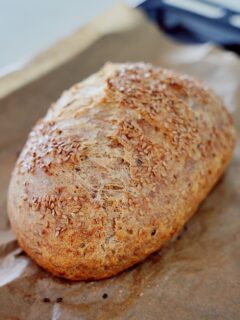
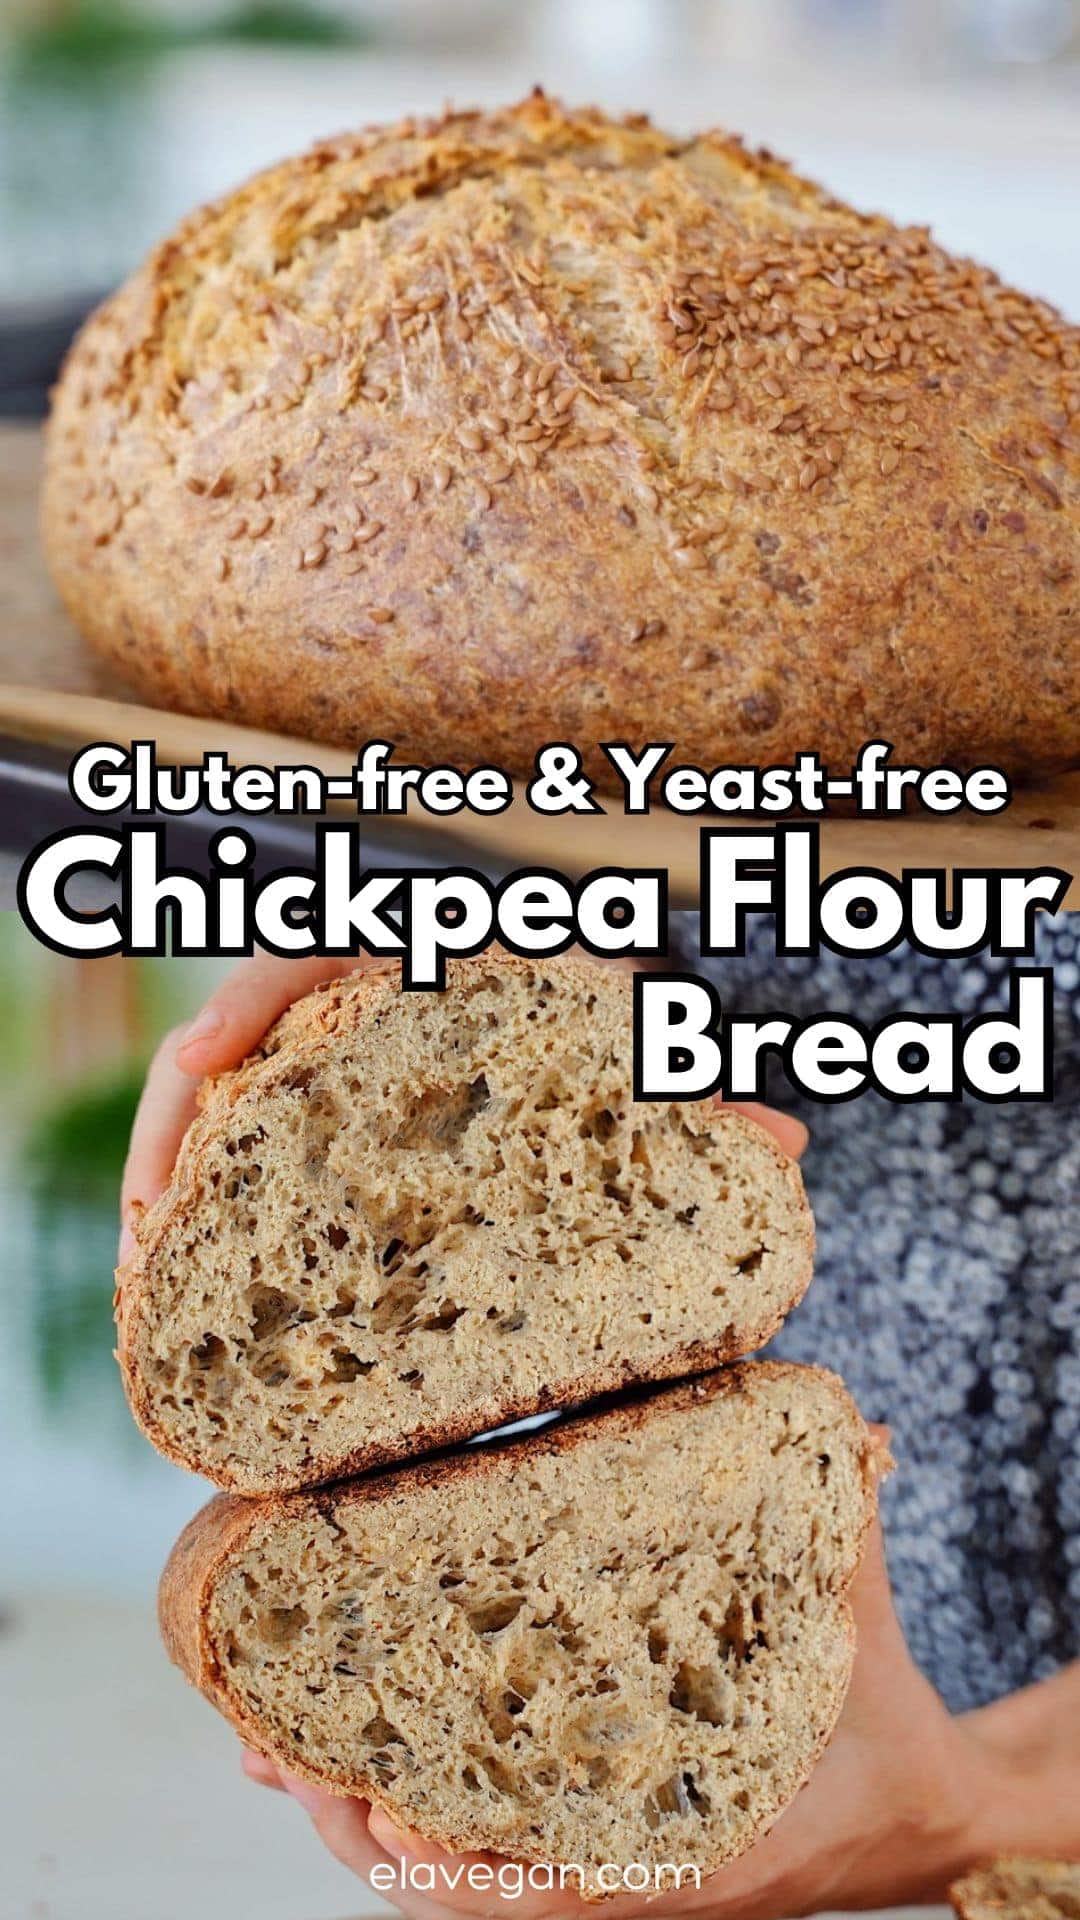
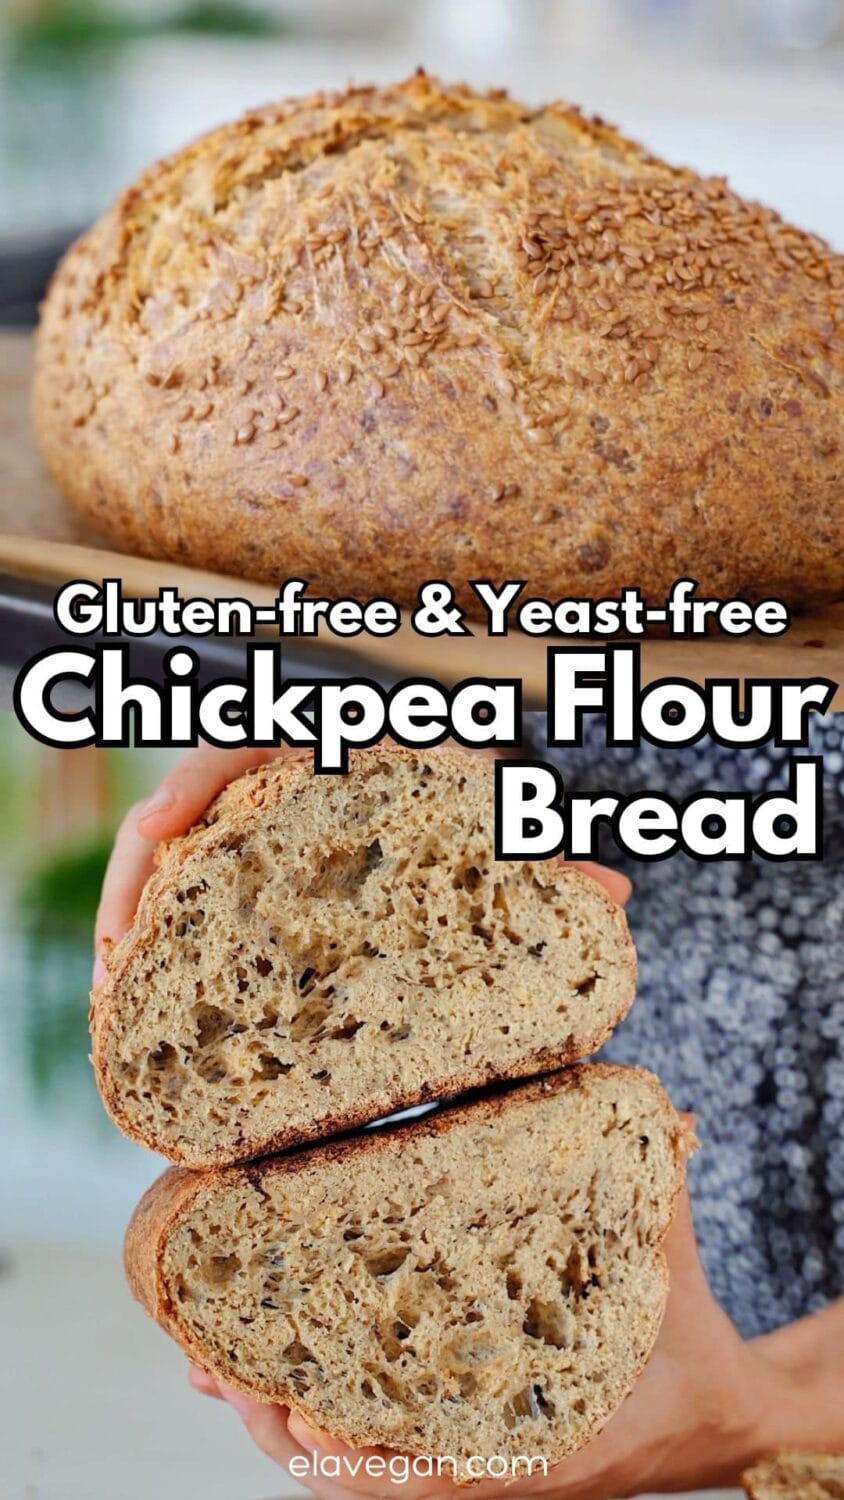
This quick and easy one-bowl chickpea flour bread is high-fiber, high-protein, gluten-free, yeast-free, and uses baking soda for a fluffy loaf, perfect for toasting and sandwiches!

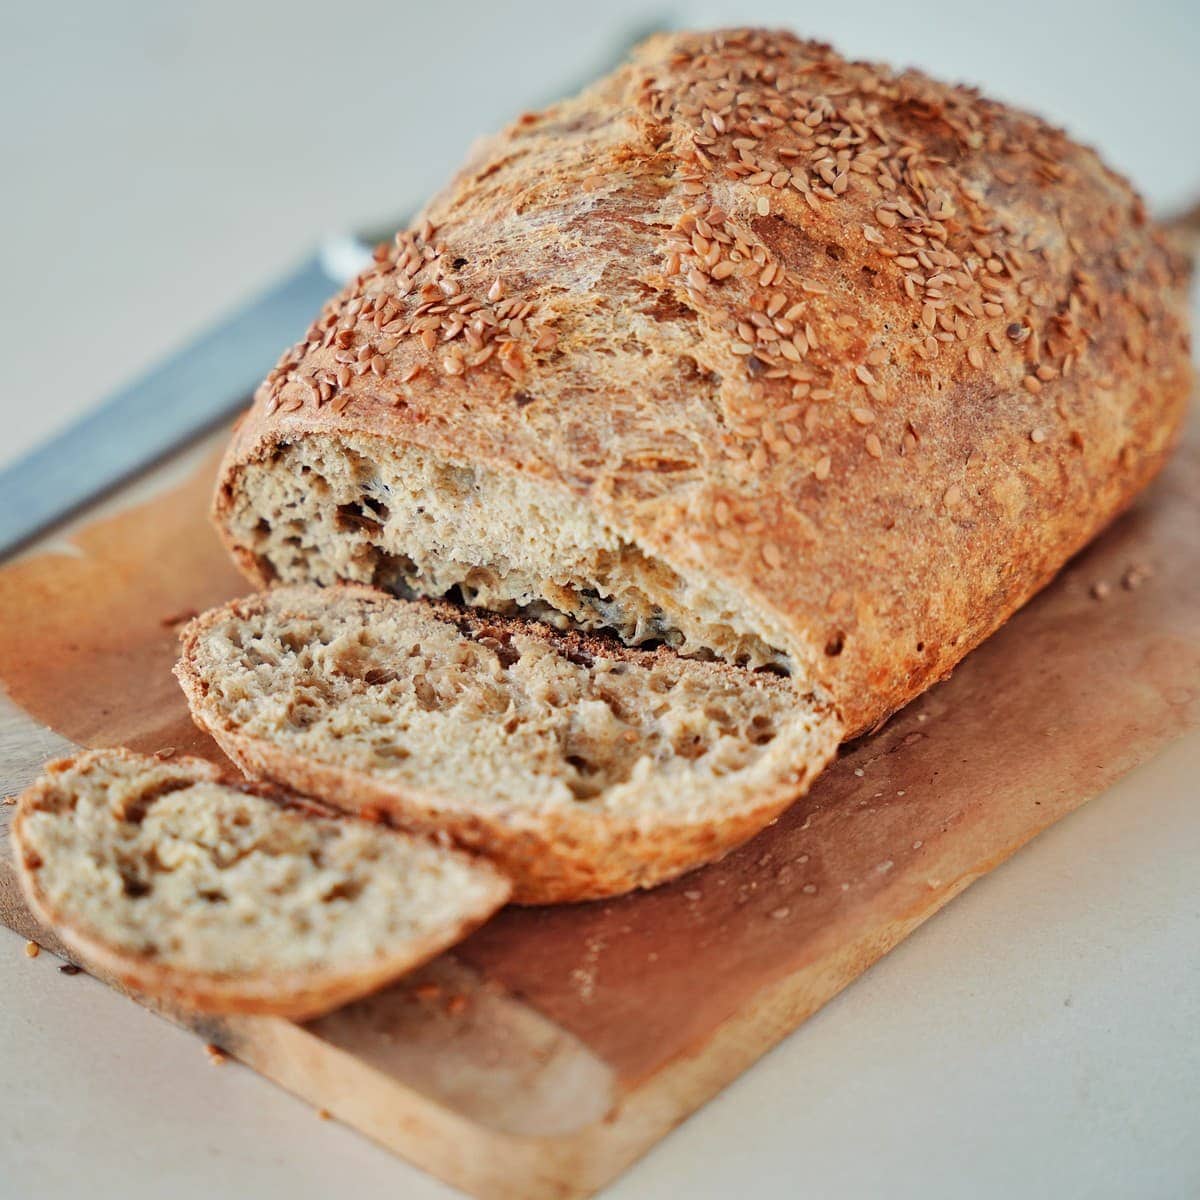
Since sharing a recipe for chickpea bread using dried chickpeas, I’ve received TONS of YouTube comments asking for a chickpea flour version. Ask, and ye shall receive! This simple chickpea flour bread recipe requires no yeast, oil, sugar, or rising time. Instead, nutty chickpea flour + baking powder and baking soda create a high-fiber, high-protein bread that’s well risen, tender, and perfect for toast and sandwiches!
You might also enjoy crispy chickpea crackers, chickpea flour gluten-free tortillas, or other nutritious, gluten-free bread recipes like lentil protein bread or quinoa bread.
The Ingredients
- Chickpea flour: (aka garbanzo bean flour or besan. Gram flour also works) It’s available in most large grocery stores/Asian markets or homemade (method in FAQs). Make sure it’s fresh, though, or it may taste bitter/stale.
- Psyllium husk powder: This is essential for binding (don’t omit). If using whole husk, grind into a fine powder (measure after grinding).
- Ground flaxseed: To further bind.
- Leavening agents: Baking powder and baking soda provide rise without yeast.
- Acid: Apple cider vinegar or lemon juice work to activate the baking soda.
- Salt: Note, chickpeas need more seasoning than you think.
- Water
For the full ingredients list, measurements, complete recipe method, and nutritional information, read the recipe card below.
Recipe Variations
- Split pea flour: Similar to when making chickpea tofu, a blend of chickpea flour and split pea flour makes a more robust flavor.
- Flavor boosters: i.e., nutritional yeast, garlic powder, onion powder, smoked paprika, cumin, turmeric, cayenne pepper, black pepper, Italian seasoning, rosemary, thyme, or fresh parsley, cilantro, or scallions.
- Mix-ins: Olives, sun-dried tomatoes, roasted garlic, sauteed or caramelized onions, preserved lemon peel, dairy-free cheese (feta or shreds), etc. Pat dry and don’t add too much, or it won’t bind.
- Toppings: Brush or spritz with water and sprinkle with seeds (sesame seeds, poppy seeds, sunflower seeds, pumpkin seeds, etc.), everything bagel seasoning, etc.
How to Make Chickpea Flour Bread
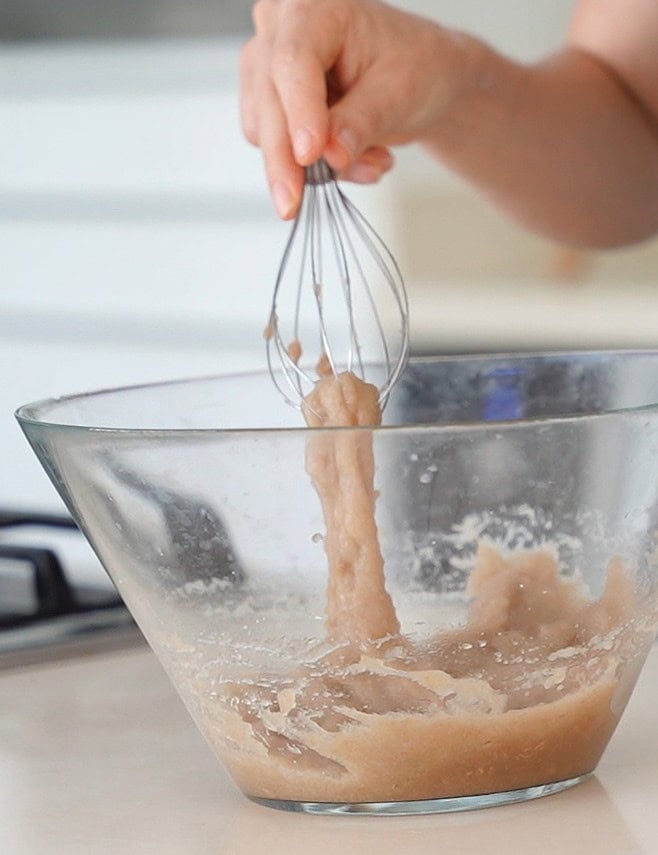
- Whisk the psyllium husk powder and water in a large bowl, vigorously, to avoid lumps. Set it aside to thicken/gel. Then, preheat the oven to 180°C (360°F).
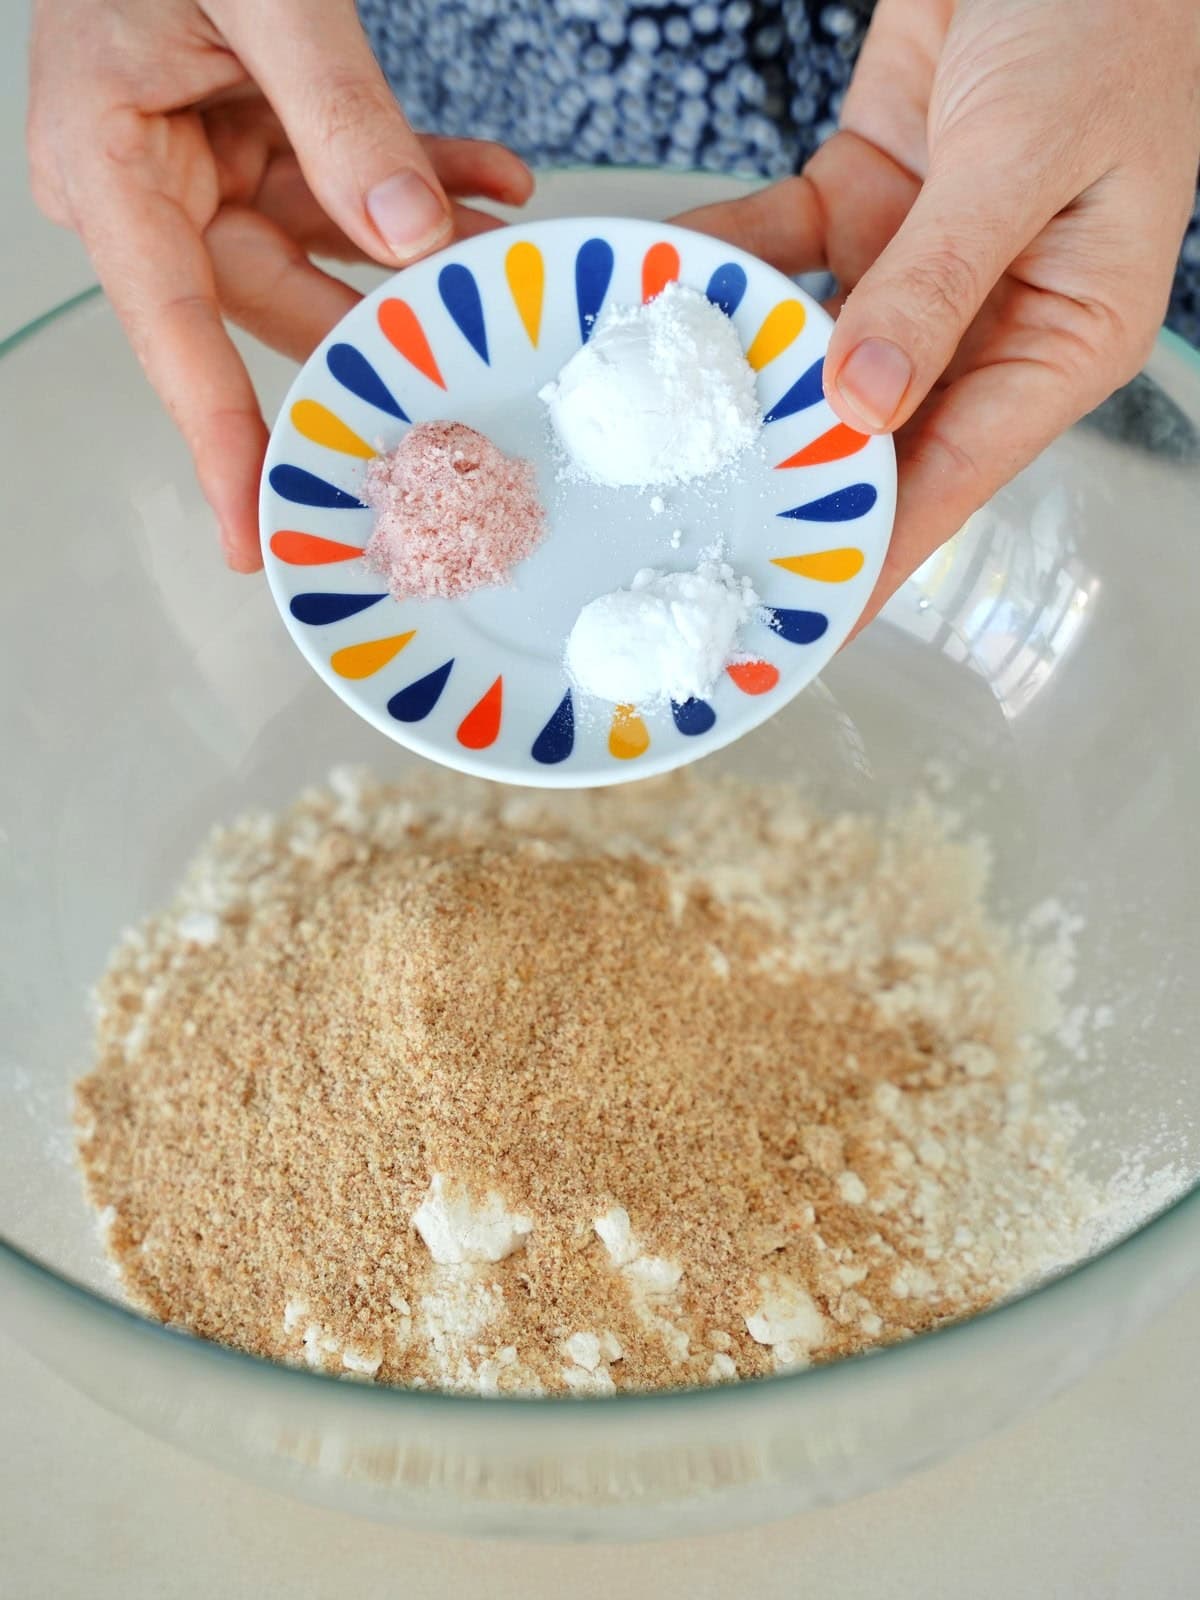
- In a separate mixing bowl, combine the chickpea flour, ground flaxseed, salt, baking powder, and baking soda. Pour the vinegar directly over the baking powder and baking soda.
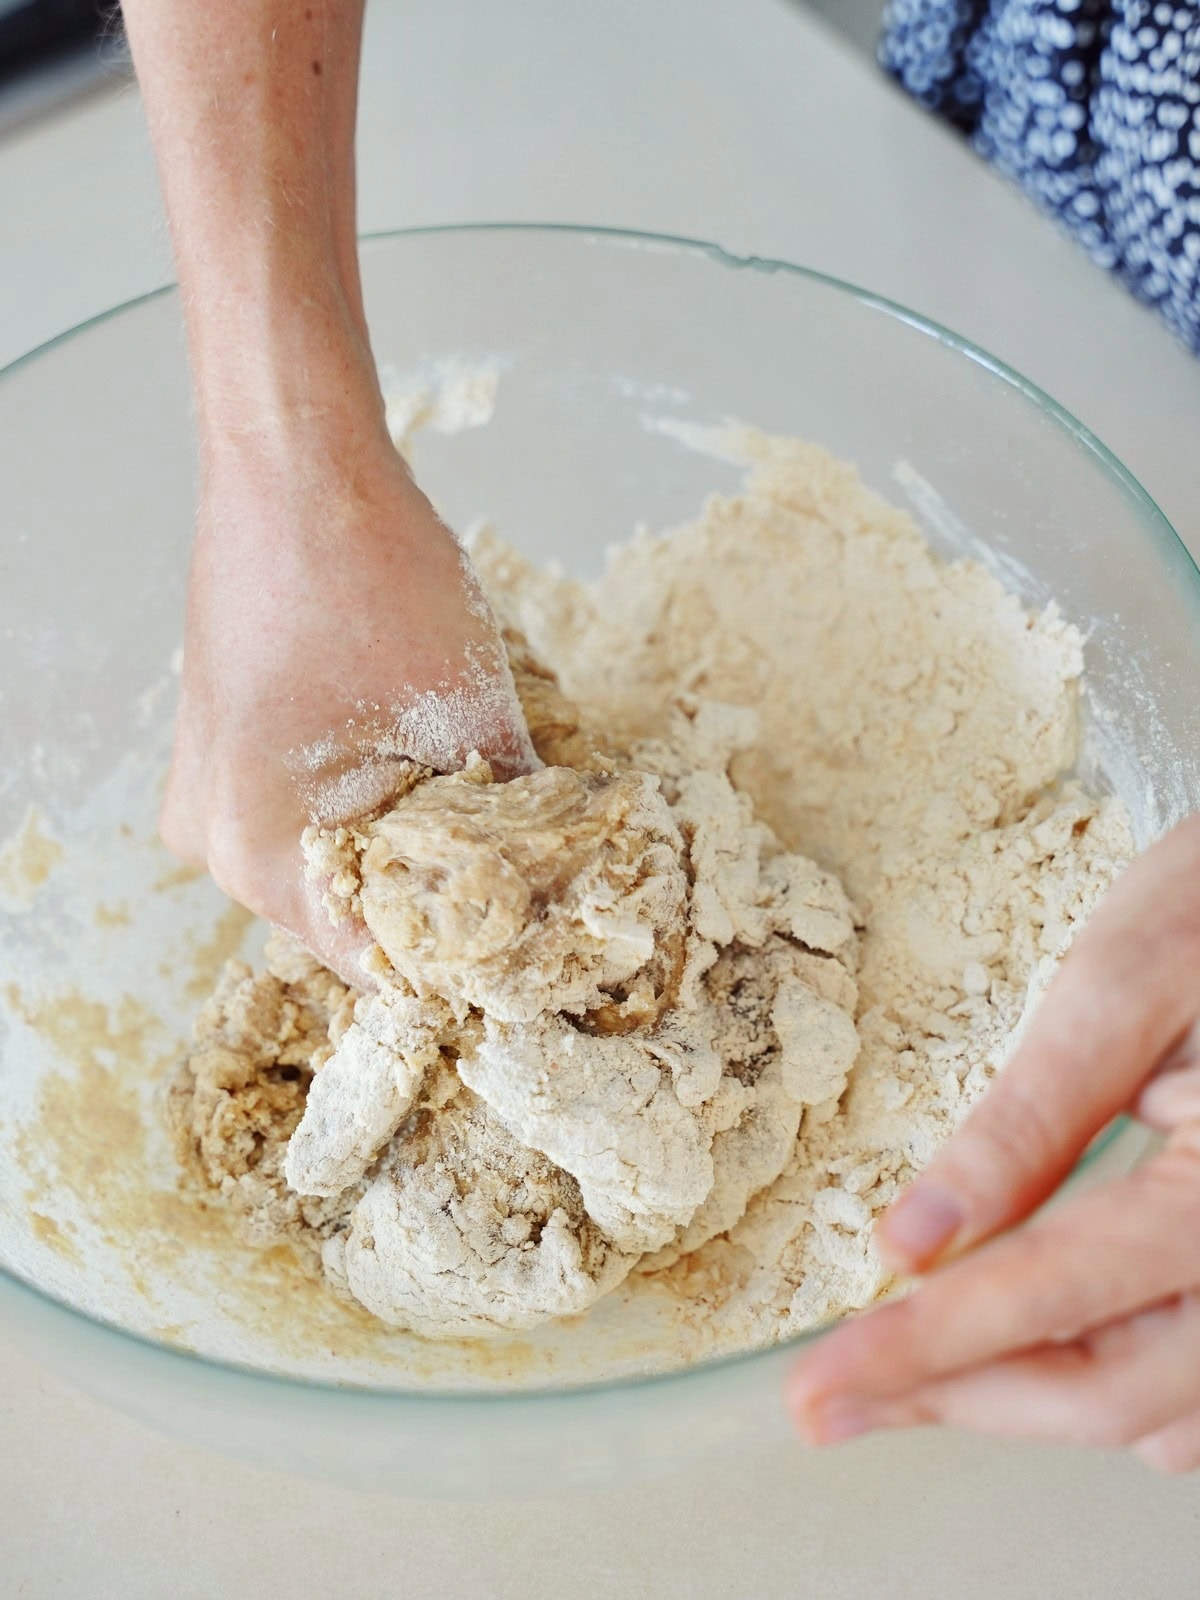
- Add the psyllium gel, then use clean hands to knead it into a dough.
It will be very sticky to begin with, but that’s normal. Wet hands will help.

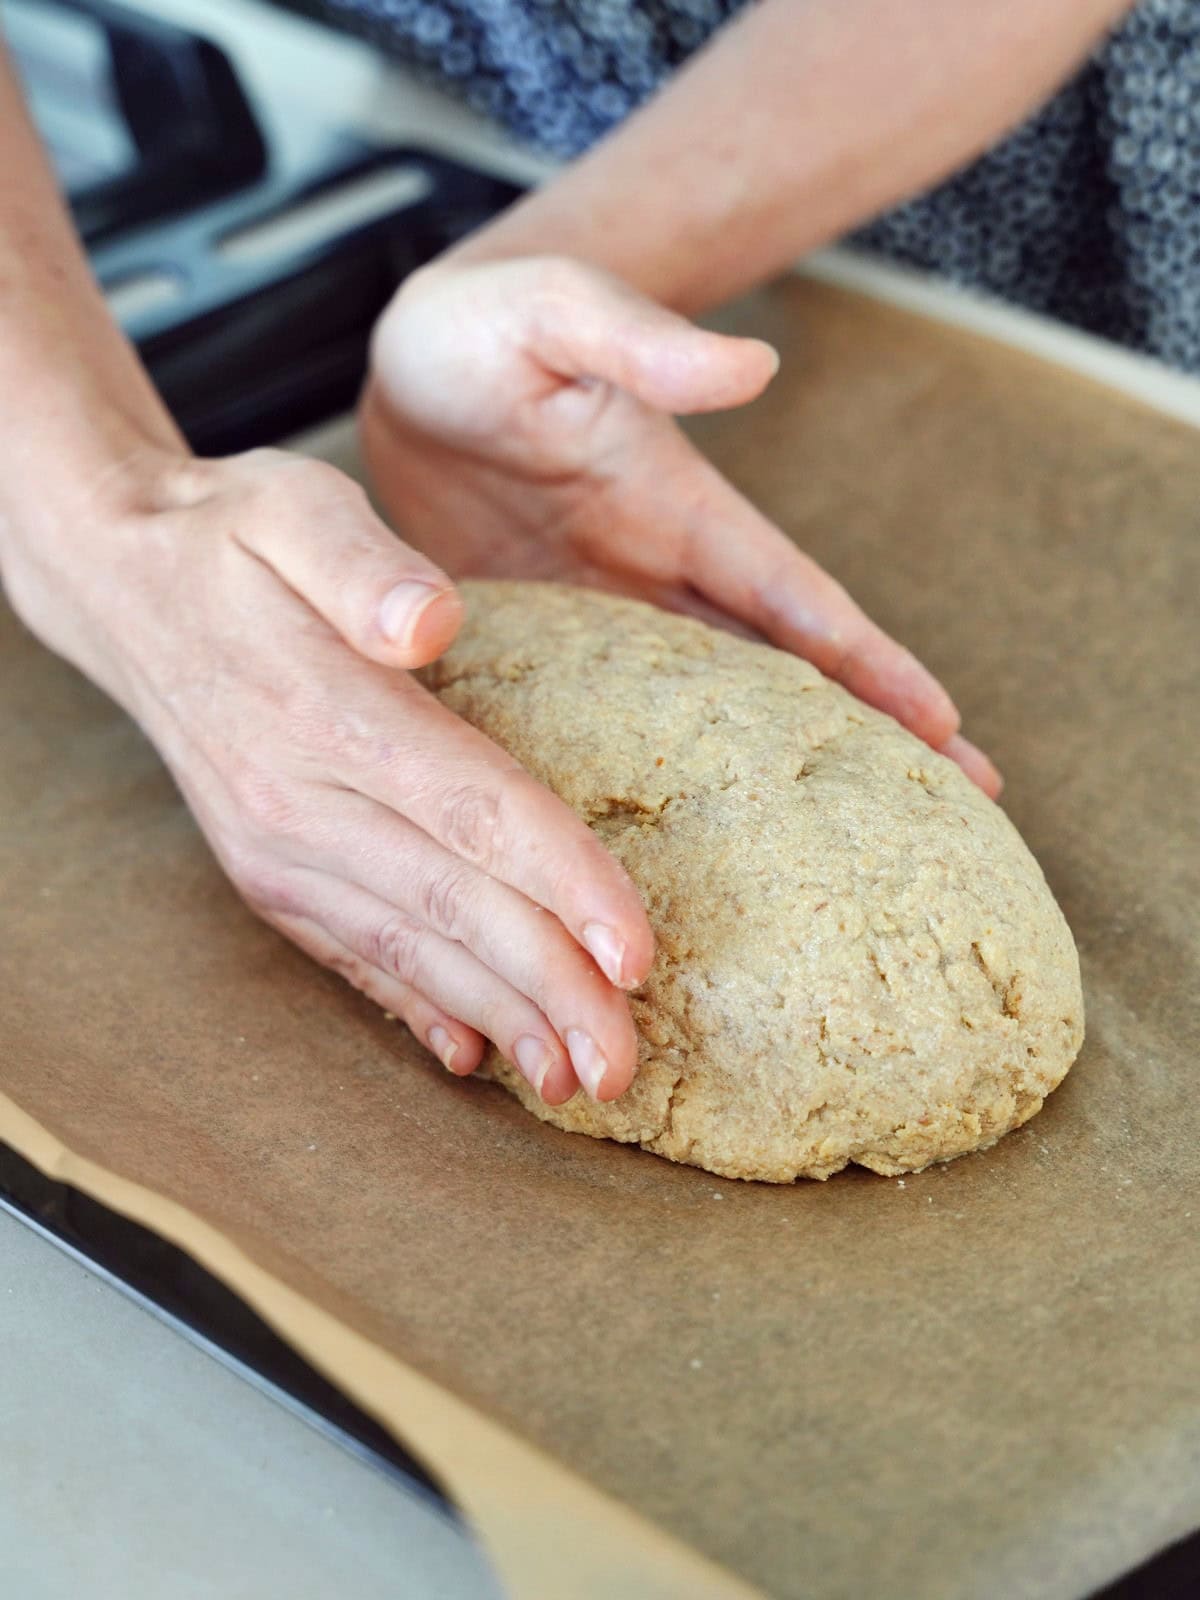
- Transfer to a parchment-lined baking sheet and shape into a flat loaf, smoothing the surface with wet hands to prevent cracks.
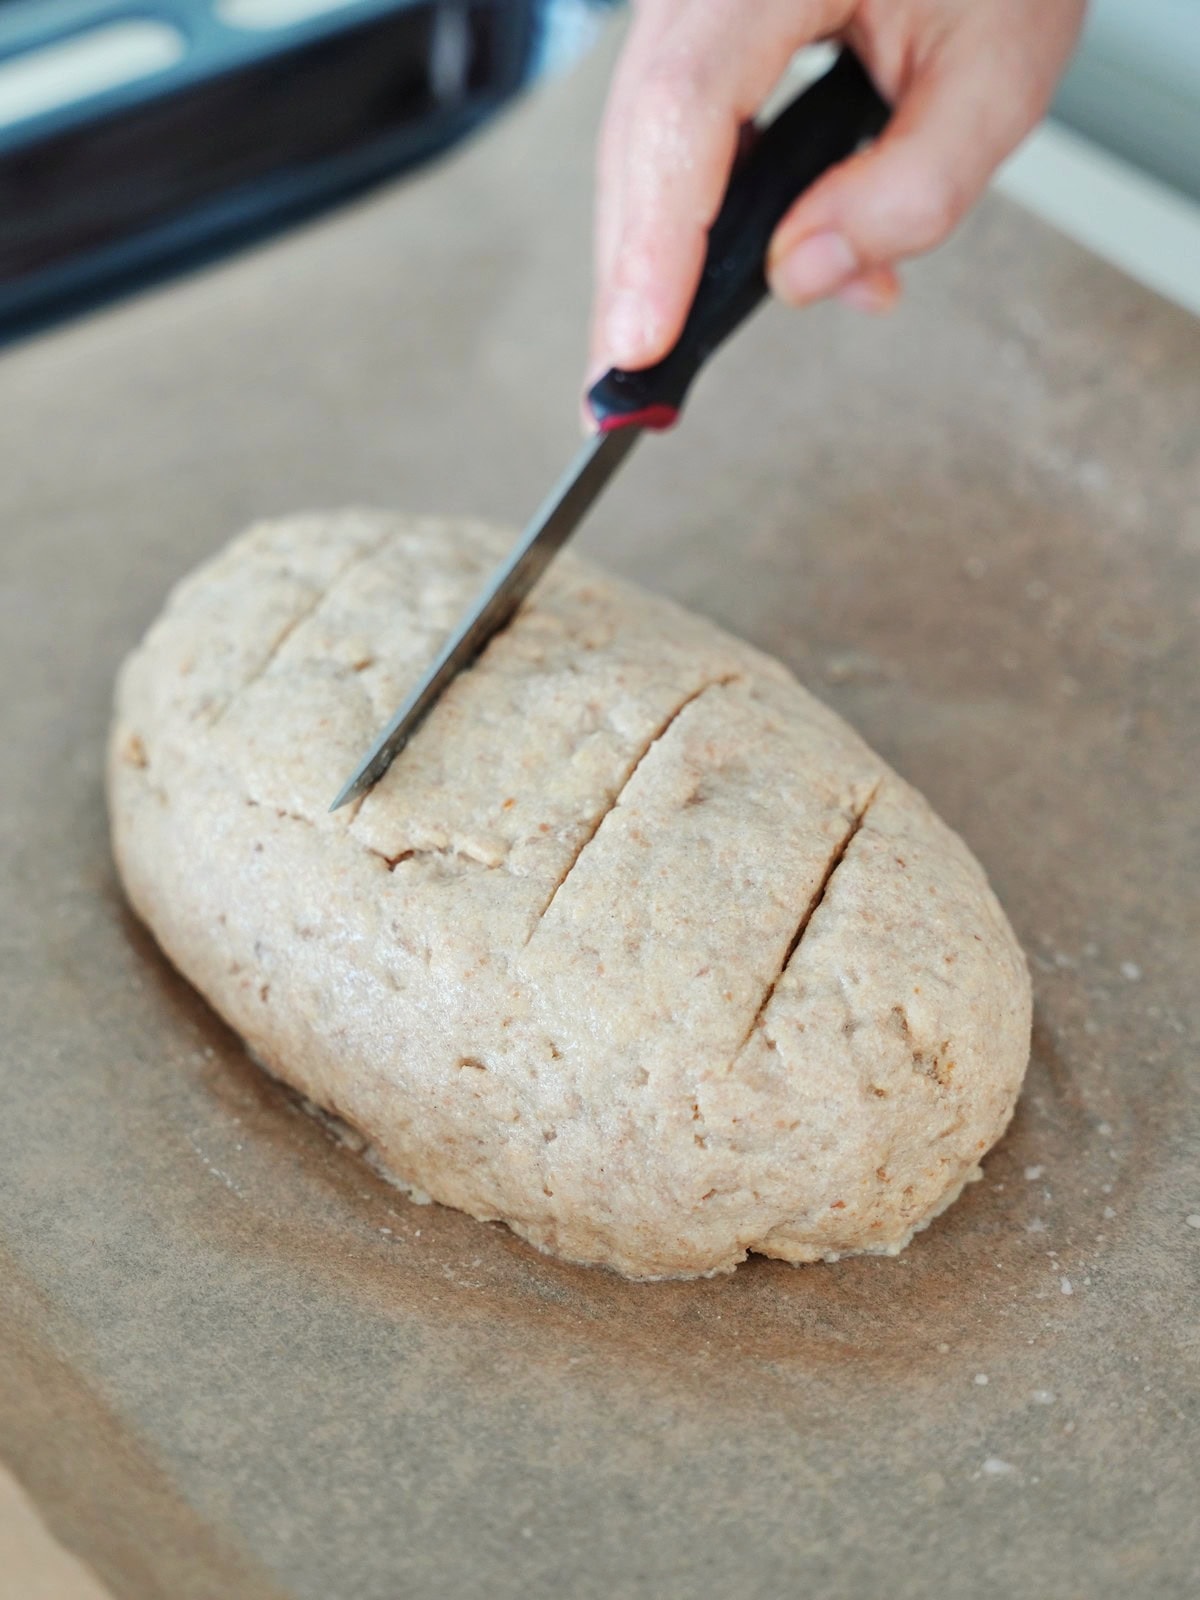
- Score the top with a knife, optionally sprinkling it with whole flaxseeds/other seeds.
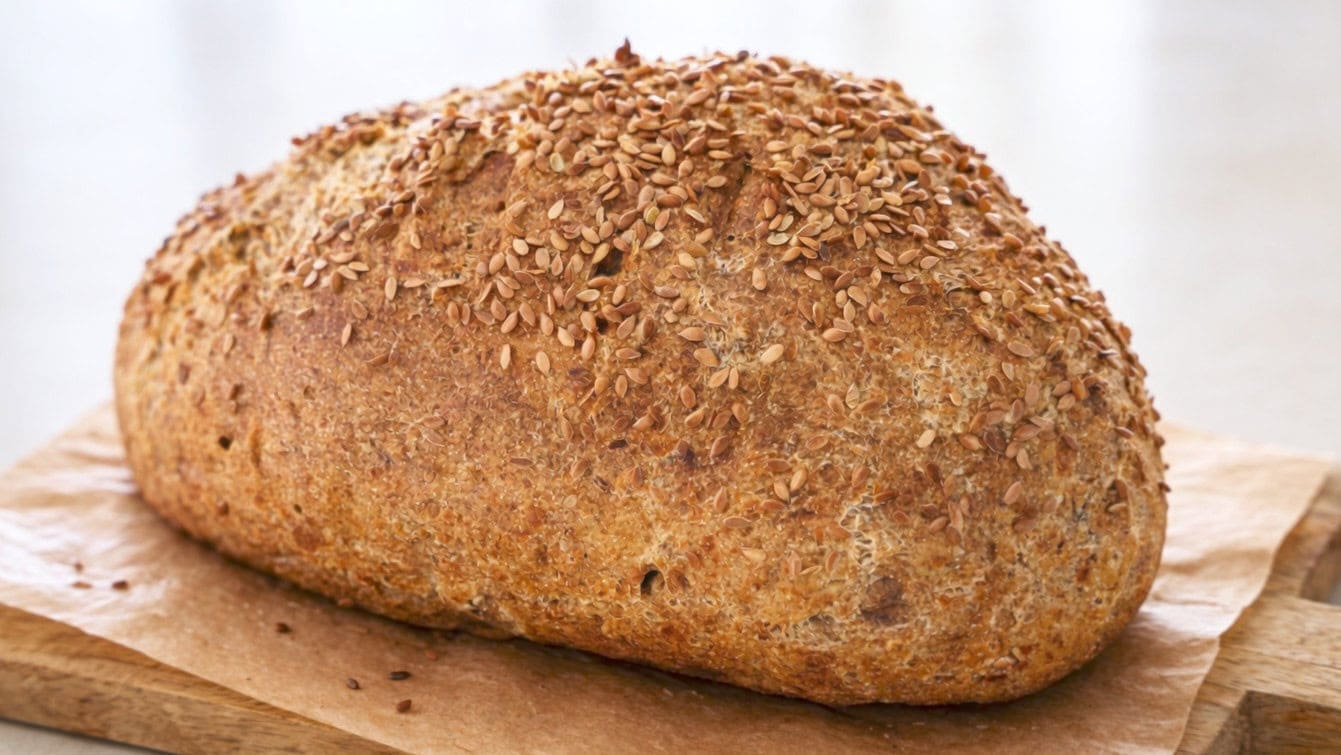
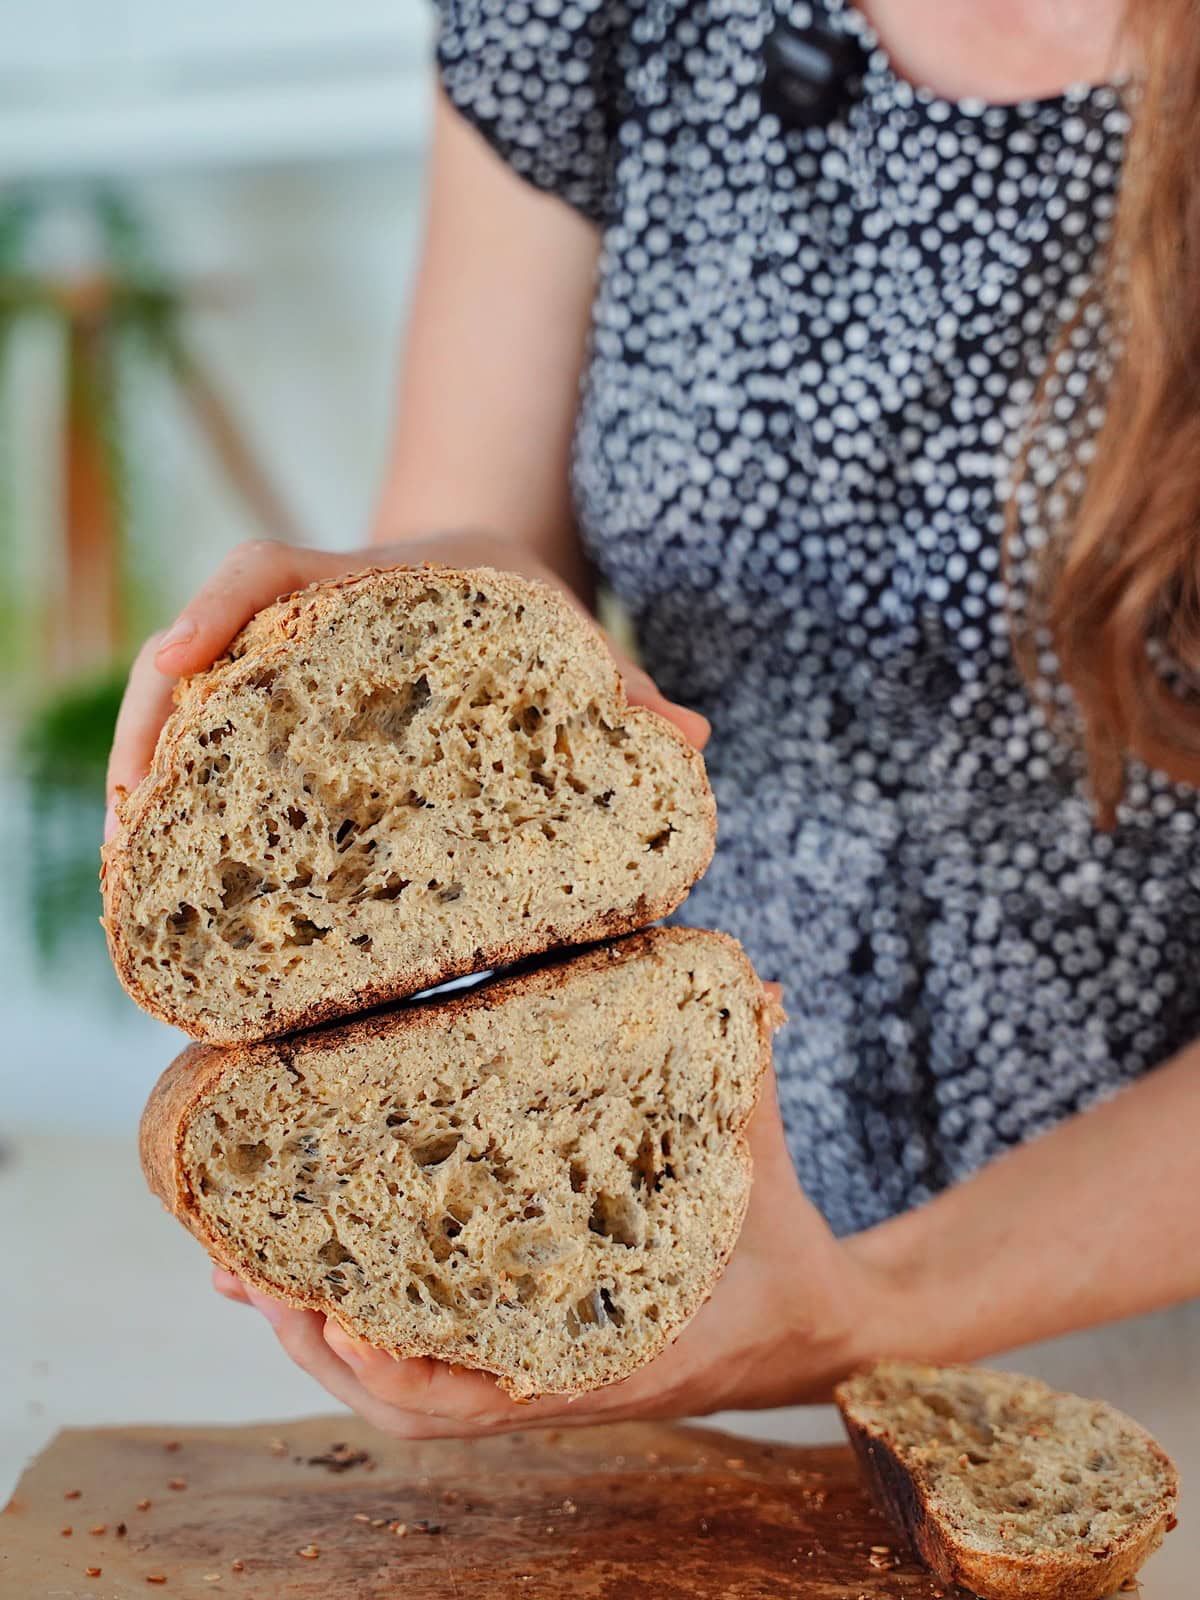
- Bake in the preheated oven for 50-55 minutes, then remove it from the oven and let it cool completely on a cooling rack before slicing. Enjoy!
Serving Suggestions
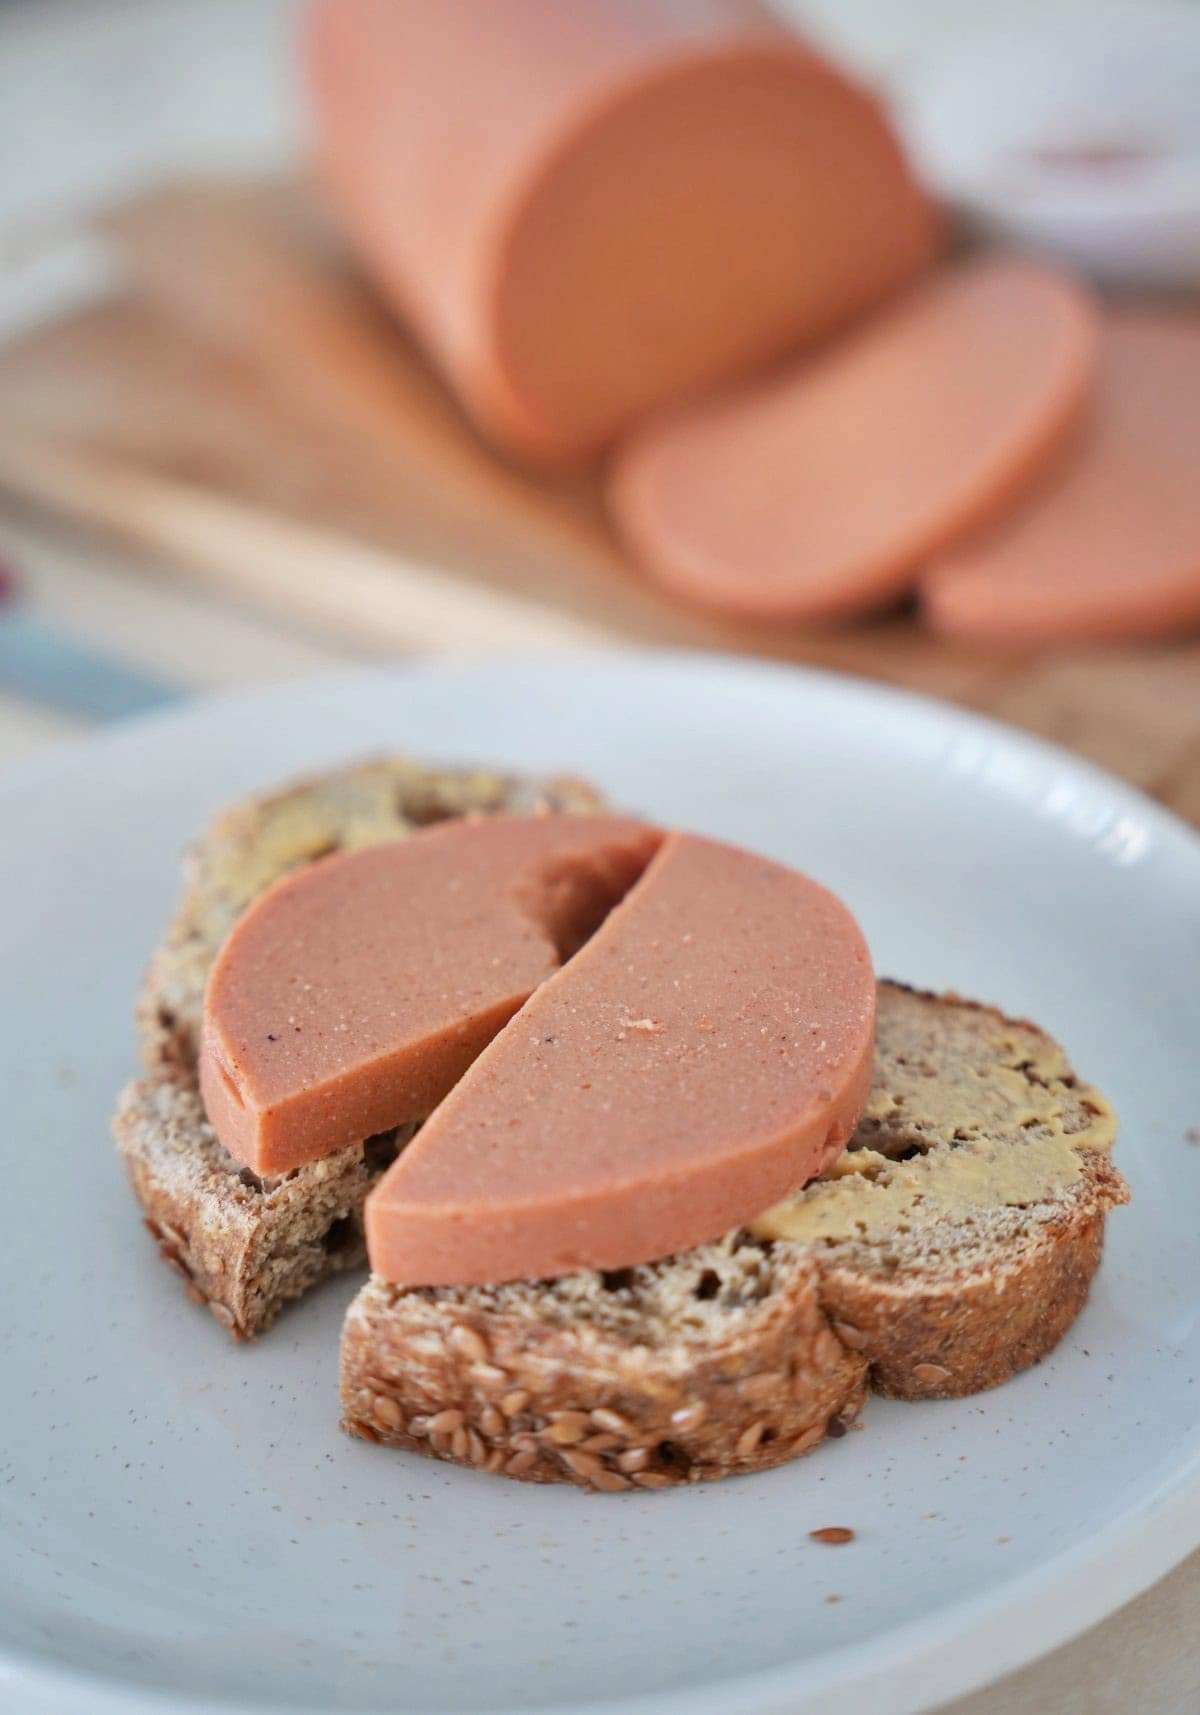
This tender garbanzo flour bread is delicious raw, toasted, or as a sandwich with:
- Vegan Butter
- Scrambled tofu or vegan egg salad
- Sauteed mushrooms
- To make avocado toast
- Vegan cream cheese or vegan ricotta cheese
- Hummus or garlic white bean dip with fresh or grilled vegetables
- Vegan bologna
- Chickpea ‘tuna’ salad
- Roasted cherry tomatoes with balsamic
Storage Instructions
Store: Let cool, then store in an airtight container at room temperature for 2-3 days or in the refrigerator for 3-5 days. Heat to restore texture.
Freezer: Store the loaf whole or sliced (parchment between slices to avoid sticking) in a Ziplock for up to 3 months.
Thaw: Defrost slices in a toaster OR thaw larger amounts at room temperature for several hours.
FAQs
How to make chickpea flour?
Grind dried chickpeas using a high-speed blender or food miller until floury, then strain it and re-process larger pieces.
Is chickpea flour bread healthy?
Chickpea flour, the primary ingredient in garbanzo bread, is unrefined, high in fiber and protein, and rich in several nutrients (including folate, iron, magnesium, and more) and antioxidants.
Why is the bread gummy inside?
You may have under-baked it, cut it too soon, or used too many wet mix-ins.
How else can I use chickpea flour?
Chickpea flour is a versatile favorite for vegan, gluten-free cooking. I’ve used it for gluten-free gnocchi, German spaetzle, gluten-free tortillas, and as an egg replacement in breakfast tomatoes, a vegan frittata, and savory vegetable muffins.
It can also be used for pakoras/onion bhaji, socca, pancakes, batter, and more.
Recipe Notes
- Measure the ingredients: I develop and test my recipes using metric measurements for the most reliable results. Using cups often leads to inconsistent results.
- Use psyllium husk powder: NOT whole psyllium husk, or the dough won’t bind properly and may cause gumminess.
- To adjust the shape: You could make a single loaf, a baguette, or mini loaves. Adjust baking time as needed.
- Cool before slicing: This allows the garbanzo bread to fully set, ready to slice.
More Gluten-Free Bread Recipes
- Keto flaxseed bread
- Oatmeal seed bread
- Gluten-free seeded bread
- Red lentil bread rolls
- Gluten-free Pita Bread
- Gluten-free Naan Bread
If you try this chickpea flour bread recipe, I’d love a comment and ★★★★★ recipe rating below. Also, please don’t forget to tag me in recreations on Instagram or Facebook with @elavegan and #elavegan—I love seeing them.
Chickpea Flour Bread
Video
Ingredients
- 40 g (4 Tbsp) psyllium husk powder
- 420 ml (1¾ cups) water
- 300 g (3 cups) chickpea flour
- 30 g (¼ cup) ground flaxseed
- ¾ tsp salt
- 1 ¼ tsp baking powder
- ¾ tsp baking soda
- 20 ml (1½ Tbsp) apple cider vinegar (or lemon juice)
Instructions
- You can watch the video for visual instructions.First, pour the water into a large bowl. Add the psyllium husk powder and immediately whisk vigorously so no lumps form. Let it sit for a few minutes until it thickens into a gel. Then preheat the oven to 180°C (360°F).Alternatively, you can add the psyllium husk powder to the bowl first, then pour in the water and whisk right away.
- In a separate bowl, combine the chickpea flour, ground flaxseed, salt, baking powder, and baking soda. Pour the apple cider vinegar directly over the baking powder and baking soda.
- Add the psyllium gel to the dry ingredients. Then knead everything together with clean hands until a dough forms.It will be very sticky at first, but that’s normal. Lightly wetting your hands with water helps.
- Line a baking sheet with parchment paper. Place the dough on top and shape it into a flat loaf.Keep wetting your hands slightly and smooth the surface of the loaf.
- Score the top with a knife. If you like, sprinkle whole flaxseeds or seeds of choice on top.
- Bake for 50 to 55 minutes. Remove from the oven and let the bread cool completely before slicing.
Notes
- Please use a kitchen scale and measure everything in grams. I develop and test my recipes using metric measurements, and using cups often leads to inconsistent results. This is especially important for psyllium. Many people use 4 tablespoons of whole psyllium husk instead of psyllium husk powder, which makes a huge difference (it would be only about half the weight). The dough won’t bind properly and the bread can turn out gummy.
- If you only have whole psyllium husks, you can grind them into powder. Measure the tablespoons after grinding, not before. Still, using a scale is always the most precise method.
Nutrition information is an estimate and has been calculated automatically
 „Simple and Delicious Vegan“ Cookbook by ElaVeganCLICK HERE to order!
If you are using Pinterest, feel free to pin the following photo:
This recipe is amazing!! The bread tasted great, sliced really easily, and opened up a whole range of
healthy choices on a diet full of food restrictions. Thank you so much.
Thank you so much, Kassan, I’m really happy to hear that! It’s great to know the bread worked well for you and that it helps expand your options despite the food restrictions. I really appreciate you taking the time to leave a comment. 😊
OMG I just tasted it and it’s delicious it’s fluffy even though it did not rise as much as yours could it be also that I put a little bit too much water for the psyllium husk powder?
I will be eating it with your vegan bologna 😊
So glad you liked it! 😊
Yes, a bit too much water with the psyllium can definitely reduce the rise slightly, but it’s great that the texture still turned out fluffy. Happy to hear it still tasted delicious!
I meant “Vegan” bologna
sorry I was dictating
HiEla,
The bread is in the oven, it’s rising but not as much as yours 😔. I hope it tastes good. I followed the recipe exactly as written. I measured the flour in grams with my kitchen scale the only problem I have is measuring the milliliters because if I go with the tablespoons you provided the amount are not the same as milliliters
. I used brand new chickpea flour. what could be the reason for not rising?
i also made your digan bologne is in the refrigerator, I only forgot the nutmeg, but when I tried the mix tasted delicious. I think that it will be successful but I am a little bit disappointed with the bread not rising I was looking forward to make this bread
Hi Elsa, I just replied on YouTube but will also reply here. 😊
Try not to worry yet, sometimes it rises a bit more while baking.
Since you measured the flour in grams, that part is perfect. For the liquid, the easiest way is to weigh the water on the scale as well. 1 ml water equals 1 gram, so you can simply weigh it instead of using tablespoons or cups.
A few other things that can affect the rise:
• The psyllium gel should be very thick. If it was more liquid, the dough can become too wet and won’t rise as much.
• Different psyllium brands absorb different amounts of water.
• Make sure the baking powder is fresh.
• Also check whether you used psyllium husk powder or whole husks, since they behave quite differently.
I’m glad to hear the vegan bologna mixture tasted great already 😊
just tried the recipe for the first time and the results were great..I made a loaf and then 4 round baps. The receipt is quick and easy to follow and the results have surprisingly the feel and texture of ordinary bread. I have stopped eating regular bread 6; months ago and was looking for a substitute and this recipe more than ticks all the boxes. So I am looking forward now to making some savoury loaves with cheese, mixed herbs and one with sun-dried tomatoes.. Thank you so much for your time and effort in making the video and posting the recipe.
That’s wonderful to hear, thank you so much for your kind feedback, Garrett! 😊 I’m really happy the recipe worked so well for you and that you enjoyed both the loaf and the rolls. It’s always great when a simple recipe can come close to the texture of regular bread.
Your savory ideas sound delicious. Hope you have fun experimenting with different variations!
Hi Ela,
I have made many of your delicious recipes, but this is my first time commenting. Most importantly, I would like to thank you for sharing so many wholesome, simple and nutritious recipes.
I made both this bread and your original chickpea bread using dried chickpeas. Two days in a row, to be honest, because I wanted to try side by side!
Both versions are very easy to make, with tasty results.
I’m wondering which one you prefer?
I will have leftovers tomorrow toasted with avocado and sauerkraut – I’m already looking forward to it! 🙂
Thanks so much for your kind words, Nicola, that really means a lot! 😊 I’m happy you tried both versions side by side, that’s actually a great way to compare them.
Personally, I like both for different reasons. The chickpea flour version is a bit quicker and more convenient, while the version with soaked chickpeas has a slightly heartier texture and flavor. So it really depends on what I’m in the mood for.
Your plan to have the leftovers toasted with avocado and sauerkraut sounds delicious. Great combination! 😊
I am delighted and surprised to discover how good this recipe is! It has the texture and consistency of a dense whole grain bread with a hint of a nutty flavor. I wanted to take a small taste after it came out of the oven and had a chance to cool, but wasn’t planning to eat a whole slice until the next morning. It tasted so good, however l, that I ended up downing three slices in one sitting. I like the taste of this recipe much more than the one that uses rehydrated dry chickpeas and white vinegar. This one is a real keeper.
Three quick comments about making this recipe. First, as someone who adheres to a low-salt diet, I used 1 tsp of No-Salt rather than 3/4 tsp of actual salt as the recipe suggests. Second, I think the use of apple cider vinegar does something a little extra for this recipe compared with the recipe using dry chickpeas and white vinegar. Third, the trickiest part of making this bread is the kneading portion because the dough mixture is SO sticky. I had to get my fingers wet repeatedly to make this part work.
Once again: great recipe! I am so happy to have a good recipe now for vegan, gluten-free, low-salt, tasty bread.
Thank you so much for your lovely feedback, Fred! I’m really happy you enjoyed the bread so much, and three slices right away sounds like the best compliment 😊
So nice to hear that it fits your vegan, gluten-free and low-salt needs. Thanks a lot for taking the time to share your experience!
I whisked the psyllium husk powder but it still seemed to be very thik when adding it to the dry ingredients. vwey sticky. it did rise , but mine did not have the crunch on the outside like yours. Any suggestions?
will make it again..
That sounds pretty normal actually. The psyllium mixture should become quite thick and sticky, that’s what helps give the bread structure and a good rise.
If the crust wasn’t as crunchy, a few things can help next time:
• Try baking it a little longer if needed. A few extra minutes can help the crust firm up.
• Make sure the loaf isn’t too wet. If a lot of extra water was added, the crust can stay softer.
• Baking it directly on a tray instead of in a tin usually helps the crust get crisper.
• Let the bread cool completely before cutting, since the crust firms up more as it cools.
Since it already rose well for you, you’re very close. The next loaf will probably turn out even better 😊
A new recipe that is so easy and requires very few ingredients, yet gives great results. The first time, I simply followed the recipe, and the second time, I added pumpkin seeds and hemp seeds. Both times it was a hit. I baked the bread for 50 minutes in the air fryer at 180°C, then turned it over and baked it for another 5 minutes. I made the dough with my stand mixer, and everything went like clockwork. The crust is nice and crispy, and the dough is beautifully baked. Thanks again for spoiling us with such a delicious, simple, and easy recipe. So far, this is the easiest bread I have ever made.
Thank you so much for your lovely feedback, Ikke! 😊 I’m really happy it worked so well for you. Great idea to add pumpkin seeds and hemp seeds, that sounds delicious. And thanks for sharing the air fryer method too, that will definitely help others. So glad you enjoy the bread!
I am so happy with this simple recipe. I am usually intimidated in the kitchen. But Ella makes it easy to follow.. And because of a health challenge I am to avoid the typical wheat bread, this comes at a perfect time! Thank you, Ella!
Thank you so much for your kind comment! 😊
I’m really happy to hear that the recipe felt easy to follow, especially if you usually feel a bit intimidated in the kitchen. That means a lot to me.
And I’m glad this bread came at the right time for you. 💛
Well, well, well. Another magical bread recipe!
I followed the recipe, but since I don’t have baking powder I increased the baking soda to 1 tsp and the ACV to 2 tablespoons.
It rose well, was full of air pockets and very ‘spongy’.
I am curious though if I might change the method. With your lentil bread recipe i mix all of the dry ingredients including the baking soda thoroughtly and I mix the wet ingredients thoroughly as well before combining them.
What if I mixed the water. psyllium and ACV together. Then mixed all of the dry ingredients including the baking soda ( in my case)?
This would miss the step of introducing the acid to the soda directly. Do you have any experience with this?
Just curious.
Thank you so much for this recipe!
Well done, Cathy, that sounds like a successful experiment 😊 I’m glad it rose nicely for you!
About your question: you can mix the ingredients that way, and it should still work. The most important thing is that the baking soda and the acid are both present in the dough before baking. They will still react once everything is combined and especially when the heat is applied in the oven.
The reason I add the acid toward the end is mainly to keep the reaction a bit more controlled and predictable, but it isn’t strictly required. Mixing the psyllium, water, and vinegar first and combining all the dry ingredients separately is perfectly reasonable.
If you try that method, just make sure to work fairly quickly after combining everything, so the leavening effect isn’t lost before the dough goes into the oven.
Thank you so much for your kind reply. If I try changing the method I will let you know.
Thank you again for all of your hard work in creating these recipes. It is very much appreciated.
.
I said to my husband, what about using this recipe to make a pizza crust (with perhaps a half recipe). Prebaking it of course.
I wonder…….
Thank you so much, I really appreciate your kind words 😊
And yes, that could be a fun idea to try! It should work as a pizza crust if you prebake it first. I would probably make it a bit thinner and prebake until it’s set and lightly golden before adding toppings.
If you experiment with it, I’d love to hear how it turns out 🙂
So simple, soft and delicious! I topped mine with both black and white sesame seeds and pumpkin seeds. Will definitely work this into my regular rotation of recipes!
So happy to hear that, Kasey! The topping with black and white sesame seeds and pumpkin seeds sounds delicious and adds such a nice texture too. Love that you’re planning to make it regularly. Thanks a lot for your lovely feedback! 🙂
This bread turned out beautifully! It tastes great, has wonderful texture, and it is simple to make, plus it is nourishing.. I was also impressed how well the loaf raised in the oven, plus the overall visual appeal. Excellent recipe!
Thank you so much, Sandy, I’m really happy to hear that 😊
It means a lot that you enjoyed the taste and texture, and that the bread rose nicely for you. That’s exactly what I was hoping for with this recipe.
Thanks for taking the time to share your feedback 💛
Is there anything that you could use to replace the psyllium?
Hey Dana! Psyllium is really the key ingredient in this recipe because it binds the moisture and gives the bread structure. Without it, the bread usually turns out dense or crumbly.
If you can’t use psyllium, the closest options are:
• Ground chia seeds, about double the amount by weight. The bread will be more compact and less fluffy.
• Ground flaxseeds, also about double the amount by weight. Texture will be different and slightly heavier.
These can work for experimenting, but the result won’t be the same. If possible, psyllium gives the best texture and stability.
Hi Ela,
Looking forward to making this bread!
Through reading the comments, you may have convinced me to buy a kitchen scale.
Like most US folks, I’ve never used a kitchen scale, don’t know which kind to buy, and I don’t know the right way to measure loose ingredients, like flour, on a scale.
I did a search on your YT channel for “kitchen scale” to see if you showed how to properly use a scale to measure flour and other dry ingredients, but I don’t see one.
Can you do a brief video (in widescreen — regular “long form”, not a vertical “Short”) showing:
(1) Which type of scale is the best to buy, and
(2) How to measure flour (and other “loose” type of ingredients) on the scale?
Thank you!
Hi Glory! Thanks so much for your lovely comment. I’m really glad you’re interested in using a kitchen scale, it honestly makes baking much easier and more reliable.
A simple digital kitchen scale like this one (click) is usually the best choice. You don’t need anything fancy, just one that measures in grams and has a “tare” or “zero” button. Many affordable scales are very accurate and work perfectly for baking.
Measuring flour is actually very easy:
– Put a bowl on the scale
– Press the tare (zero) button so it shows 0 g
– Add flour until you reach the number of grams in the recipe
That’s it. No scooping or packing needed. Using a scale is the most accurate way to measure flour and helps recipes turn out consistently.
A video is a great idea. I’ll keep that in mind! 😊
Thank you, Ela!
The reviews on scales I looked at in the meantime are from “great” to “terrible”. Many of the “terribles” report that the scales wears down the batteries much too fast. The plug-in styles are rare and much more expensive. I’ll need to review more of them to see which have the least bad reviews.
Thanks so much for this recipe. I made it yesterday and it turned out great! So many GF store bought breads taste gritty until you toast it. This one doesn’t need to be toasted! I followed the recipe exactly and weighed the ingredients in grams.
Thank you so much for trying the recipe, Judith, I’m really happy it turned out well for you 😊
And I love that you mentioned the texture. That’s exactly what I was hoping for, a bread that tastes good even without toasting.
Great to hear you measured everything in grams too. That really helps make the results more consistent. Thanks for your feedback 💛
This is delightful. Thank you for another quick, simple recipe. I had just received my chickpea flour when I saw this recipe, so I tried it this morning. It rose beautifully.
I reconsulted your pictures and instructions to make sure I did everything as instructed (thank you for those!).
My bread fell while cooling, even though I baked it 55 minutes. What do you recommend?
It still tastes great.
Hello Karie! Thank you for the feedback 💛 I’m so glad it still tastes great!
Can I ask a few quick questions to help troubleshoot?
• Did you measure the ingredients in grams, or cups? I really recommend using grams if possible, since small differences can affect the structure.
• Are you using psyllium husk powder or whole psyllium husks? The powder absorbs more liquid and can behave quite differently.
• Which brand of psyllium are you using? Some brands vary a lot in strength and fineness.
If the bread rose well and then fell, it’s often a structure issue, and psyllium type and exact measurements are usually the key factors. Once we figure that out, we can adjust it perfectly for you 😊
I use the kitchen scale for metric measurements in your recipes.
I am using MicroIngredients og psyllium husk powder. It behaved as it should. In fact, it is better than whatever I used years ago in your first gluten free bread recipe I found.
I just realized I did not use the metric 420 ml when measuring the water, but simply measured out 1 3/4 c.
It was difficult to knead in the dry ingredients once I added the psyllium husk preparation, but I did manage to get it done. (That’s what made me consult your pictures and instructions again.)
It was beautiful until I removed it from the oven. I could see it diminishing in size rather quickly. I even had taken pictures, which I showed my husband so he would understand why I was disappointed. But tonight, after eating some more of this bread, he says it’s all good. Beans, flour, all of them are great, even if the raise isn’t there. How’s that for a wonderful commentary on your creativity and flavor in the kitchen?
Thank you so much for the detailed explanation. 😊 Your husband sounds very kind, I love that comment!
I think the main reason might actually be the water measurement. Even small differences between cups and milliliters can affect the structure quite a bit, especially in gluten-free breads. Next time I would definitely try the full 420 ml measured in metric, that should help with stability.
It’s also completely normal that the dough feels difficult to knead once the psyllium gel is added. It usually comes together after a bit of kneading, even though it stays quite sticky.
The psyllium brand you used sounds perfect, so that’s probably not the issue. Since the bread rose nicely in the oven, the structure was almost there, which is a very good sign. A slightly different hydration level could easily explain why it sank during cooling.
You could also try dividing the dough into two smaller loaves. Sometimes that works even better, because smaller loaves bake more evenly and hold their structure more easily.
Thank you, Ela. After using my new chickpea flour again today, I think it is a much coarser grind than what you are using. Would that make a difference in stability/structure?
The chickpea flour which you use (highlighted) doesn’t seem to be on Amazon any longer.
Any thoughts?
Yes, Karie, that could definitely make a difference. A coarser chickpea flour can affect the structure and stability, while a finer flour usually binds better and gives a more even crumb.
If your flour feels a bit grainy between your fingers, that might be the reason. A finer grind often works better for this recipe.
If you want to experiment, you could try briefly blending it to make it finer. That sometimes helps a lot. And I have updated the link. Thanks for letting me know!
That is amazing! Once I finish my store bought bread I am making this.
I was wondering….should I stick something like a skewer into the bread at 55 minutes to see if it comes out dry (to get sure that it is all cooked through) or you are pretty sure that the 55 minutes should be enough?
Thank you!
Hi Alina, with this bread the skewer test isn’t always 100% reliable because it’s naturally more moist than traditional wheat bread. If you want to be extra sure, the most accurate way is to check that the internal temperature is around 95 to 100°C.
In most ovens, 50 to 55 minutes is enough. If your oven runs a bit cooler, it might need a few extra minutes. And letting it cool completely before slicing is very important, as the structure continues to set while cooling. 🙂
This sounds amazing; are you planning a video on your YouTube channel for making it? I didn’t notice a link on this page. I did see something up above that said ” Ask and ye shall receive.’ (love it!) Thanks for your lovely recipes. We’ve made the Red Lentil Bologna twice and love it.
Hey, thanks so much for your comment! The video is included in the blog post, just above the ingredient list – here’s the direct link: https://elavegan.com/chickpea-flour-bread/#recipe-video
If you have an ad blocker, it might prevent the video from showing.
I also uploaded it to YouTube today, you can watch it here: https://youtu.be/0YQ4I9FDWCA
Hope this helps. 🙂
Oh yes, perfect! I will unblock my browser for your site, thanks for that tip, too. I LOVE bread… my personal dessert, ha ha.
Thank you so much, I really appreciate that. And I totally get it… fresh bread is basically dessert in disguise.
Hope you find lots of new favorites on the site. Enjoy every slice 😊
Can this be made in the bread maker?
Hi Anne! Short answer: not really ideal for a bread maker.
This bread isn’t a traditional yeast dough. It doesn’t need kneading cycles or proofing time, and it rises quickly from baking powder and baking soda. Bread makers are designed for yeast-based recipes, so the long mixing and resting phases can actually make this batter too dense or gummy.
If you still want to try it:
Use the quick bread or cake setting if your machine has one.
– Let it mix just until combined.
– Skip any long proofing cycle.
– Bake immediately after mixing.
Keep in mind the texture may be tighter than when baked in the oven.
Honestly, this recipe works best in a regular oven since it’s more like a shaped quick bread than a classic kneaded loaf.
so excited to try this
thank you for all you do! 💗
Yay, I’m so glad, Lara! I hope you will like it! 🙂