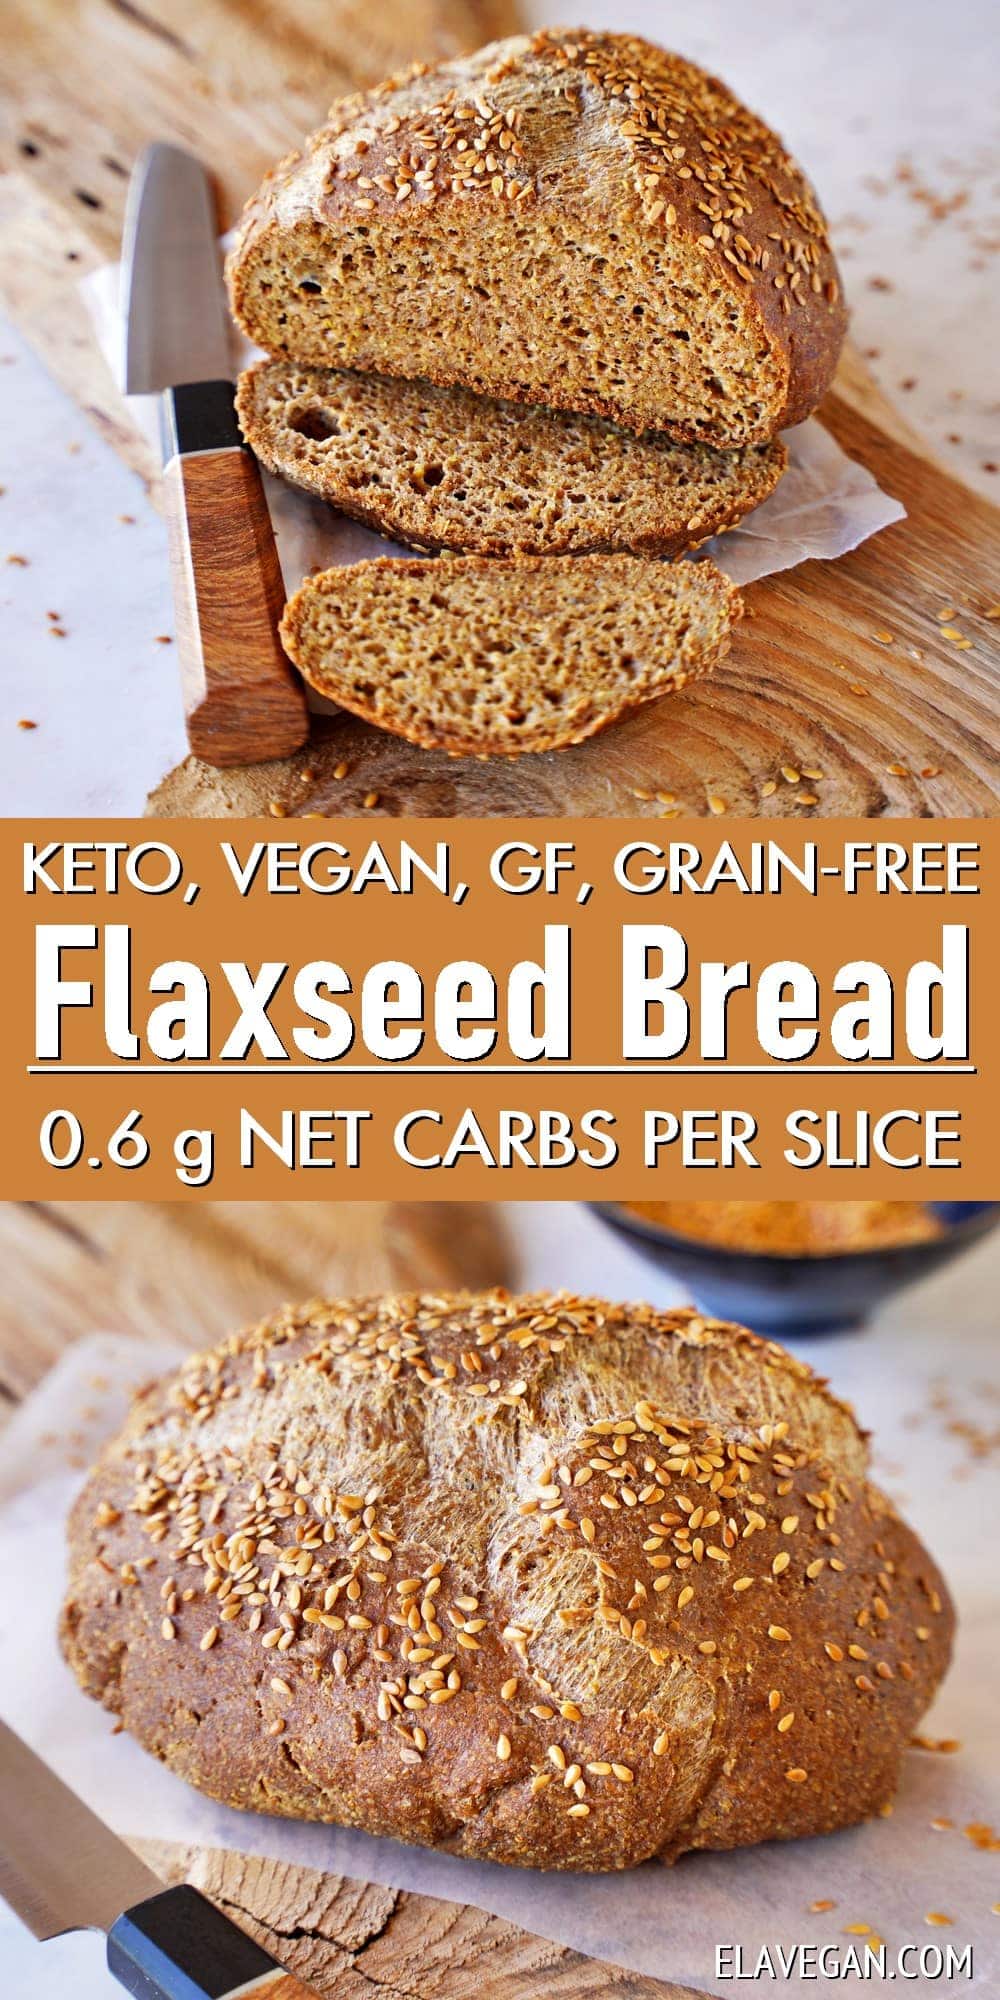
This easy keto bread with just 3 main ingredients, and only 0.6 g net carbs per slice, is crusty and perfect for toasting and sandwiches. Plus, the flaxseed bread is 100% gluten-free, wheat-free, flourless, low-carb, sugar-free, oil-free, yeast-free, paleo-friendly, egg-free, dairy-free (vegan), and can be made grain-free!
Diet-Friendly Keto Flaxseed Bread
No matter your dietary requirements, no one should have to forego bread. Over the years, I’ve made plenty of gluten-free bread loaves, rolls, and baguettes. However, if you’re looking for a gluten-free bread that is also high in fiber and protein, and low-carb (keto!), this flaxseed bread recipe is a must-try.
The fiber helps to keep you full for longer while supporting a healthy gut. Meanwhile, flaxseeds are also packed with heart-healthy omega-3 fatty acids (alpha-lipoic acid), which help to lower total cholesterol. Plus, it’s low GI, meaning no blood sugar spikes, unlike regular bread.
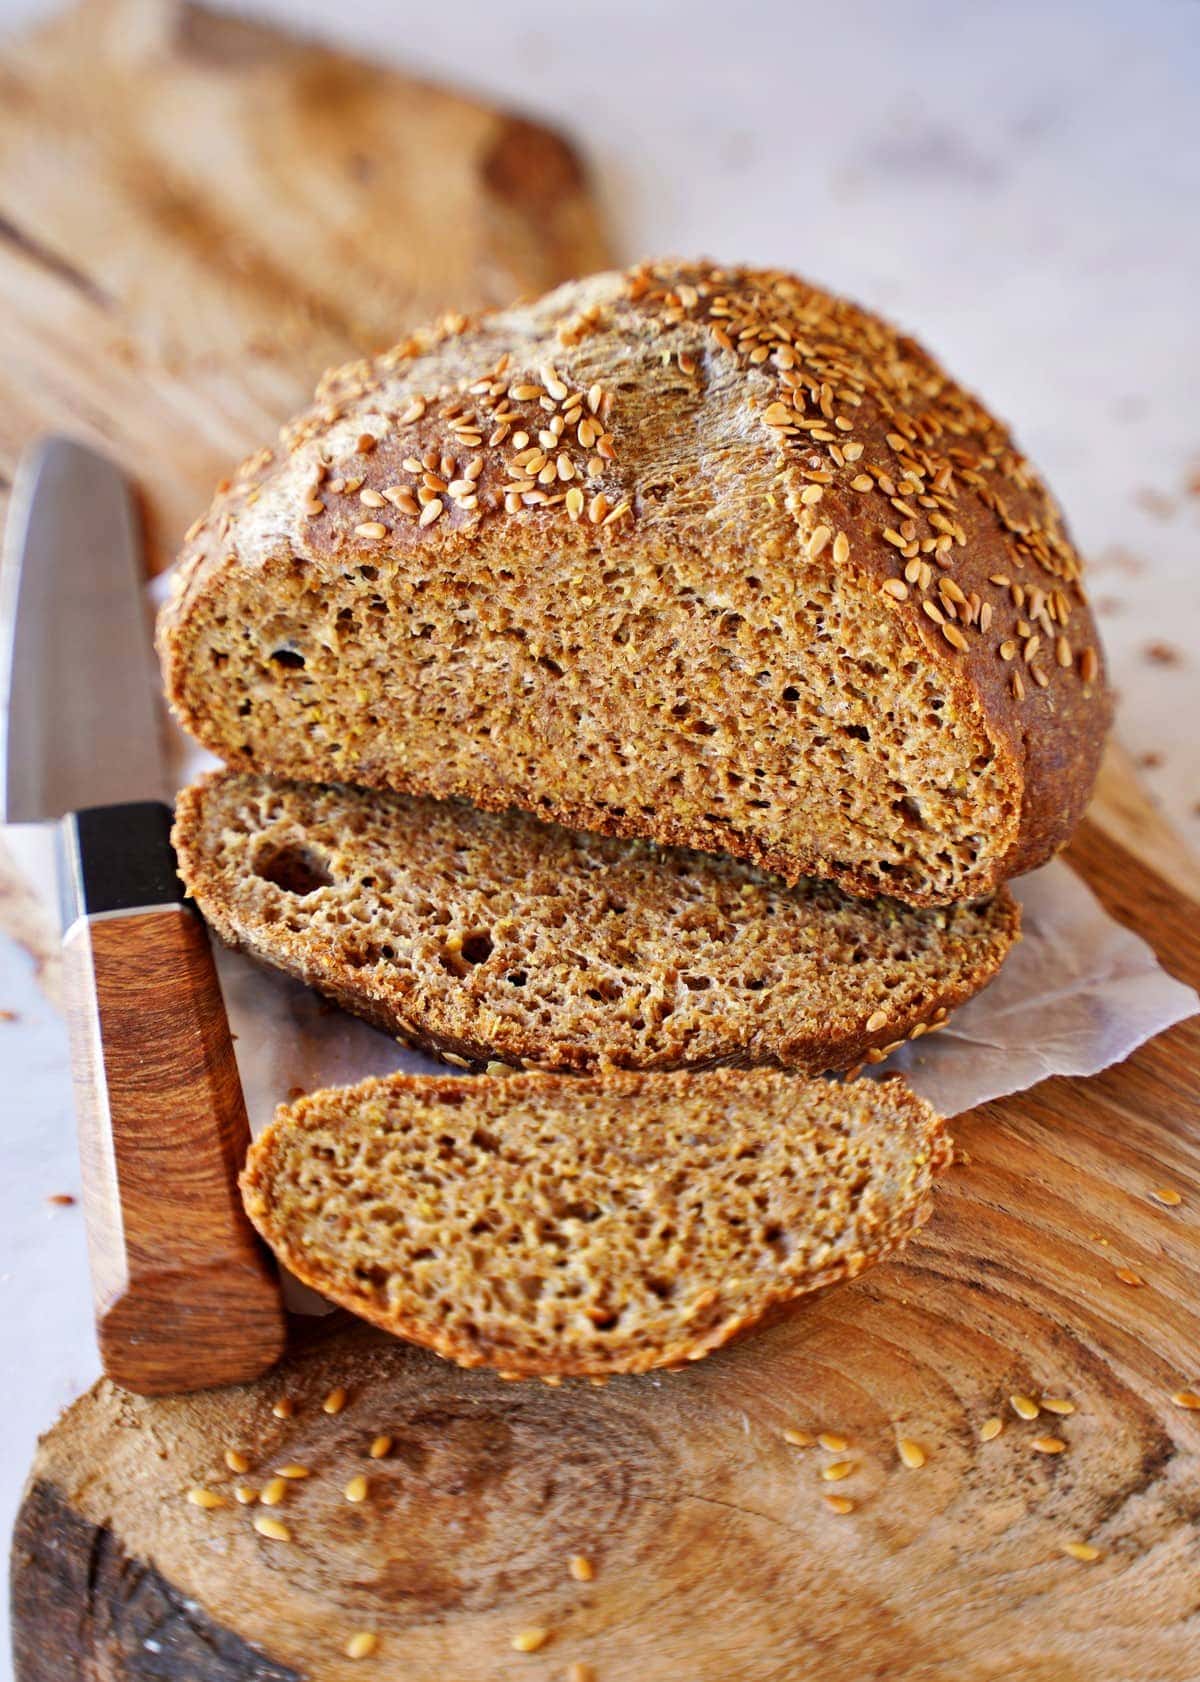
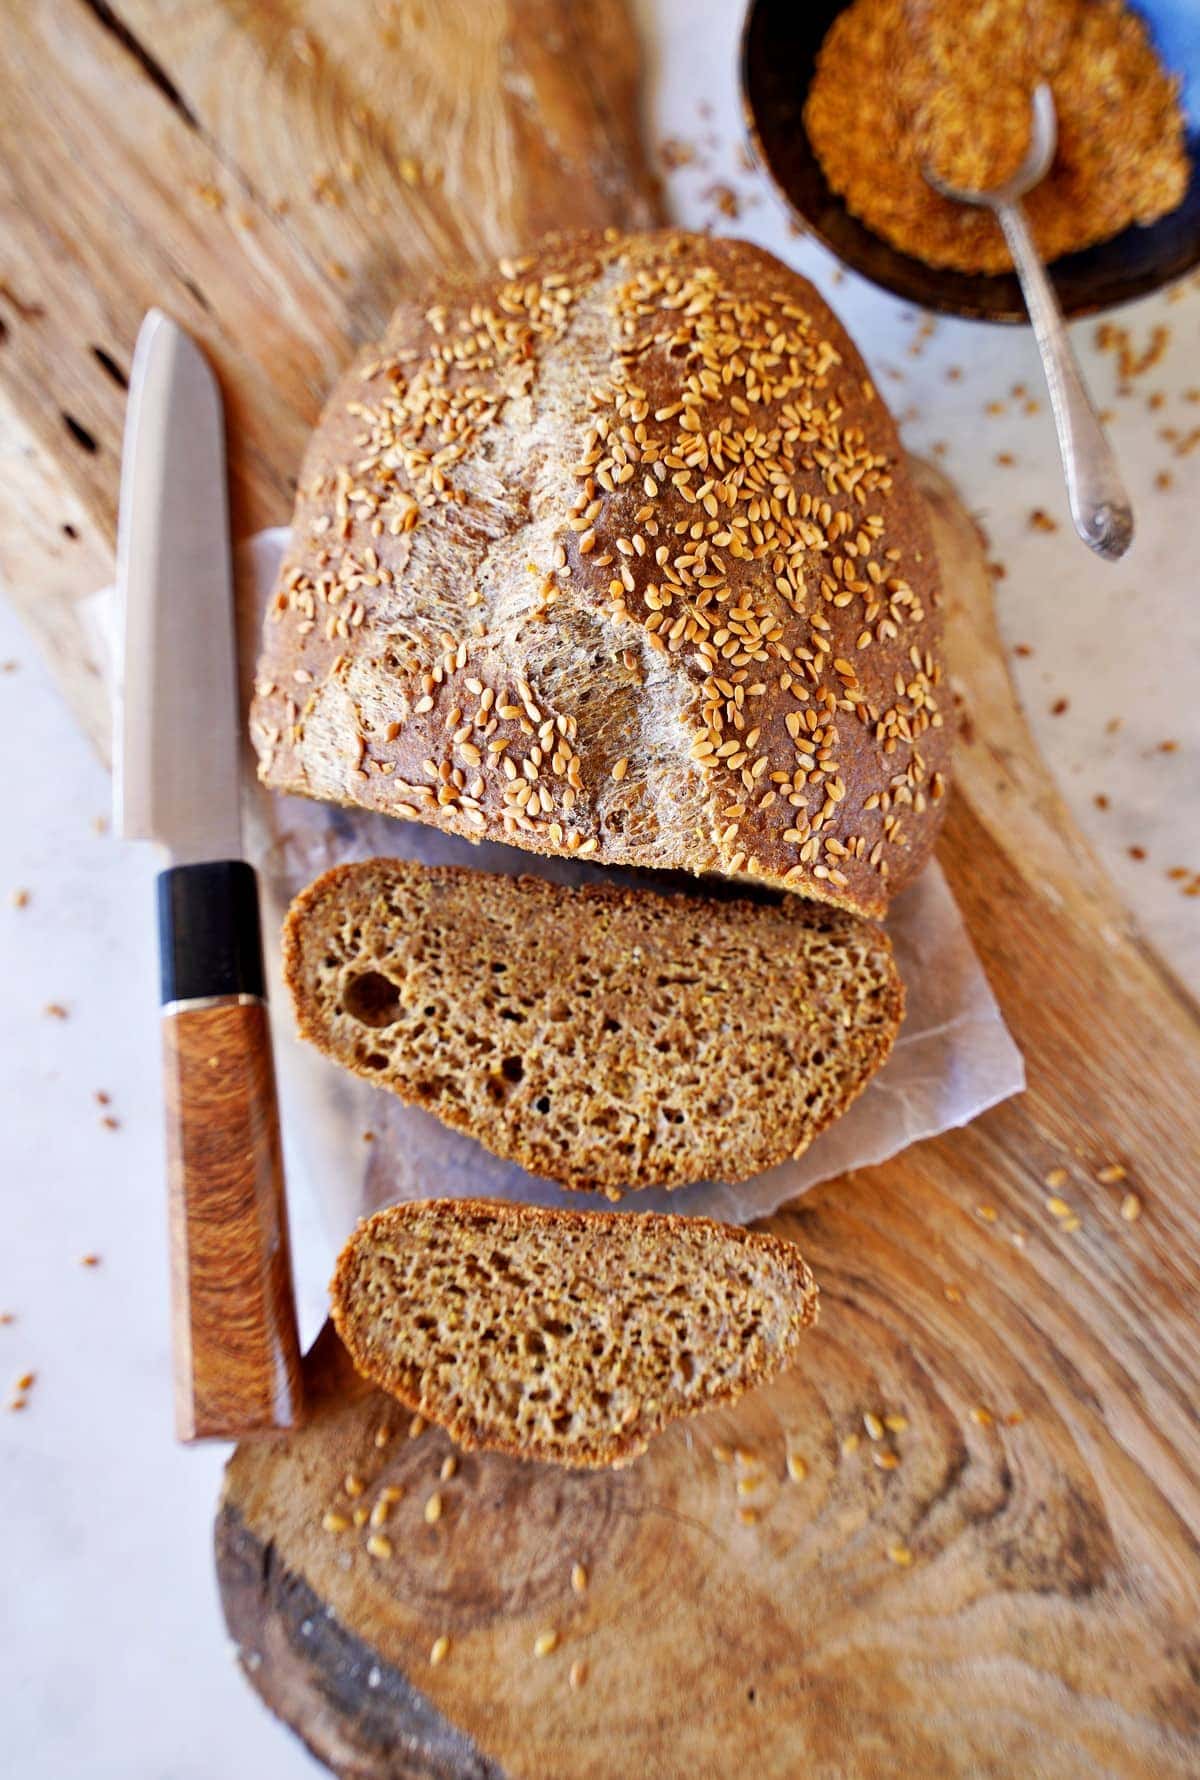
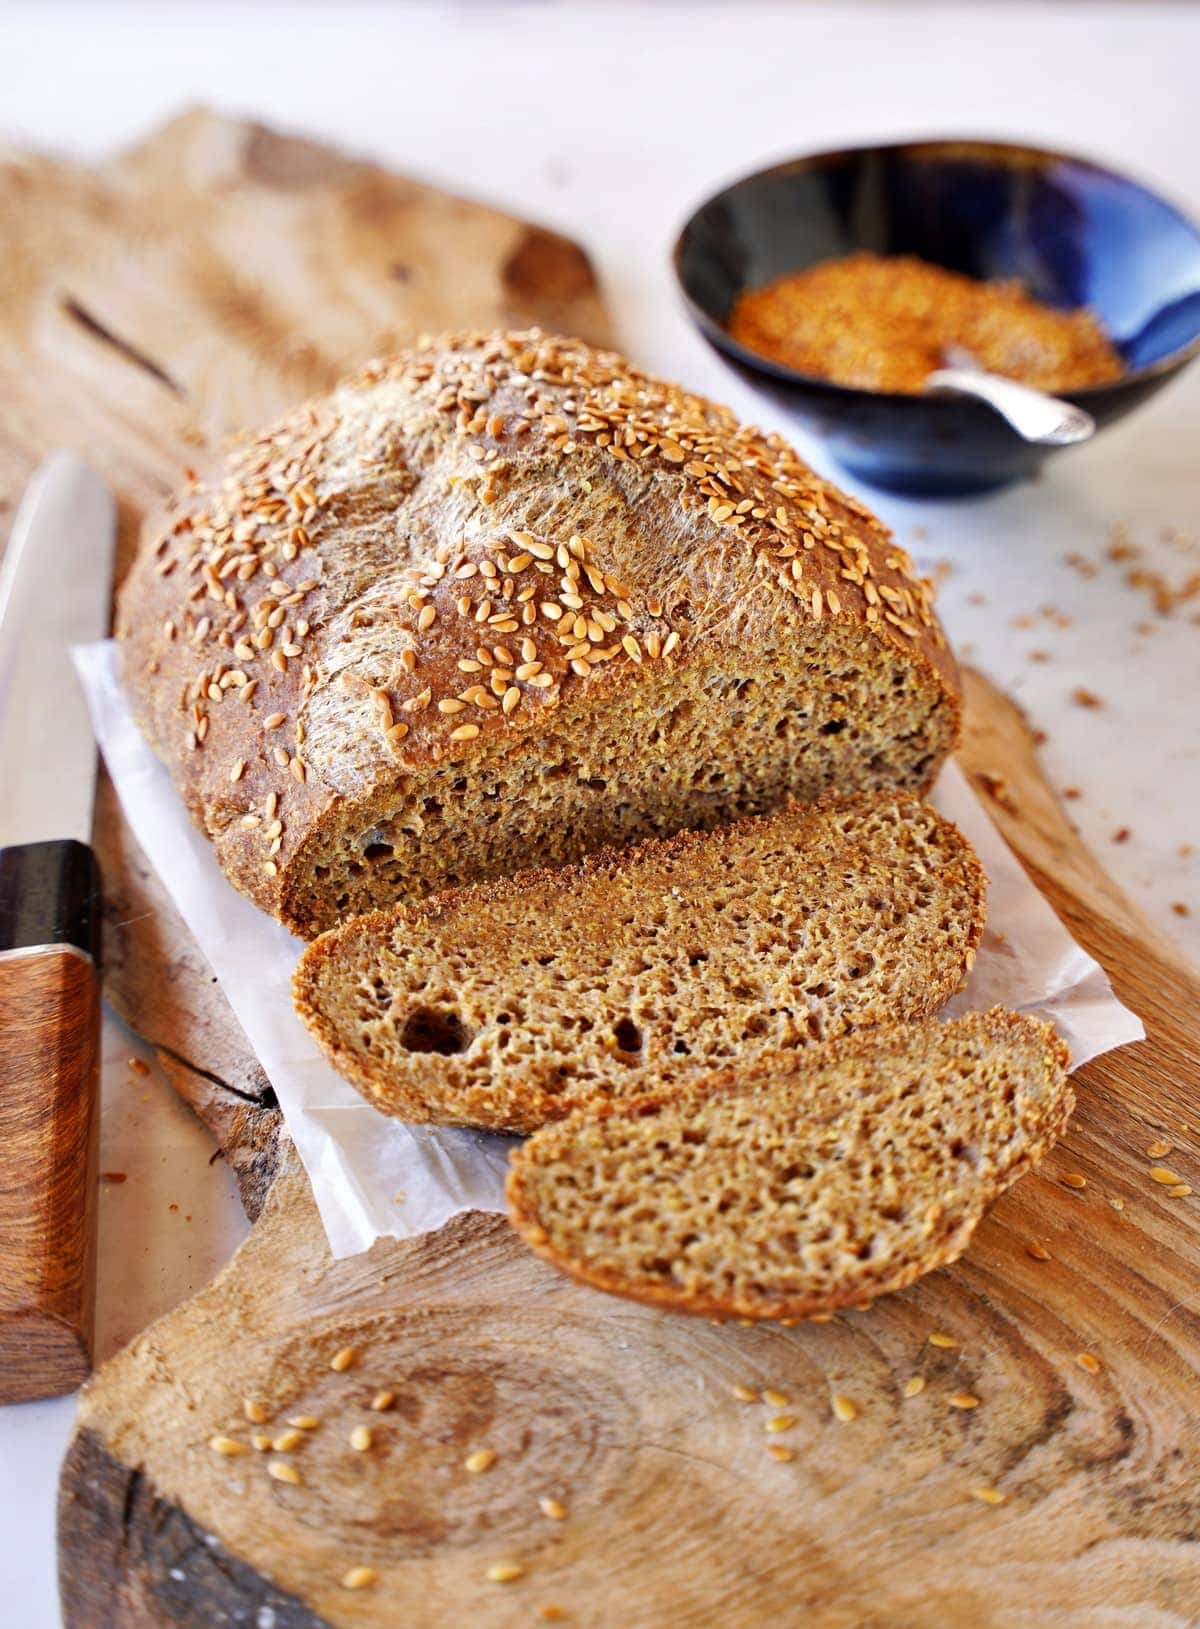
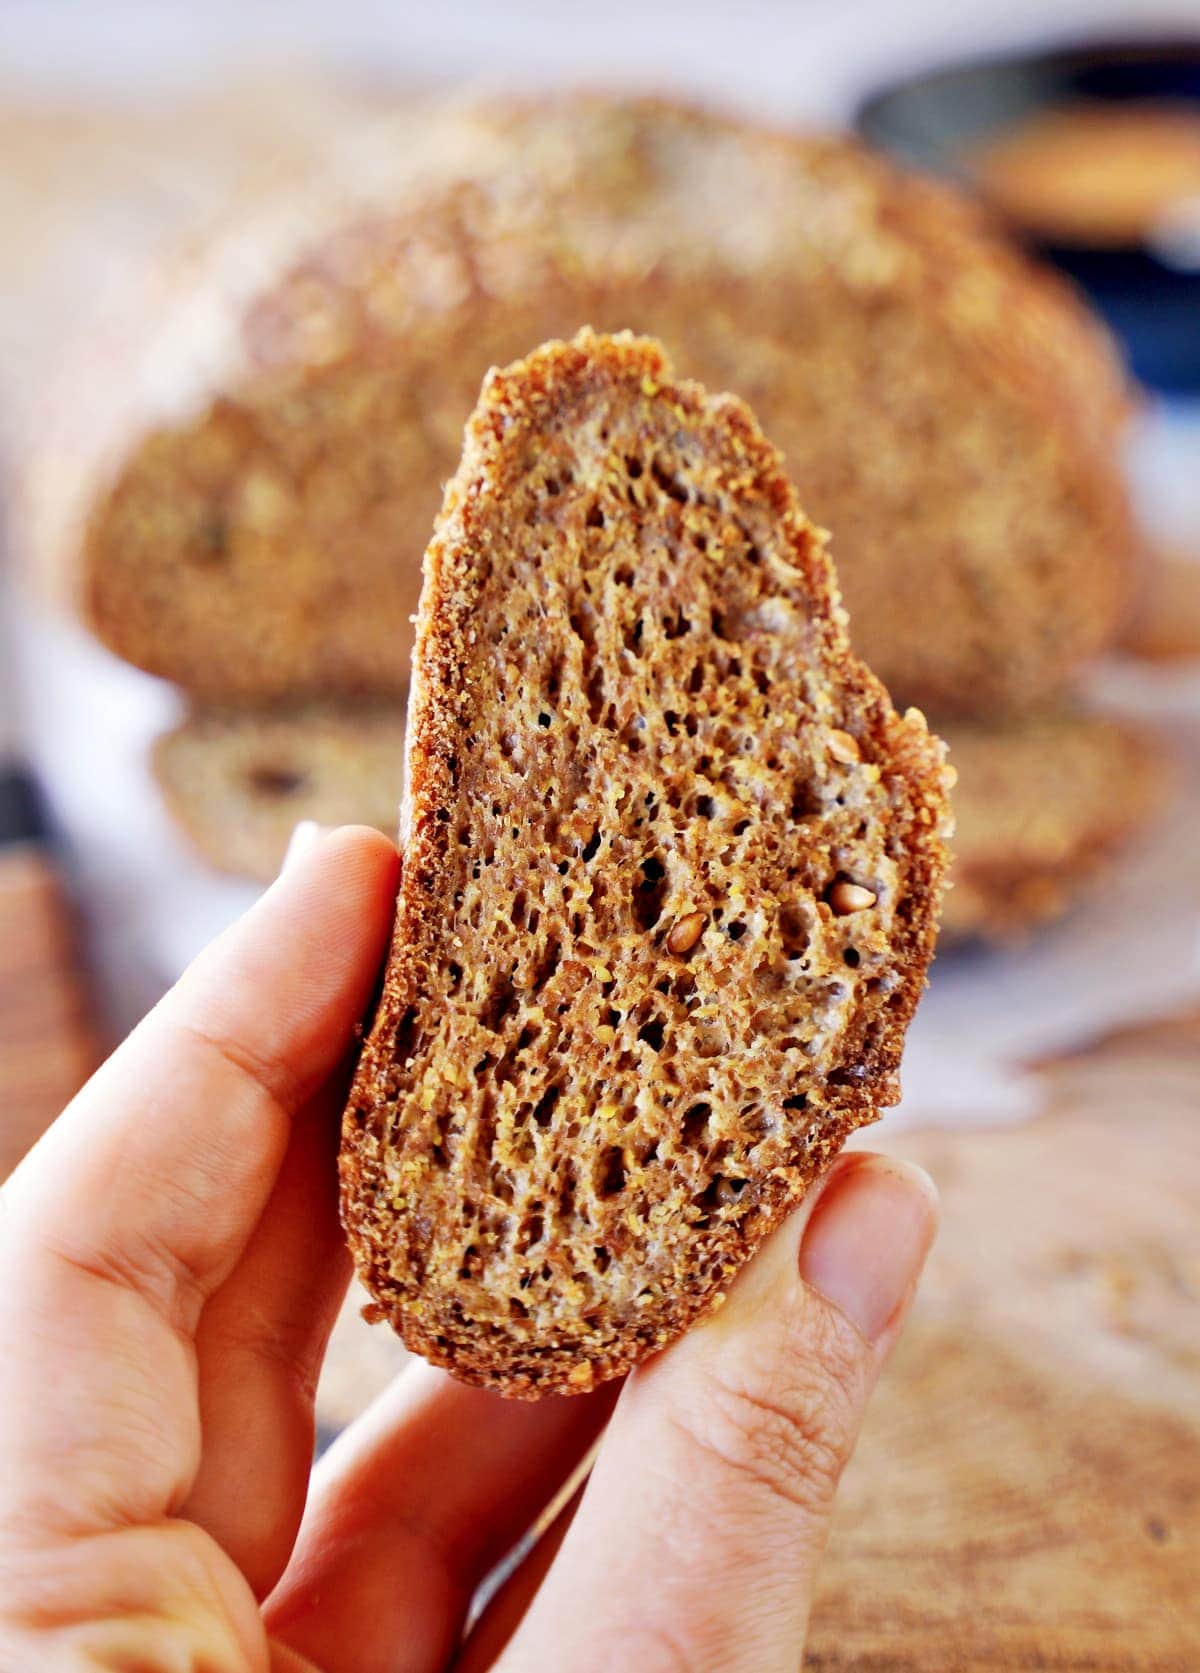
With just 3 main ingredients, where ground flaxseed is key, this linseed bread has an earthy, nutty flavor and relies on baking powder and psyllium husk to double (or even triple) in size while baking without the need for yeast. The resulting bread is crusty on the outside and soft on the inside, without being dry and gritty like other keto bread.
Best of all, by ditching the yeast and gluten, this low-carb flax bread requires no mixer, kneading, or rising time and just 10 minutes to prep. Mix, shape, and bake the dough—no special equipment or skills are required. You might also like this recipe for high-protein lentil bread or keto almond flour tortillas.
The Ingredients
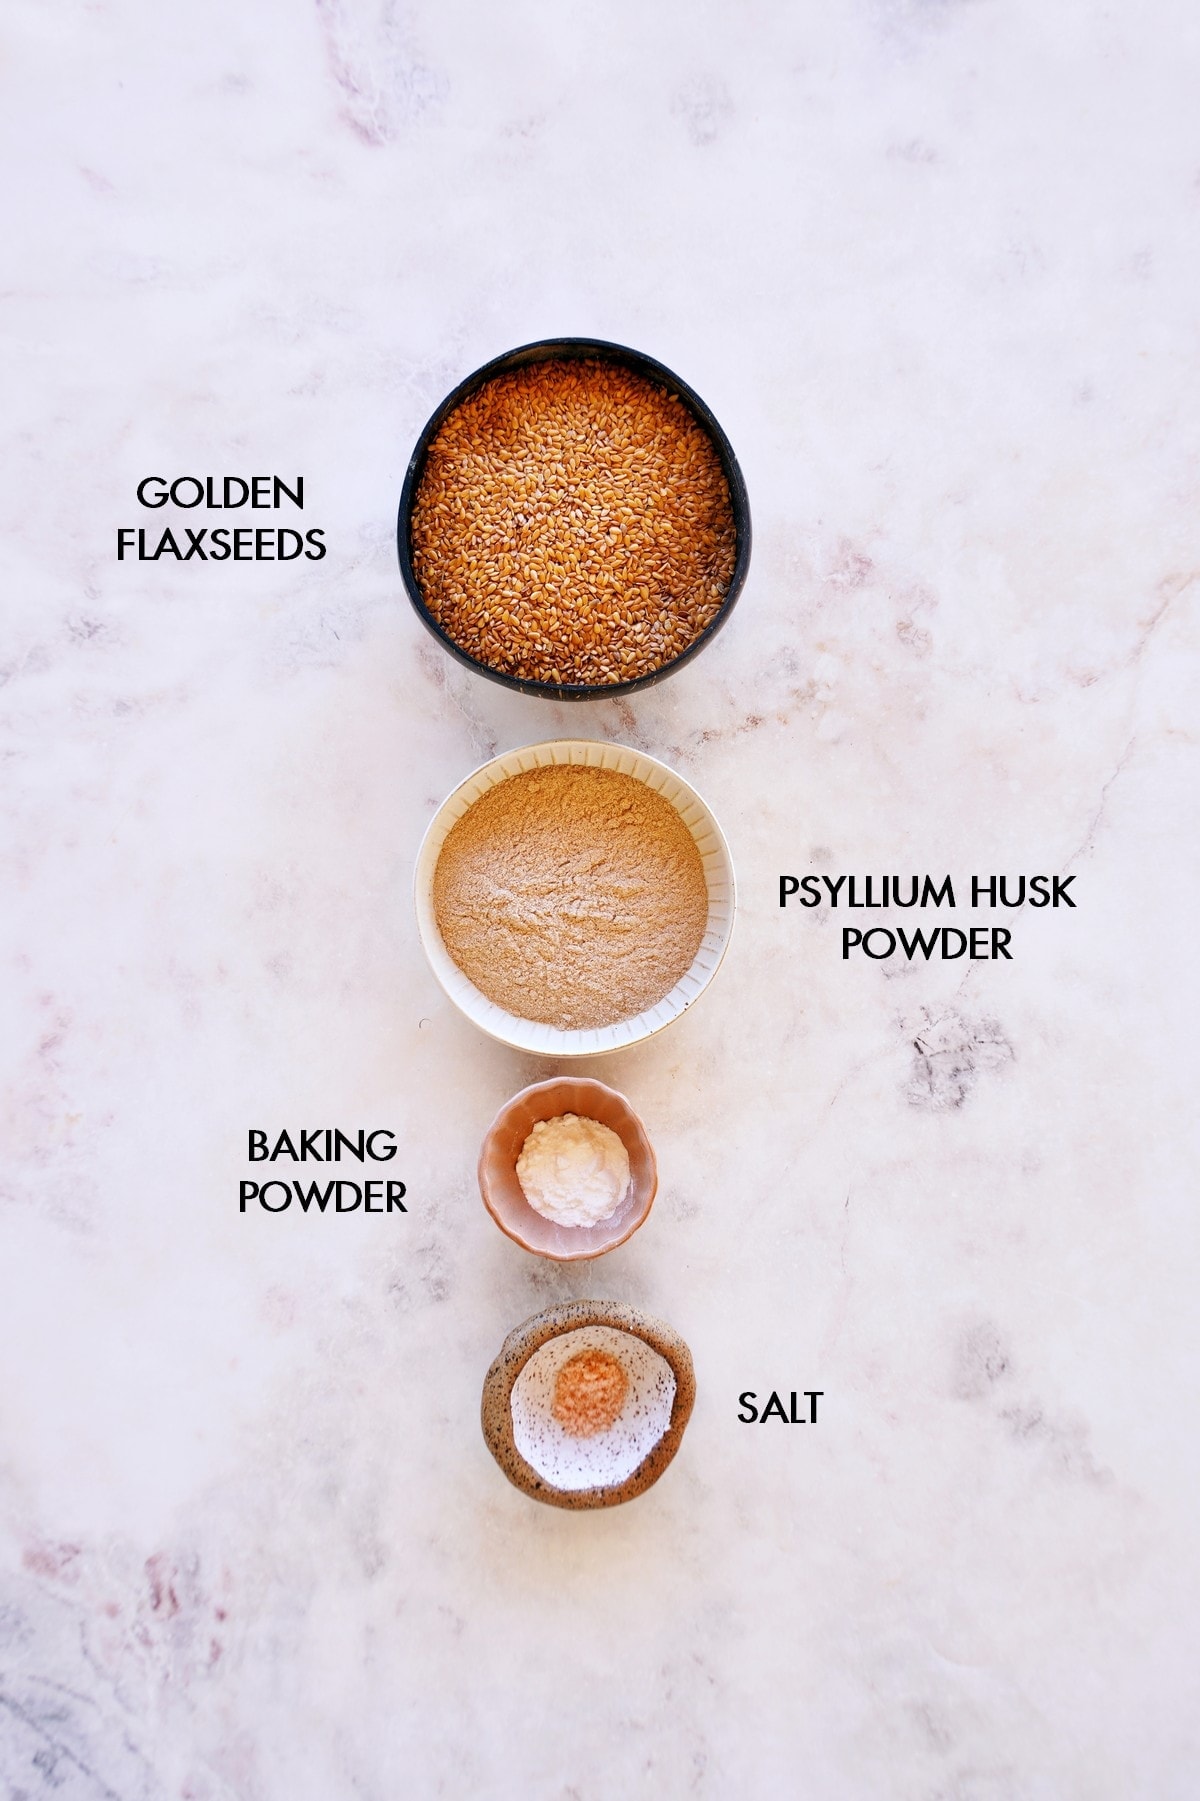
Just three ingredients, plus salt and water, are needed to prepare this keto flaxseed bread recipe.
- Flax seeds: I use whole golden flaxseeds (also called linseeds) for this gluten-free bread that I grind into a fine flour. I don’t recommend using brown flaxseed, as the smell and flavor is far more robust. Do NOT use pre-ground flaxseed meal, as that won’t work since some brands are defatted.
- Psyllium husk powder: This ingredient is essential for helping this gluten-free and wheat-free bread mimic gluten dough, making it easier to work with. Plus, it helps the bread to double (or even triple) in size.
- Baking powder: This will provide the yeast-free bread with lift. You could experiment (I haven’t tried it myself) with 3/4 tsp baking soda and a little vinegar or lemon juice for a grain-free (paleo) bread recipe, or use grain-free baking powder.
- Salt: A small amount of salt will enhance the flavor of the bread.
- Hot water: To bring the dough to the correct consistency and make it pliable.
For the full ingredients list, measurements, complete recipe method, and nutritional information, read the recipe card below.
How to Make Keto Flaxseed Bread?
- First, preheat the oven (either use a convection oven or a gas oven with a fan) to 356 °F/180 °C and line a baking sheet with parchment paper or a silicone mat
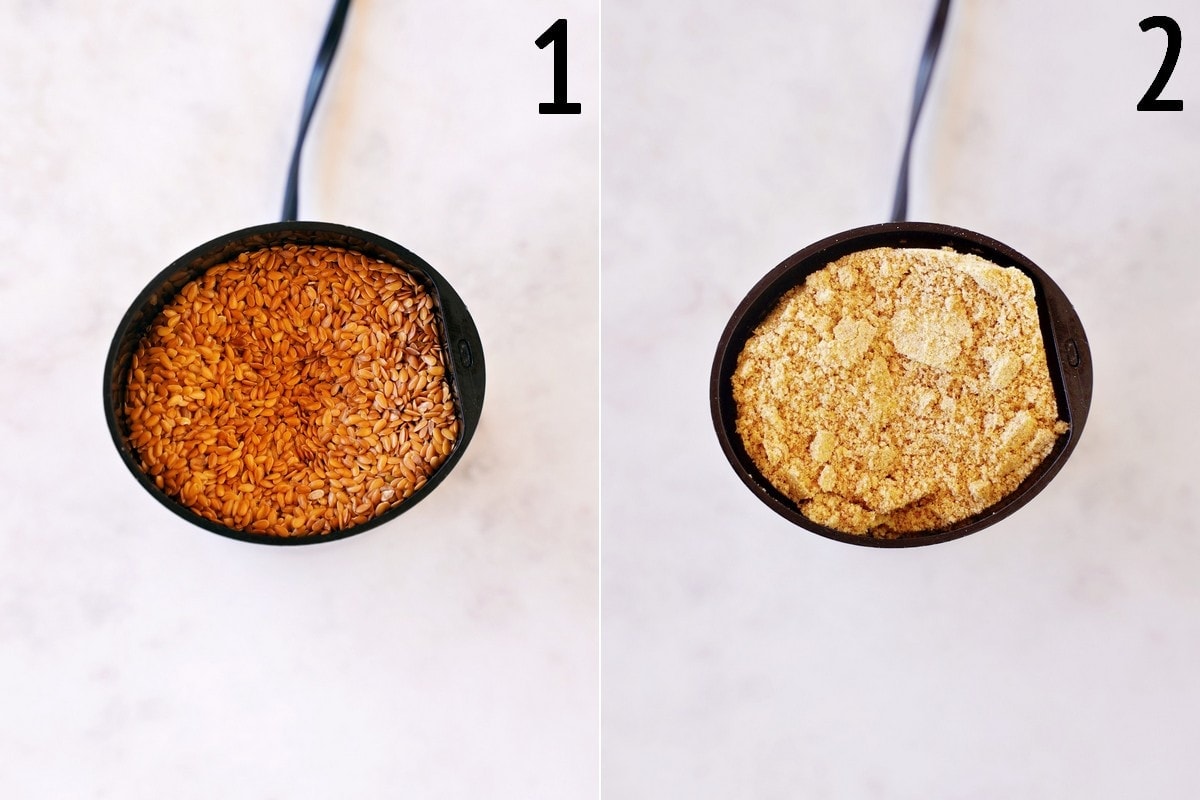
- Then, blend the flaxseeds in an electric spice/coffee grinder (or small blender) until floury. Transfer the flaxseed meal to a medium-large bowl.
- Add the remaining dry ingredients (psyllium husk powder, baking powder, and salt), and stir with a spoon.
If you only have whole psyllium husk, grind that into a powder after the flax seeds and measure it after grinding!
- Pour in the hot water and mix with the spoon, kneading it with your hands once it’s cool enough to handle.
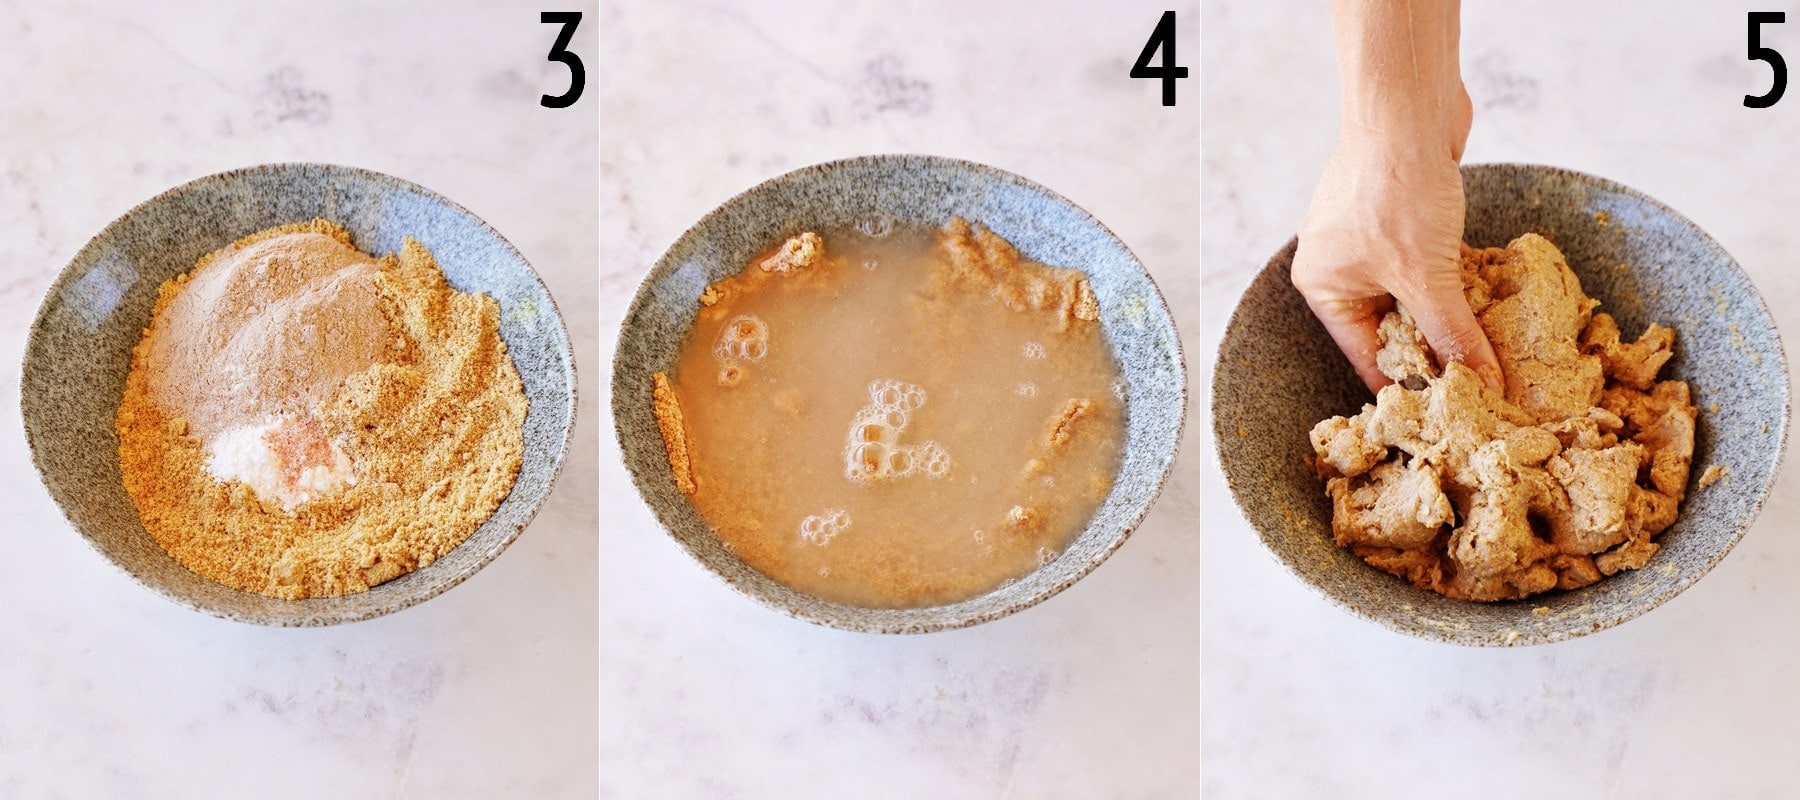
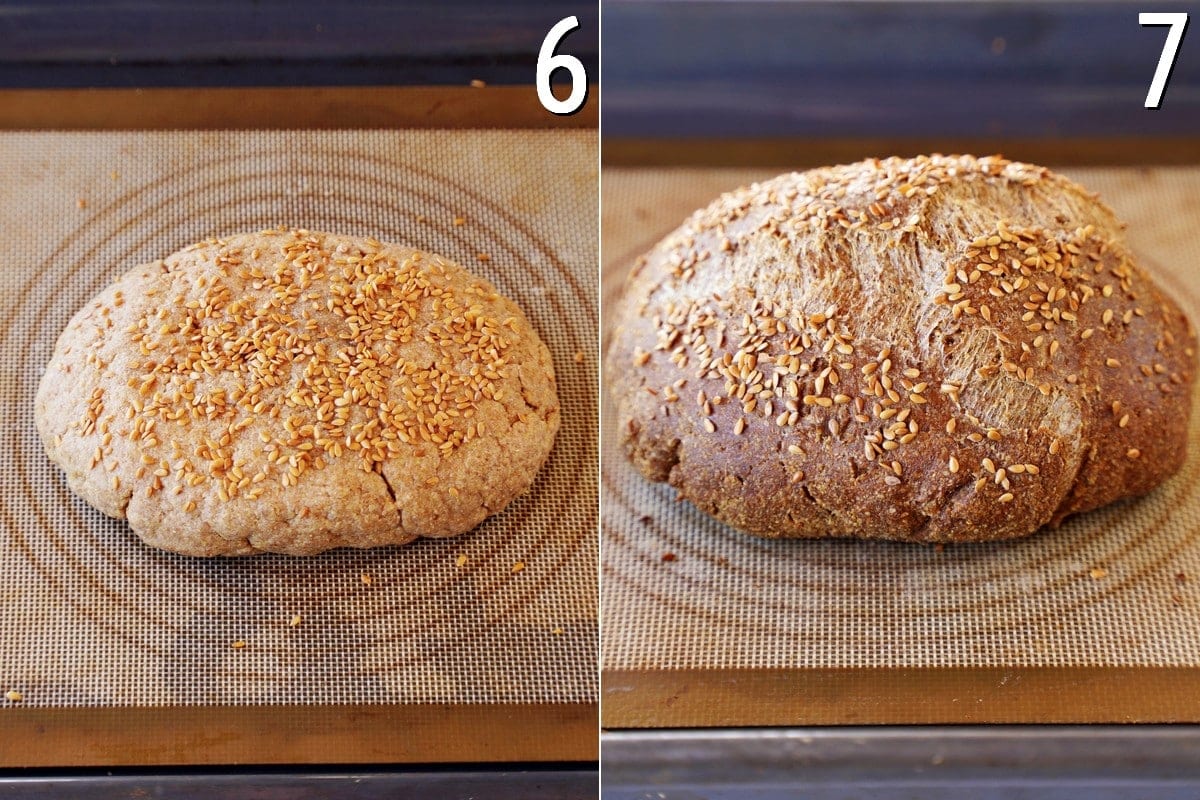
- Transfer the bread dough to the prepared baking sheet and shape it into a round disk.
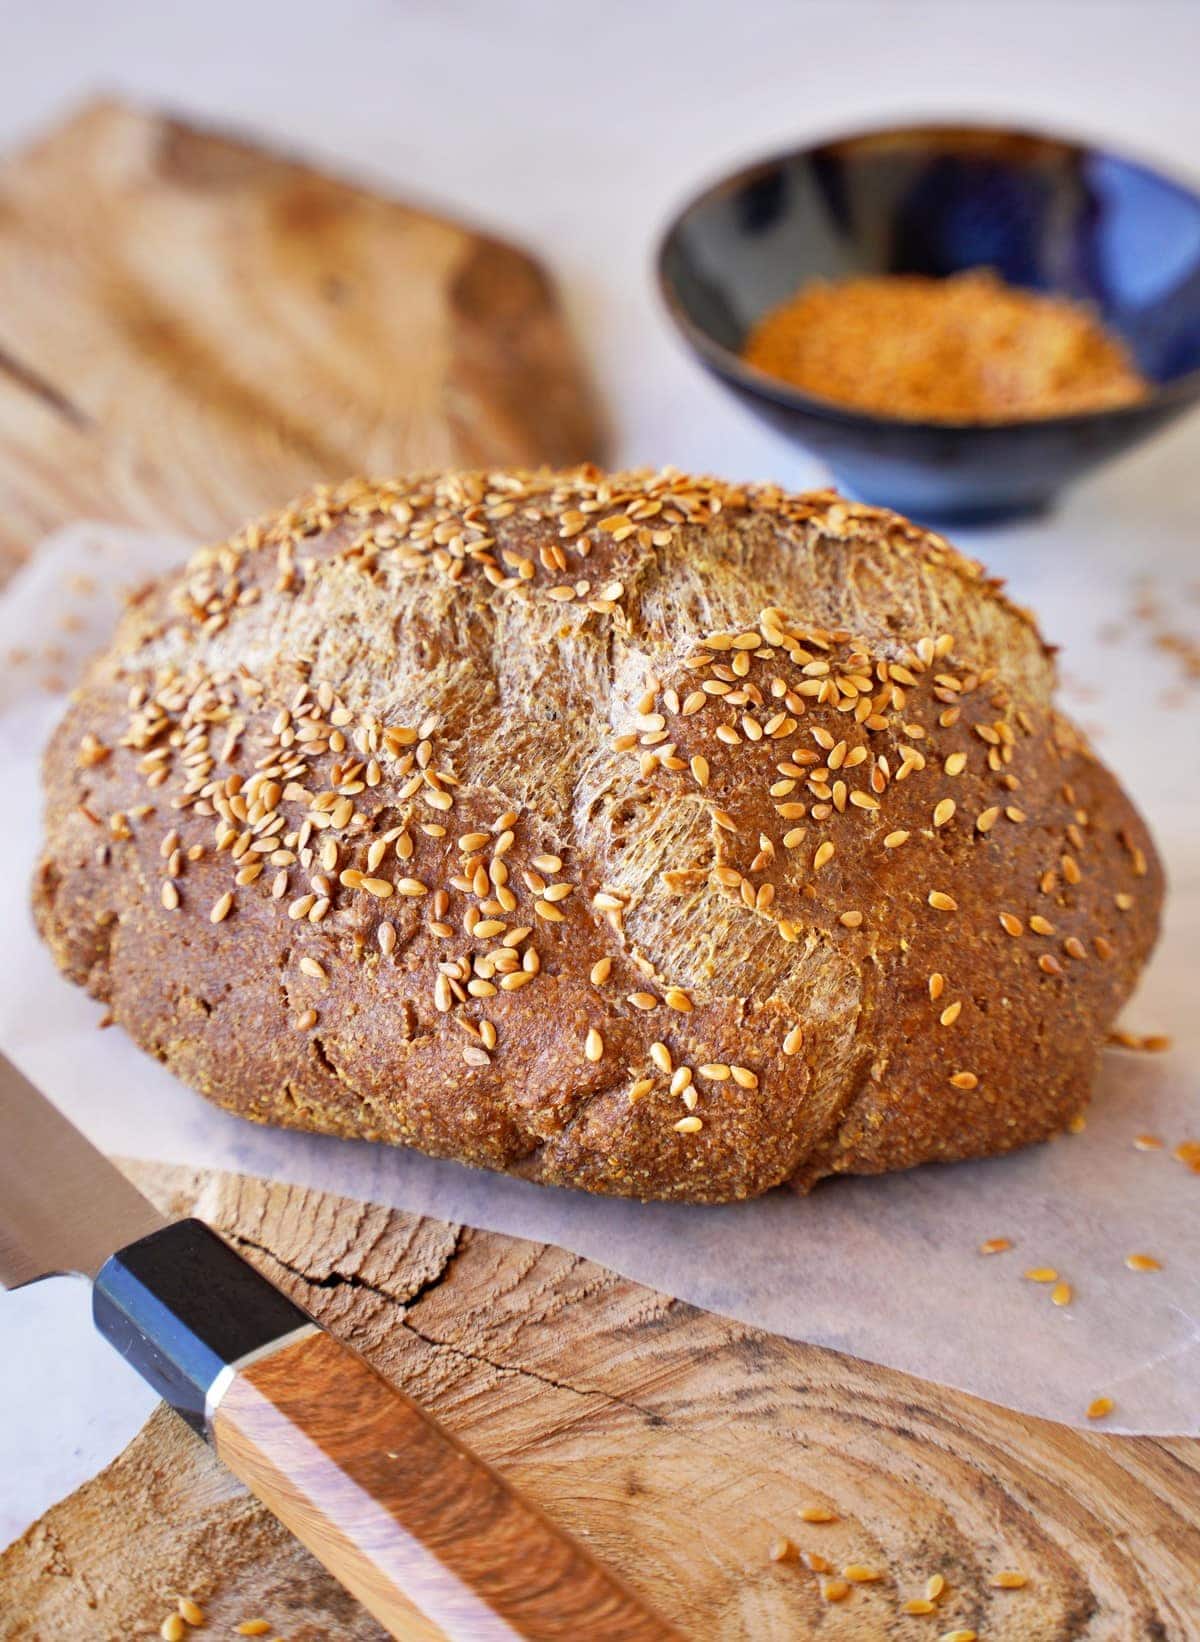
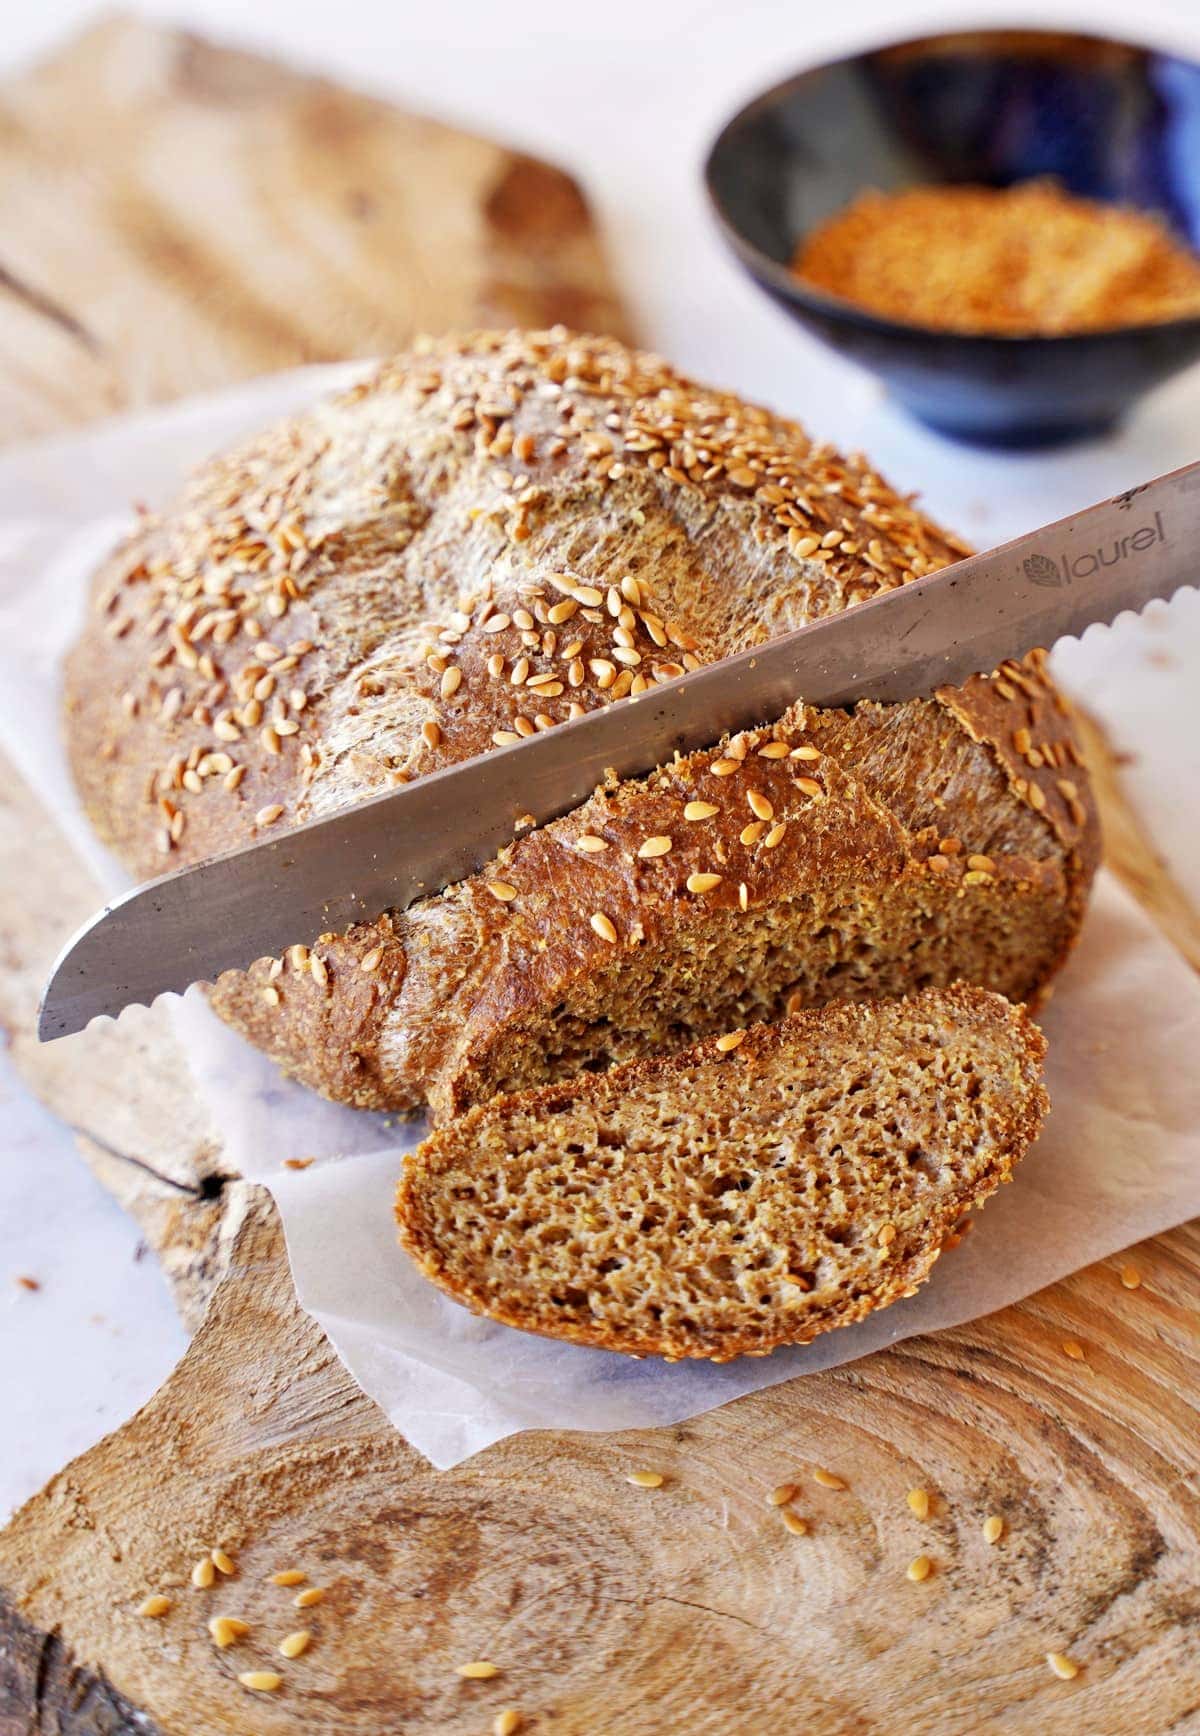
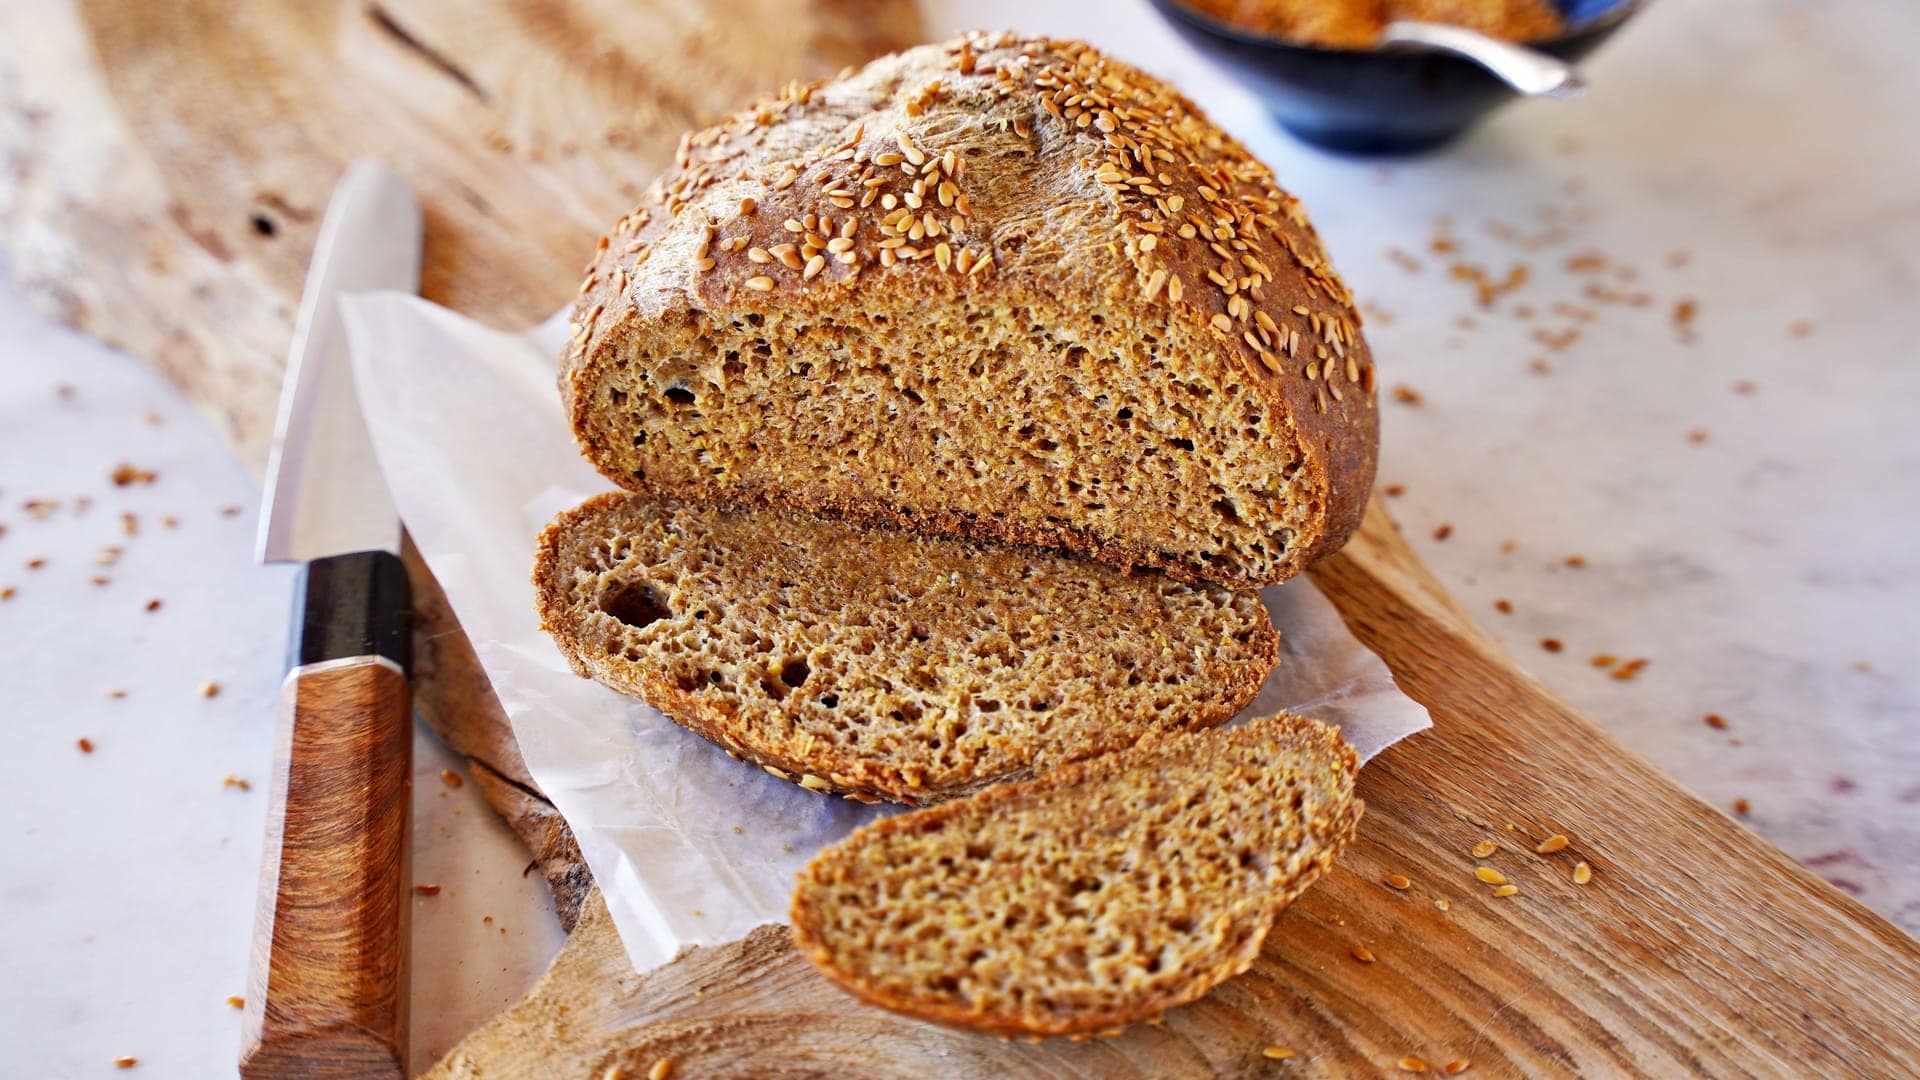
- Lightly wet the top of the dough and sprinkle it with extra whole flax seeds, then bake the gluten-free bread for 45-50 minutes, until it doubles (or even triples) in size and has a golden brown crust. Finally, transfer it to a wire rack to cool completely before slicing and enjoying it!
You can enjoy this low-carb bread slathered with hummus, to make avocado toast, for other toasts and sandwiches, and to dip into soups and stews.
Storage Instructions
Store: Once cooled, store any leftover vegan bread tightly covered/ in an airtight container in the fridge for 7 days.
Freeze: You can also freeze this keto bread, either whole or sliced with parchment paper between the slices (to defrost only as much as needed each time) for up to 3 months.
Thaw at room temperature, or thaw/reheat slices in a toaster oven/microwave.
FAQs
Which oven is recommended?
I recommend using a convection oven or an oven with a fan, otherwise, the bread will be denser.
My bread turned out dense or didn’t rise. What is the reason?
Some of the most common mistakes are:
- Using cup measurements instead of the metric measurements I provide (and then measuring 1 1/2 cups of ground flaxseeds instead of whole).
- Using brown flaxseeds instead of golden.
- Using store-bought flaxseed meal (it often has less fat and won’t work).
- Using the same amount in tablespoons of whole psyllium husk instead of psyllium husk powder. If you only have whole psyllium husk, grind that into a powder and measure it after grinding!
- Using too much water.
- Not using hot water (let it simmer in a kettle, then pour it immediately over the dry ingredients).
- Kneading the bread for more than 30 seconds (this might result in a dense, flat loaf).
- Baking the bread with other dishes (like a casserole) which will affect the humidity in the oven.
How many carbs does one slice of this keto bread have?
One slice (from 11 slices) of this healthy low-carb bread contains less than 0.6 g net carbs, which is extremly low! This keto bread contains mainly fiber that helps to keep you full for longer and is very beneficial for a healthy gut.
Why is there a large air bubble in the low-carb bread?
If you don’t grind the golden flax meal fine enough, it can cause issues with the structural integrity of this yeast-free bread. That can mean large air bubbles or even the crust pulling away from the bread within.
Can I use a bread loaf pan?
I haven’t tried it, though it should work. However, the baking time may need adjusting.
Why is my flax bread bitter?
Flaxseeds become rancid quickly and become bitter. Before making the low-carb bread, smell and taste the seeds. When fresh, they should have a mellow, nutty flavor and aroma.
Can I add more flavor to the flaxseed bread recipe?
Just like regular bread, you can add more nutrients and flavor to the linseed bread with the addition of your favorite fresh or dried herbs (thyme, rosemary, sage, Italian seasoning, etc.), spices (onion/garlic powder, etc.), sun-dried tomatoes, minced jalapeños, or some olives. You could even sprinkle some extra seeds (like sunflower, pumpkin, sesame seeds, etc.) over the top.
Recipe Notes
- Use home-ground flax seeds: They’ll taste much better and fresher than pre-ground seeds (which often won’t work if you use a brand of flaxseed that has been defatted). Note that the finer the meal, the better the bread will hold together. Sifting it and re-grinding leftovers will help make a really fine flour.
- Allow to cool completely: Leave it to rest for at least 15 minutes before slicing.
- Shape the dough to your liking: Instead of one large loaf, feel free to make smaller bread rolls or baguettes and adjust the baking time as needed.
Other Gluten-free ‘Bread’ Recipes
- Gluten-Free Bread Rolls (German Brötchen)
- Vegan Cheesy Garlic Breadsticks
- Potato Flatbread
- 2-Ingredient Lentil Tortillas
- Chickpea Flour Tortillas
- Gluten-Free Pita Bread
- Gluten-Free Naan
If you try this healthy keto flaxseed bread recipe, I’d love a comment and ★★★★★ recipe rating below. Also, please don’t forget to tag me in re-creations on Instagram or Facebook with @elavegan and #elavegan—I love seeing them.

Keto Flaxseed Bread
Video
Ingredients
- 1 ½ cups (240 g) whole golden flaxseed (see notes)
- 4 Tbsp (40 g) psyllium husk powder
- 2 tsp baking powder
- ½ tsp salt
- 1 ⅓ cups (320 ml) hot water
Instructions
- You can watch the video in the post for visual instructions. I recommend using metric measurements for exact results.First, preheat the oven (either use a convection oven or a gas oven with a fan) to 356 °F/180 °C and line a baking sheet with parchment paper or a silicone mat.
- Then, blend the whole flax seeds in an electric spice/coffee grinder (or small blender) until floury. Transfer the flaxseed meal to a medium-large bowl.If using ground flaxseed, make sure to use 240 grams (don't measure 1 1/2 cups of ground flax seeds). By grinding the flax seeds the volume will increase a lot, so it's always best to follow metric measurements.
- Add the remaining dry ingredients (psyllium husk powder, baking powder, and salt), and stir with a spoon.If you only have whole psyllium husk, grind that into a powder after the flax seeds and measure it after grinding!
- Pour in the hot water and mix with the spoon, kneading it with your hands for some seconds (up to 30 seconds), once it’s cool enough to handle.
- Transfer the bread dough to the prepared baking sheet and shape it into a round disk.
- Wet the top of the dough and sprinkle it with extra whole flax seeds, then bake the bread for about 50 minutes, until it doubles (or even triples) in size and has a golden brown crust.Please note that it might take longer as each oven is different.
- Finally, transfer it to a wire rack to cool completely before slicing and enjoying it!
Notes
- Please read the FAQs section in the post before making the bread.
- Use home-ground flax seeds: Note that the finer the meal, the better the bread will hold together. Do NOT use store-bought pre-ground flaxseed meal, as that won't work, since some brands are defatted.
- Make sure to use grain-free baking powder if you have to avoid corn.
- Shape the dough to your liking: Instead of one loaf, feel free to make smaller bread rolls or baguettes and adjust the baking time as needed.
- Oven: I noticed that the bread will be denser if NOT using a convection oven or an oven with a fan.
- You can add more flavor to the bread with the addition of your favorite fresh or dried herbs, spices, sun-dried tomatoes, minced jalapeños, or some olives.
- Check out some of the bread remakes which I highlighted in my Instagram story.
Nutrition information is an estimate and has been calculated automatically
Equipment
 „Simple and Delicious Vegan“ Cookbook by ElaVeganCLICK HERE to order!
IF YOU ARE USING PINTEREST, FEEL FREE TO PIN THE FOLLOWING PHOTO:

Hello Ella, my question is: can I use brown flax seed instead of golden flax seed?
Hi Anna, yes you can but the bread will be a little denser and darker.
Ela
Heyy Ela , , Im allergic to psylium , it makes me sick ! what can I substitute it for ?
thanks
Andrea
Hey Andrea, please check out this bread recipe without psyllium: Gluten-Free Seeded Bread
I just made this. it’s the first bread I’ve had since eating keto for a couple of months. I’m also celiac so finding something that fits into this category is so cool! The bread turned out FANTASTIC! Followed the recipe exactly. I ate a slice just after it cooled, and I’m looking forward to trying it toasted with some SF berry spread or keto honey, or a BLT. Haha, I’m so excited – Thank you!!!
That makes me so happy to hear, Rochell! 😊 Especially when you haven’t had bread in a while, it’s such a nice feeling to finally enjoy a slice again. I’m really glad the recipe worked out perfectly for you. Thanks so much for sharing your experience. 💛
Hi Ella,
This bread is saving my life😅 I’m vegan, low glycemic and glutenfree aaaand my doctor recently told me to eat less carbs. So, I’ve been making this ketobread a lot lately. But, I’m still not completely satisfied on my skills. I did notice that the bread rised less when I used a different psyllium husk brand, which I think was more fiber like. I found a powder one again and the bread rised more. I also flattened it our more, while I was more going for a ball before. the only thing I noticed last time, is that I had a lot of air on the top and the bottom was way more condensed. it also was less baked through on the bottom which prob makes sense when it is more condensed. Although I baked it 10 min longer to make sure it didn’t deflate while cooling. I used my kettle with temperatures this time, to make sure it was 60 °C. And I put a timer on to only kneed it 30 sec. What am I still doing wrong🙈 I still.enjoyed ir very much and find it lightweight and delicious!
Hi Marion! 😊
First of all, I’m really happy to hear that the bread works so well for you. And it sounds like you’re already doing many things exactly right.
You also made a good observation about the psyllium brand. The powder version usually works best and gives the bread more rise, so that likely explains the difference you noticed.
If the top had large air pockets and the bottom was more dense, it can sometimes happen when the dough traps steam while baking. Since you already shaped it flatter, a few other things you could try are:
* Make sure the flax seeds are ground very finely, almost like flour. If the meal is too coarse, the structure can become uneven.
* Try placing the loaf a little higher in the oven (middle rack) so the heat circulates more evenly.
* If the bottom seems less baked, you could place the loaf directly on the oven rack for the last 5–10 minutes.
Also, small differences in psyllium brands can really affect the texture and rise, so that may already solve part of the issue. And since you still enjoyed the bread, you’re definitely on the right track! 😊
I would like to try some of your breads but I don’t have an oven, only an air fryer, please advise
Thankyou
Most of my bread recipes can be made in an air fryer. It usually works really well.
I recommend shaping the dough a bit flatter or making smaller loaves so the inside cooks through evenly. A temperature around 160 to 180 °C (320 to 350 °F) works best for most breads.
Depending on the size, baking usually takes about 30 to 50 minutes. It’s a good idea to check after about 25 to 30 minutes. If your air fryer heats more from the top, you can turn the bread over for the last few minutes.
The bread should feel firm, nicely risen, and golden on the outside. If you insert a knife or toothpick, it should come out mostly clean.
Hi, Lovely taste to the bread, but I have not been able to obtain the amount of rise shown in the video. What might I be doing wrong?
Thanks
If the taste is good but the bread doesn’t rise as much, a few small details can make a big difference with this recipe:
Most common reasons:
1. Psyllium husk type
Make sure you used psyllium husk powder, not whole husks. Powder creates a stronger gel that traps air and helps the bread rise. Whole husks usually lead to a denser loaf.
2. Fresh baking powder
If the baking powder is older, the rise will be weaker. Gluten-free breads depend heavily on baking powder, so freshness matters a lot.
3. Finely ground flaxseed
The flaxseed should be ground very finely, almost like flour. Coarser meal makes the dough heavier and reduces the rise.
4. Oven type
This bread rises best in a convection oven (fan oven). Without a fan it usually turns out a bit denser and won’t expand as much.
5. Water temperature
The water should be about 60 degrees Celsius. This helps activate the psyllium and improves the structure.
Even if it doesn’t double or triple exactly like in the video, a slightly lower rise is still normal as ovens and ingredients vary. If you want, you can tell me:
Did you use psyllium powder or whole husks?
Convection oven or regular top/bottom heat?
Usually the psyllium type is the key factor.
Hi, we used psyllium powder as recommended. We use a convection oven. We will try grinding the flaxseed finer next time and buy some fresh baking powder. Kay
I followed the recipe to the T and it came up great. I agree with th author that you need to not make any modifications and follow the instructions. I was concerned that the bread would shrink but it did not.
So glad it turned out well for you! 😊 Yes, with this bread it really helps to follow the recipe closely, since small changes can affect the result. Great to hear that yours didn’t shrink and came out nicely!
Great recipe thank you. I bake it in a baking tin and then I cut into slices and freeze some.. I’m currently on a journey with my gut and gluten free so this is perfect and I actually love the taste and texture. I have just put one in the oven as I write 🙂 I follow the recipe to a t and it works for me. All of the tips are very helpful!
Thank you so much for sharing this 🤍
I’m really happy to hear it works so well for you and that you enjoy both the taste and texture. Freezing slices is exactly how I do it too, so practical. Wishing you all the best on your gut healing journey, I’m glad this recipe can be a little support along the way. 😊
Wow I am so impressed with how easy this recipe was and how great the bread turned out. It rose quite a bit in then oven and then deflated about half the size it rose, but it still turned out great. I’m planning on switching this to my son’s new sandwhich bread.
That’s wonderful to hear, Brittani. A bit of deflating is totally normal with this bread, so I’m glad it still turned out great. Using it as your son’s sandwich bread sounds like a perfect idea. Thanks so much for the lovely feedback. 😊
Hey. This tastes delicious.. but when I baked it it was totally hollow! Any ideas what I might have done wrong?
Hey Abbie! That usually happens when the outside sets too quickly and traps steam inside. Common reasons are an oven that runs hot, baking powder that’s a bit too strong, or shaping the loaf too thick in the center. The steam then creates a hollow space as it bakes.
For next time, try shaping it a little flatter, making sure the flax is very finely ground, and double-check the baking powder amount and freshness. Baking it slightly longer at a touch lower temperature can also help the crumb set more evenly. The good news is the flavor being great means you’re very close.
Hi Ela, lovely recipe. I’m making it now so don’t know how it will turn out.
My oven took a longtime to reach the temperature. Any chance of baking it in the air fryer? I’ll be grateful of your comments. Also thank you very much for the recipe and all the helpful comments. It’s definitely a healthy bread.. love from Devon
Thank you so much, that’s really kind of you. Yes, you can bake it in the air fryer. I’d recommend shaping it a bit flatter and baking it at about 160 °C (320 °F) for around 30 to 40 minutes. Check it after 25 minutes and flip it if your air fryer heats more from the top. It should be firm, nicely risen, and golden on the outside.
Hellooo Ela
This recipe is absolutely fantastic! Thanks so much.
I’m now having a go at the lentil 🍞 😁
Hello Emma 🤍 That makes me so happy to read, thank you so much.
Yay for the lentil bread, that one is such a good next step. I’m excited for you, it’s a really nice one to play around with too. Let me know how it turns out 😁
Hi, I tried this recipe and it went exactly like in your instructions and video, it rised the same and looked exactly the same when I sliced it up. My problem is that it was gummy like and chewy and got stuck in my teeth everywhere. Just wondering if this is normal or if I needed it cooking for longer. i toasted it too and it was still gummy. Many thanks for the recipe though as it packs a powerful nutritional boost and is unbelievable how something this small as flaxseed can be such a power house super food.
Hi Kelly, thanks for trying the recipe. Here are a few tips that often help:
– Make sure the flax is very finely ground. If the flax meal isn’t fine enough, the structure becomes weak and collapses as steam escapes. It should feel like soft flour, not grainy. Grinding it longer usually fixes this.
– The water should be around 60 °C (140 °F) or slightly more. If it’s too hot, the rising process activates too early and the loaf can collapse before it even gets into the oven.
– Don’t overmix the dough. Mix only until everything is combined. Overmixing pushes out the air and prevents the loaf from rising properly.
– Try baking it a bit longer. If the center is slightly underbaked, it can sink while cooling. Bake it 5–10 minutes longer so the structure sets more firmly.
– Let it cool completely before slicing. Cutting too early lets the steam escape and compresses the crumb, which can make the loaf look sunken and the texture will be gummy.
– Shape it taller rather than wide. If the dough spreads too much, the bottom becomes dense. Shaping it higher helps it rise more evenly.
– Optional but helpful: add 1–2 extra teaspoons psyllium. Some psyllium brands bind less strongly. A little more can stabilise the loaf.
I hope this helps! 🙂
I wish I could find the video? I click on the “jump to video” button but it just takes me t the recipe????
Hi Donna, the video is definitely included in the post, but it might not show if you’re using an ad blocker—try disabling it first. If it still doesn’t appear, you can also try a different browser or check out my YouTube channel (Elavegan) to watch it there. 🙂
Hi Ela, can you please advise how to adjust the time in the oven in case it is shaped as a baguette? Thank you
Hi Lys, if you shape the dough into a baguette, you can reduce the baking time a bit because the loaf is thinner. I’d start checking after about 40 minutes. The baguette should feel firm, have a nicely browned crust, and sound hollow when tapped. If it still feels soft, leave it in longer.
Every oven is different, so just keep an eye on it toward the end. 😊
This worked really well for me but i also adapted it by replacing 2/3rds of the flax with equal parts chickpea flour and tapioca starch for a non-keto version.
The result is a fantastic gluten free sandwich bread!
That sounds amazing, Andrew! 😍
Love your adaptation — chickpea flour and tapioca are such a great combo for structure and softness. So happy it turned into a fantastic gluten-free sandwich bread for you! Thanks for sharing your version! 💛
I love flax bread. Your recipe is great except I have the same problem with it that I do all flax bread recipes. The bread rises nicely but then when I take it our of the oven and during the cooling process the bread deflates and compresses, especially at the bottom of the loaf. Any suggegestions to help with this so that the loaf will stay fluffy and not fall?
Hi! Here are a few tips to help your loaf stay fluffy and keep its shape:
1. Make sure the flax is ground very finely
If the flax meal isn’t fine enough, the structure is weaker and collapses as steam escapes. It should feel like soft flour, not grainy. Grinding it longer usually helps a lot.
2. Don’t overmix the dough
Mix only until combined. Over-kneading causes the air to escape, so the loaf won’t hold its rise.
3. Let it bake a little longer
If the inside is slightly underbaked, it will fall as it cools. Try baking 5–10 minutes longer to set the structure more firmly.
4. Cool on a rack, but not in a draft
A sudden temperature change can make it sink. Turn the oven off, open the door slightly, and let the bread rest inside for 10 minutes, then transfer to a rack.
5. Try shaping it taller, not too flat
If it spreads too much, the loaf becomes dense at the bottom. Shape it higher so it rises more evenly.
6. Optional but helpful: Add 1-2 more teaspoons psyllium
If your psyllium is a weaker-binding brand, the structure won’t hold well. Adding a little more can stabilise the loaf.
Hola Ella
Me encantó lo sencilla de tu receta y me gustaria saber si el pan queda como la foto.
Bueno lo hice y lo que note es que al agregar el agua se seca o encogen los ingredientes.. No se si fue la temperatura del agua..Solo con la cantidad de agua de la receta me quedó muy seca la masa.. Le fui agregandi de poco en poco agua hasta 3/4 de taza mas pero aun asi quedó seca… Al final el pan quedó compacto… Me podrias dar consejo sobre la temperatura del agua? Gracias!!!
Hola! Sí, el pan naturalmente queda así como en la foto. Te recomiendo ver también el video de la receta, y en mis destacados de Instagram hay varios remakes hechos por otras personas (el enlace está en las notas).
Pesaste todos los ingredientes en gramos? Es muy importante para que la textura salga bien.
El agua debe estar caliente, unos 60–70 °C, no solo tibia.
Jeszcze nie piekłam tego chleba, lecz na tle setek innych przepisów intuicyjnie czuję, że ten przepis jest bardzo dobrze opracowany i efekt końcowy będzie dokładnie taki jak w opisie przygotowania i wykonania. I właśnie ten opis, z tak precyzyjnym i szczegółowym komentarzem do wykonania -inspiruje do działania. Gdy napotkam jakieś problemy nie ujęte w komentarzu autorów, ponownie zadam pytanie. Teraz dziękuję i zabieram się do pracy…
hi Ela
I haam having a really hard time for the bread to rise. any suggestions? I will love to send you a picture
thanks, m
Hey, sorry to hear your bread didn’t rise as expected! The most common reasons are:
– The psyllium husk powder brand (some absorb way more liquid than others)
– Water temperature (it needs to be hot, not lukewarm)
– Grind/texture of flax meal (very fine works best)
Also, make sure to use my metric measurments (grams), not cups.
Shaping the dough into smaller rolls instead of one big loaf often helps too.
You’ll also find lots of helpful tips from other readers in the comments (Leo and Jenny shared some awesome insights about water amount, kneading, and slicing).